One of the main advantages of building components is to promote reusability. For example, if you build a object that represents an invoice, there could be many other projects in your company that can reuse the same object. This concept of re-using components in various projects promotes what is called RAD (Rapid Application Development). Traditional application development environemnts like VB supported this paradigm by making a toolbox available from which developers could pick and choose components from a toolbox (for example a grid control).
Visual Studio.NET also supports such a paradigm, wherein the components that we develop can be hosted inside the toolbar and then dragged and dropped into the various projects. The development environment then writes the necessary code for us.
In this article, I'm going to explain how to develop components that are pluggable into the Visual Studio.NET development environment. We will develop a simple component that can be added into the toolbar and then controlled using the properties dialog box.
System.ComponentModel
The System.ComponentModel namespace provides classes that are used to implement the run-time and design-time behavior of components and controls. This namespace includes the base classes and interfaces for implementing attributes and type converters, binding to data sources, and licensing components.
Among the various types that exist in this namespace, we are interested in one type called Component. The following diagram shows the inheritance chart for this type.
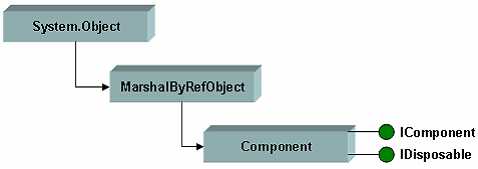
In the above diagram, we see that the Component type derives from MarshalByRefObject and so is able to be remoted only by passing a proxy to the object created from the type across AppDomains. Classes derived from Component must exist in the AppDomain in which they were created, but might be referenced by clients across AppDomain boundaries by reference. Typically, reusable classes (like controls) whose instances will exist in a single AppDomin are derived from Component.
Also, as shown in the diagram, the Component class implements the Icomponent and IDisposable interfaces. IDisposable is an interface that allows classes to implement deterministic finalization through an explicit Dispose method rather than solely relying on the garbage collection algorithm of the CLR. IComponent simple extends this interface by adding a Disposed event and support for interacting with a component's site. In this way, classes that implement IComponent interface can be dragged and dropped onto the VS.NET Web Forms designer surface to support rapid application development.
A site, as the name implies, refers to the placement of a component into a container. For example, the Web Forms designer is a container that implements the System.ComponentModel.IContainer interface. When a component is placed in the container, a site is created and can be referenced using the Component property of the ISite interface. For the types of development typically done in business applications, you won't have to worry about creating containers and dealing with sites.
A Simple Example
Based on the fundamentals outlined above, let us build a simple example. Here, we will consider a reusable class called Contacts that will be used to maintain the various types contacts (like organizations, persons etc). Fire-up Visual Studio .NET and create a class library project and type in the following code in it.
Imports System.ComponentModel
<DefaultProperty("ContactName")> _
Public Class GenericContact : Inherits Component
' Properties that are generic to all contacts
Private mstrContactName As String
Private mstrContactType As String
' Public property that exposes the contact name
<Browsable(True), Category("Properties"), Description("Identifies the contact
name.")> _
Public Property ContactName() As String
Get
Return (mstrContactName)
End Get
Set(ByVal Value As String)
mstrContactName = Value
End Set
End Property
' Public property that exposes the contact type
<Browsable(True), Category("Properties"), Description("Identifies the contact
type.")> _
Public Property ContactType() As String
Get
Return (mstrContactType)
End Get
Set(ByVal Value As String)
mstrContactType = Value
End Set
End Property
' Default constructor for the contact
Public Sub New()
Me.ContactName = "MSDN India"
Me.ContactType = "Web Site"
End Sub
' Constructor that accepts parameters for the contact
Public Sub New(ByVal pContactName As String, ByVal pContactType As String)
mstrContactName = pContactName
mstrContactType = pContactType
End Sub
End Class
If you look at the above code, it is a very simple class and would be very similar to what you would normally develop to solve a business domain problem. What is different though is the inheritance from IComponent and the various attributes that decorate the class definition and the methods. The following points illustrates the various attributes used in the code and their meaning.
- Browsable. This attribute ensures that the property shows up in the properties window.
- Category. This attribute is used to group properties by functionality.
- Description. This attribute is used to attach a description to the property.
- DefaultProperty. This attribute is used to indicate the name of the property that will be the default when displayed in the properties window.
Note that in the above example, we have used properties that expose the various attributes of the class and it is on these properties that we apply the attributes.
After you have placed this code in the editor, compile it using the Build menu. This will generate an assembly that we can then reference in the VS.NET IDE. To add this component in the IDE do the following steps (for example, on a Windows Form projecct):
- In the Visual Studio .NET toolbox, select the General tab, right click and choose Add/Remove Items (I'm using Everett Final Beta, in earlier versions of VS.NET, this option might be called Customize Toolbox).
- Choose the .NET Framework Components tab and click on the [Browse] button to locate the assembly that you created in the example above.
- After locating the assembly, select it. The assembly that appears in the .NET Framework Components list and is selected.
- Click on the [OK] button.
- The General toolbox then displays the component.
You can now drag and drop this component onto the design surface of any other project and the VS.NET IDE will automatically write the necessary initialization code (which can be seen by choosing the View Code option and then opening the automatically generated region). Also, you can use the Properties Window to set values for the various properties defined in the object. The following images shows the above steps:

You can see that the properties window shows the public properties that we defined in the code. Also, the ContactName is shown as the default property. These properties can be changed and the auto-generated code is automatically changed.
Conclusion
In this article, we have seen how to write reusable components that can be plugged into the VS.NET interface to ensure RAD development. You can use these features to develop enterprise components that can be distributed to all development teams so that you can ensure standards based development. Also, business objects can be used in all types of projects in a consistent manner.