Let me say thing one thing first; remember we install Silverlight Add-On (or say plug-in) for browsers to run Silverlight applications? The same here, we also install Expression Studio (it includes Blend, Encoder, Design, Web applications) for Visual Studio so that we can start developing Silverlight by using either Visual Studio or Expression Blend. Finally, what we have here is, Expression Blend adds the features to existing Visual Studio.
Expression Blend itself can develop Silverlight applications. Please read my previous article for installation of software. Now, let's create a Silverlight project using Expression Blend.
Creating "Hello" Program using Expression Blend
Let's start Expression Blend; you will get the following splash screen at first.
This screen loads all necessarily program files to memory for building Silverlight Application. After a couple of seconds, you will get the following screen.
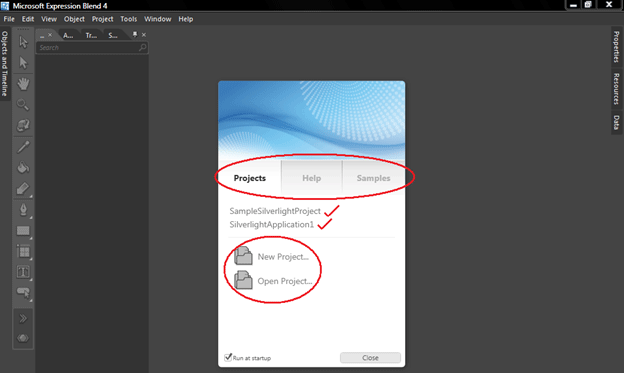
In this screenshot, look at the items in the red circle.
Projects
This tab lets us open any recently used projects from a list, create a new project or open any existing projects.
Help
This tab lets us open the User Guide by visiting online tutorials or web communities.
Samples
This tab provides sample projects developed by Expression Blend development team from Microsoft or somebody else.
Now, let's click on the "New Project" option; you will get the following screen.
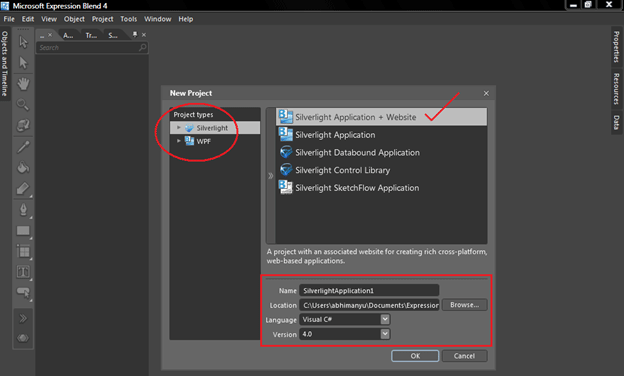
As marked in screenshot.
Project Types
In the above screenshot, look at the red rectangle. There are two project type options available; Silverlight and WPF. Here are some major differences between them.
Silverlight and WPF (Windows Presentation Foundation) are two different products from Microsoft, but they have lots of overlap. We are aware of Silverlight as I described in previous article. WPF is a Microsoft technology meant for developing enhanced graphics applications for desktop platform. In addition, WPF applications can be hosted on web browsers which offer rich graphics features for web applications, but it is limited to Operating Systems. Web Browser Applications (WBA), developed on WPF technology uses XAML (read as Zameel) to host user interface for browser applications. XAML stands for eXtended Application Markup Language which is a new declarative programming model from Microsoft. XAML files are hosted as discrete files in the Web server, but are downloaded to the browsers and converted to user interface by the .NET runtime in the client browsers. WPF runs on .NET runtime and developers can take advantage of the rich .NET Framework and WPF libraries to build really cool windows applications. WPF supports 3-D graphics, complex animations, hardware acceleration etc.
- Silverlight is simply a subset of WPF.
- Silverlight is meant to be used online, while WPF is for local use.
- You can use Silverlight applications regardless of the operating system you use, while WPF applications are restricted to later versions of the Windows operating system.
- Silverlight lacks access to local resources, while WPF can utilize local resources.
- Silverlight only has perspective 3D support, while WPF is capable of full 3D images.
Now come back to our topic, after selecting Silverlight from "Project Types", you will see five project categories.
Silverlight Application + Website
A project with an associated website for creating rich cross-platform, web-based applications.
Silverlight Application
A project for creating rich cross-platform, web-based applications but without an associated website.
Silverlight Databound Application
A project that uses data and command bindings to support loose coupling between View and ViewModel.
Silverlight Control Library
A project for creating custom controls that can be reused across other Silverlight applications.
Silverlight SketchFlow Application
A project for prototyping rich cross-platform, web-based applications.
Finally, I will use the first one that is "Silverlight Application + Website" and select Name, Location, Language and Version whatever you wish. I will be using here the default. Ok...look at the screen when I click ok button.
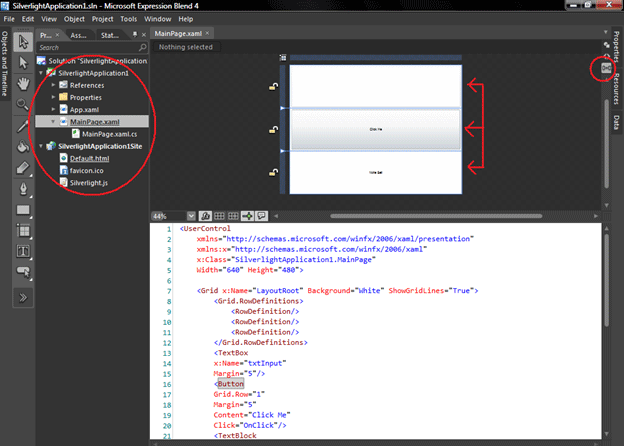
In the above screenshot, I double-clicked to opened my default Silverlight Application page that is 'MainPage.xaml" in Project Explorer and then I split the view of stage, look at right side red circle. Look at the code I am using there:
<UserControl
xmlns="http://schemas.microsoft.com/winfx/2006/xaml/presentation"
xmlns:x="http://schemas.microsoft.com/winfx/2006/xaml"
x:Class="SilverlightApplication1.MainPage"
Width="640" Height="480">
<UserControl
xmlns="http://schemas.microsoft.com/winfx/2006/xaml/presentation"
xmlns:x="http://schemas.microsoft.com/winfx/2006/xaml"
x:Class="SilverlightApplication1.MainPage"
Width="640" Height="480">
<Grid x:Name="LayoutRoot" Background="White" ShowGridLines="True">
<Grid.RowDefinitions>
<RowDefinition/>
<RowDefinition/>
<RowDefinition/>
</Grid.RowDefinitions>
<TextBox
x:Name="txtInput"
Margin="5"/>
<Button
Grid.Row="1"
Margin="5"
Content="Click Me"
Click="OnClick"/>
<TextBlock
x:Name="txtOutput"
Grid.Row="2"
Margin="5"
Text="Note Set"
TextAlignment="Center"
VerticalAlignment="Center"/>
</Grid>
</UserControl>
The main goal of this article is to just introduce, how to run "Hello Program", we will talk about every item used in code in next articles. The above code can be named "Front End" code. Now let's write the "Back End" code. Look at the screenshot below:
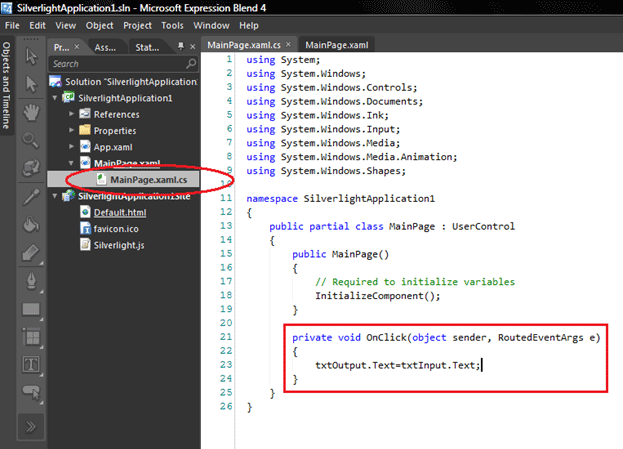
In the above screenshot, I double-clicked to open its code behind page and used the following coding there:
using System;
using System.Windows;
using System.Windows.Controls;
using System.Windows.Documents;
using System.Windows.Ink;
using System.Windows.Input;
using System.Windows.Media;
using System.Windows.Media.Animation;
using System.Windows.Shapes;
namespace SilverlightApplication1
{
public partial class MainPage : UserControl
{
public MainPage()
{
// Required to initialize variables
InitializeComponent();
}
private void OnClick(object sender, RoutedEventArgs e)
{
txtOutput.Text=txtInput.Text;
}
}
}
I will describe all the code later. After writing the code shown above, we have to build the project and run it to check this stuff. Look at the screenshot to build and run this project.
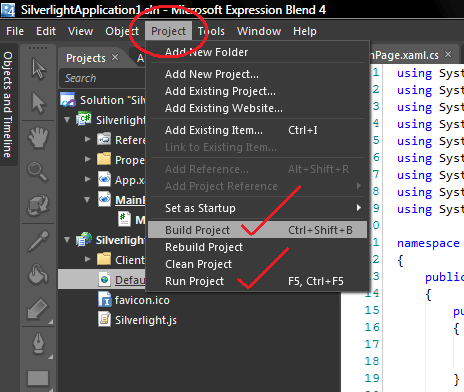
In the above screenshot, I have marked the menu items to build the project and then to run this project. Remember, after building this project you will get a "ClientBin" folder in the Project Explorer's "SilverlightApplication1Site" tree.
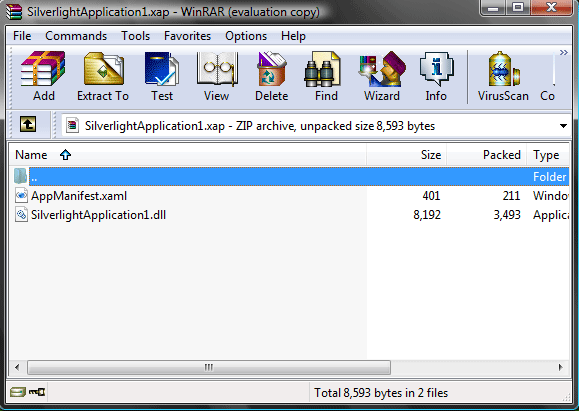
What is ClientBin and why does it appear?
Remember, it is the directory which contains every single item like graphics, images etc. that we have used inside our project and this folder will be published to web server for hosting. We also have to publish all items in 'SilverlightApplication1Site' tree. When you open 'ClientBin' folder you will see a '.xap' file; this file is similar to a compressed file. Try to open that file in WinRar and look at the result, you will find every used element. Look at the screenshot:
Come back to our topic now and run the project; you will get the following screen.
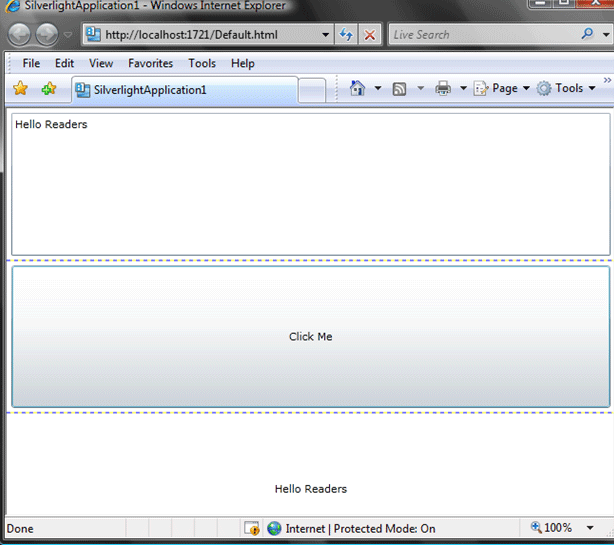
In the above screenshot, I just typed some text into a textbox and clicked on the Click Me button and the result appeared in TextBlock.
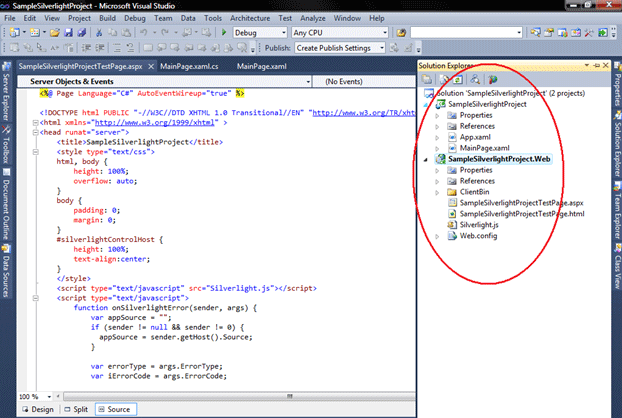
Now, switch this project or open this project in Visual Studio and see the same markup there. Look at screenshot given below:
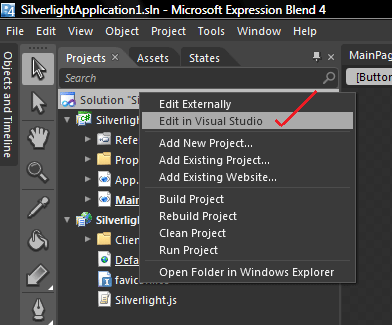
To open this simply Click in Project Explorer to "Edit in Visual Studio"; you will get all the files there too. Look at the screenshot. Note that you have to download Silverlight update for Visual Studio 2010 (in some case), to open it completely.
Keep in touch for the next article.
HAVE A HAPPY CODING....