Introduction
A RadioButton is usually used in a group with multiple options where one has to be selected.
The RadioButton tag represents a RadioButton control in XAML.
<RadioButton></RadioButton>
The Width and Height properties represent the width and the height of a RadioButton. The Name property represents the name of the control, which is a unique identifier of a control. The Margin property tells the location of a RadioButton on the parent control. The HorizontalAlignment and VerticalAlignment properties are used to set horizontal and vertical alignments.
The Background and Foreground properties represent the background and foreground colors of a RadioButton.
The following code snippet sets the name, height, and width of a RadioButton control. The code also sets horizontal alignment to left and vertical alignment to top.
<RadioButton Margin="10,10,0,0" GroupName="MCSites" Background="Yellow"
Foreground="Blue" Content="C# Corner">
</RadioButton>
The RadioButton looks like following:

Figure 1. RadioButton
RadioButton Grouping
The GroupName property of a RadioButton assigns a RadioButton to a group. Only one RadioButton can be in the selected states at once and by selecting a new RadioButton unselects the previous selected RadioButton.
The following code assigns four RadioButton controls to a group called MCSites.
<RadioButton Margin="10,10,0,0" GroupName="MCSites" Background="Yellow"
Foreground="Blue" Content="C# Corner">
</RadioButton>
<RadioButton Margin="10,50,0,0" GroupName="MCSites" Background="Yellow"
Foreground="Orange" Content="VB.NET Heaven" >
</RadioButton>
<RadioButton Margin="10,90,0,0" GroupName="MCSites" Background="Yellow"
Foreground="Green" Content="Longhorn Corner">
</RadioButton>
<RadioButton Margin="10,130,0,0" GroupName="MCSites" Background="Yellow"
Foreground="Purple" Content="Mindcracker">
</RadioButton>
The output looks like Figure 2. If you select one RadioButton, the previous RadioButton will be unselected.
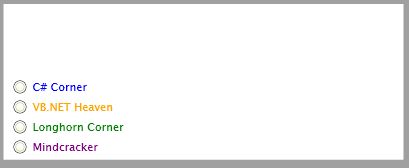
Figure 2
Adding a Checked Event Handler
RadioButton control has Checked event as default event and raised when you check a radio button. The following code snippet adds the event handler. I also add x:Name property for all RadioButton controls.
<RadioButton Margin="10,10,0,0" GroupName="MCSites" Background="Yellow"
Foreground="Blue" Content="C# Corner" Click="RadioButton_Click" x:Name="Button4"
>
</RadioButton>
I also add a TextBox to the page.
The IsChecked property of RadioButton represents of a RadioButton is checked or not. The following code snippet on a button click event handler finds the text of the selected RadioButton in a group.
The following checked event handler sets the Text property of the TextBox to the content of the RadioButton on the radio button click event handler.
private void RadioButton_Click(object sender, RoutedEventArgs e)
{
if (Button1.IsChecked == true)
TextBox1.Text = Button1.Content.ToString();
else if (Button2.IsChecked == true)
TextBox1.Text = Button2.Content.ToString();
else if (Button3.IsChecked == true)
TextBox1.Text = Button3.Content.ToString();
else
TextBox1.Text = Button4.Content.ToString();
}
New RadioButton group looks like Figure 3.
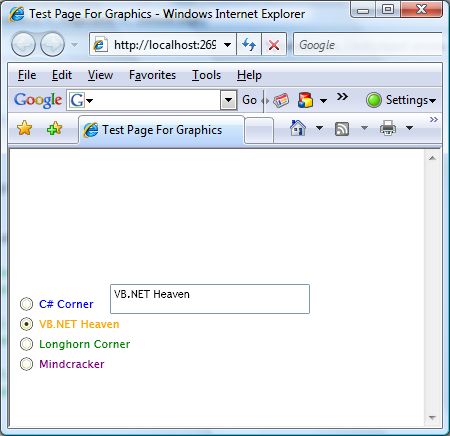
Figure 3.
Summary
In this article, I discussed how to create and use a RadioButton control available in Silverlight 2.0.