Silverlight Rectangle Control
This article demonstrates how to create and use a Rectangle control in Silverlight using XAML and C#.
The Rectangle object represents a rectangle shape and draws a rectangle with the given height and width. The Width and Height properties of the Rectangle class represent the width and height of a rectangle. The Fill property fills the interior of a rectangle. The Stroke property sets the color and StrokeThickness represents the width of the outer line of a rectangle.
Creating a Rectangle
The Rectangle element represents a Silverlight Rectangle control in XAML.
<Rectangle/>
The code snippet in Listing 1 creates a rectangle by setting its width and height properties to 200 and 100 respectively. The code also sets the black stroke of width 4.
<Rectangle
Width="200"
Height="100"
Fill="Blue"
Stroke="Black"
StrokeThickness="4" />
Listing 1
The output looks like Figure 1.
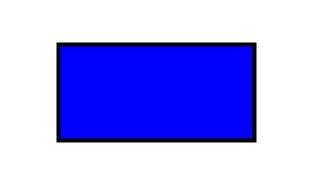
Figure 1
The CreateARectangle method listed in Listing 2 draws same rectangle in Figure 1 dynamically.
/// <summary>
/// Creates a blue rectangle with black border
/// </summary>
public void CreateARectangle()
{
// Create a Rectangle
Rectangle blueRectangle = new Rectangle();
blueRectangle.Height = 100;
blueRectangle.Width = 200;
// Create a blue and a black Brush
SolidColorBrush blueBrush = new SolidColorBrush();
blueBrush.Color = Colors.Blue;
SolidColorBrush blackBrush = new SolidColorBrush();
blackBrush.Color = Colors.Black;
// Set Rectangle's width and color
blueRectangle.StrokeThickness = 4;
blueRectangle.Stroke = blackBrush;
// Fill rectangle with blue color
blueRectangle.Fill = blueBrush;
// Add Rectangle to the Grid.
LayoutRoot.Children.Add(blueRectangle);
}
Listing 2
The RadiusX and RadiusY properties set the x-axis and y-axis radii of the ellipse that is used to round the corner of a rectangle. By adding the following lines of code to Listing 7 creates a rounded rectangle, which looks like Figure 2.
// Set roundness
blueRectangle.RadiusX = 20;
blueRectangle.RadiusY = 20;
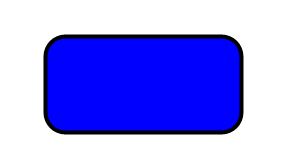
Figure 2
Formatting a Rectangle
We can use the Fill property of the Rectangle to draw a rectangle with any kind of brush including a solid brush, linear gradient brush, radial gradient brush, or an image brush. The code in Listing 3 uses linear gradient brushes to draw the background and foreground of a Rectangle.
<Rectangle
Width="200"
Height="100"
Stroke="Black"
StrokeThickness="4" >
<Rectangle.Fill>
<LinearGradientBrush StartPoint="0,0" EndPoint="1,1" >
<GradientStop Color="Blue" Offset="0.1" />
<GradientStop Color="Orange" Offset="0.25" />
<GradientStop Color="Green" Offset="0.75" />
<GradientStop Color="Red" Offset="1.0" />
</LinearGradientBrush>
</Rectangle.Fill>
</Rectangle>
Listing 3
The new Rectangle looks like Figure 3.
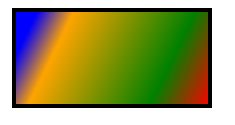
Figure 3
Setting Image as Background of a Rectangle
To set an image as background of a Rectangle, we can set an image brush as the Fill of the Rectangle. The code in Listing 4 sets fills the rectangle with an image.
<Rectangle.Fill >
<ImageBrush ImageSource="dock.jpg" />
</Rectangle.Fill >
Listing 4
The new output looks like Figure 4.

Figure 4
Drawing a Semi-transparent Rectangle
The Opacity property represents the transparency of a Rectangle. The value of Opacity is between 0 and 1, where 0 is fully transparent and 1 is fully opaque. The code listed in Listing 5 generates a semi-transparent shape.
<Rectangle
Width="200"
Height="100"
Stroke="Black"
StrokeThickness="4"
Opacity="0.5">
Listing 5
The new output looks like Figure 5.

Figure 5
Summary
In this article, I discussed how we can create a Rectangle control in Silverlight at design-time using XAML and at run-time using C#. We also saw how we can format a Rectangle by setting its fill property. After that, we saw you to set an image as the background of a Rectangle. In the end, we saw how to draw a semi-transparent rectangle.