Blue Theme Orange Theme Green Theme Red Theme
 
Home | Forums | Videos | Photos | Downloads | Blogs | Interviews | Jobs | Beginners | Training
 | Consulting  
Submit an Article Submit a Blog 
 Login Close
User Id:
Password:
 
Forgot Password
Forgot Username
Why Register
 Jump to
Skip Navigation Links
TechnologyExpand Technology
WebsiteExpand Website
 Resources  
Close
 Our Network  
Close
Search :       Advanced Search »
Home » Algorithms & AI » Code Generator for Basic Stamp II Microcontroller

Code Generator for Basic Stamp II Microcontroller

The Basic II Stamp is programmed by the language its named after, Basic. The language is a combination of Basic syntax and built in key words that control the Basic Stamp II chip.

Author Rank:
Total page views :  20415
Total downloads :  146
   Print Read/Post comments Post a comment  Similar Articles  
   Email to a friend  Bookmark  Author's other articles  
Download Files:
BasicStampGenMG.zip
 
Become a Sponsor


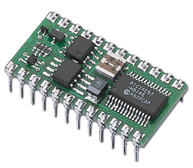
Figure 1 - "Board of Education" Circuit for the Basic Stamp II

The world is changing and technology is changing faster. You can now buy computers and computer hardware that is over 1000 times more powerful than it was 10 years ago and at a greatly reduced price. Also the world of electronics and robotics is starting to open itself up to the hobbyist at a much more affordable price with all the potential to develop your own cool complex electronic inventions.

One of the more popular microcontrollers  for creating these automated gadgets is the Basic Stamp II. Figure 1 shows what is known as the "Board of Education", a simple prototype board in which you can get started creating blinking LEDS, Beeping Buzzers, and Spinning Motors within 10 minutes of receiving it from the Vendor, Parallax. It just requires a 9-volt battery and a connection to the serial port and your off and running.  

The Basic II Stamp is programmed by the language its named after, Basic. The language is a combination of Basic syntax and built in key words that control the Basic Stamp II chip. The stamp can be programmed for several functions including making pins go high or low, reading the input of a pin, sending pulses, reading or writing the serial port, playing a frequency, timing, and much more.  Below is a table describing some of the custom BASIC commands of the Basic Stamp II:

Command Example

Description
LOW 14 Send Pin 14 Low
HIGH 13 Send Pin 13 High
PAUSE 1000 Pause for 1 second
DO ...LOOP UNTIL IN3 = 1 Loop until Pin 3 goes high
FREQOUT 9, 500, 1500 Sends a wave to pin 9 that lasts 1/2 second at 1.5khz
PULSOUT 6, 500 Send a pulse on pin 6 for a 1 millisecond
WRITE 7, 195 Write the value 195 to address 7 of the EEPROM
RCTIME 5, 1, time Measure the rc time on pin 5 and place the value in the time variable
DEBUG HOME, "time = ", DEC5 time Output the variable time to 5 decimal places to the computer from the Basic Stamp
DEBUGIN DEC pulse Enter the variable pulse into the Basic Stamp from the debug window on the computer

Table 1 - BASIC Stamp Custom Command Examples and Descriptions

The Basic stamp BASIC compiler also supports control statements such as if..then, while, do...loop, for...next, and even select...case.

We can use the power of C# and .NET to create a code generator that generates a state engine for the BASIC STAMP from a state diagram in WithClass. Because WithClass is basically a COM Server, by creating a reference to WithClass in the Solution Explorer, we can reference the WithClass state model and all its contents from within our .NET project. Then, we simply milk the information out of the model and use the .NET System.IO namespace to write the information to a bs2 (Basic Stamp II) code file.

Simple LED Pushbutton Toggler

To demonstrate our code generator, we are going to create a simple pushbutton toggler. The way it works is that every time we push the pushbutton the LED will turn on or off depending on its previous state. Below, in Figure 2, is the schematic of our pushbutton-toggler. It uses about 5 parts: an LED (Light Emitting Diode), a pushbutton, and 3 resistors.  The resistors help limit current flow through the delicate components and help "pull-up" the voltage to 5.0 volts when the voltage is high.

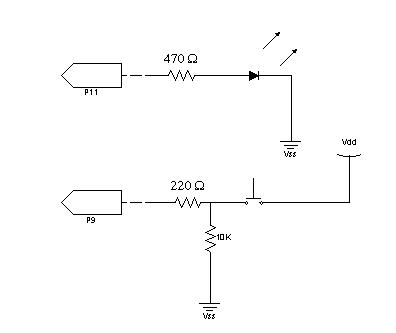
Figure 2 - Our pushbutton light toggler Circuit

P11 is pin 11 on our Basic Stamp. This pin will be used as an output pin either set high or low in order to activate or deactive our LED.  P9 will be used as input pin to let us know if our pushbutton is pressed. The state machine for running our LED toggle circuit is shown in the WithClass diagram shown below in Figure 3:

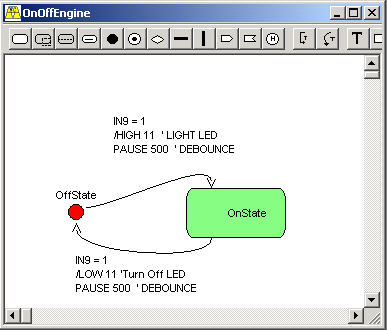
Figure 3 - State Diagram of the LED toggle circuit.

The diagram tells us that the circuits starts in the OffState. It also tells us, that in the event pin 9 goes high(Pin 9 will go high when the user pushes the pushbutton as shown in the schematic in figure 2.), we proceed to set pin 11 to high(lighting the LED) and wait 500 milliseconds (1/2 second). The reason we wait this 1/2 second of time is to debounce the pushbutton(the button will have extraneous pulses after it is first pressed that we need to ignore).  Once the pin 9 going high event occurs, we transition to the OnState. Looking at the diagram, the only way in which we can transition back to the OffState is if pin 9 goes high again. In the event pin 9 goes high from the OnState we send pin 11 low (turning off the LED), and transition back to the OffState.  

Converting a State Engine into BASIC Code

In order to build a state engine that can be generic enough to handle all state diagrams we build for the stamp, we need to pick a control structure that mimics state behavior in BASIC. The SELECT...CASE structure serves us well in this regards, because we can select a state based on a particular case and perform our transitions within each CASE.  Below is the code that we want to generate for our example above:

Listing 1 - State Engine Code for the Basic Stamp II  in BASIC  

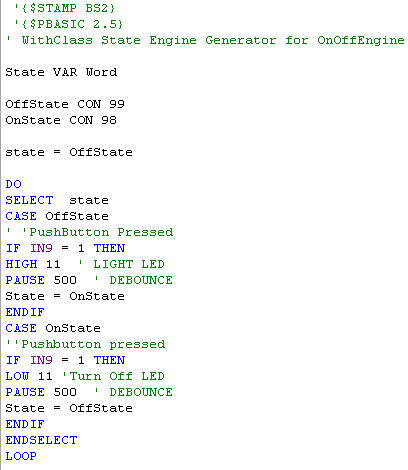
Each State is represented by a constant number value named after the states in our diagram. Each state name appears in a CASE in our Select statement. Transitions are handled by responding to events and conditions in IF..THEN structures.  If the events fire, we carry out the action inside the IF....ENDIF control statement.

The BS2 Code Generator in .NET

Our .NET Generator is a simple Windows Form application shown in Figure 4 below:

Figure 4 - Basic Stamp Generator in .NET

Although there are many aspects of this application we can discuss, we will concentrate on how we do code generation from the WithClass model.  After opening up the WithClass project from within .NET we will cycle through each state diagram contained in the WithClass project and generate a state engine SELECT...CASE structure like the one shown in Listing 1.  Listing 2 shows the code for going through each diagram and generating the necessary code:

Listing 2 - Generating a Basic Stamp File for each StateDiagram in WithClass

private void GenerateStateCode()
{
// Form output directory
OutputFileDirectoryName = this.OutputDirectoryEdit.Text;
if (OutputFileDirectoryName[OutputFileDirectoryName.Length - 1] != '\\')
OutputFileDirectoryName += "\\";
// Go through each state diagram and generate a bs2 file
wcDoc.StateDiagrams.Restart();
// set up the progress bar for the maximum number of diagrams
this.progressBar1.Minimum = 0;
this.progressBar1.Maximum = wcDoc.StateDiagrams.Count;
this.progressBar1.Value = 0;
while (wcDoc.StateDiagrams.IsLast() == false)
{
// create a bs2 file from the name of the diagram in WithClass
With_Class.StateDiagram nextDiagram = (With_Class.StateDiagram)wcDoc.StateDiagrams.GetNext();
StreamWriter sw =
new StreamWriter(OutputFileDirectoryName + nextDiagram.Name + ".bs2", false);
// Generate the Basic Stamp II State Engine Code
GenerateBasicStampFile(sw, nextDiagram);
this.progressBar1.Value++;
this.statusBar1.Text = nextDiagram.Name;
sw.Close();
}
MessageBox.Show("Finished Generating Basic Stamp II Code");
}

The GenerateBasicStamp method generates the full code necessary to run the State Engine from our Diagram. It creates the file in three stages. First it creates the header information which includes all of the directives. Then it creates the constants representing the states. Then it creates the SELECT...CASE statement needed to run the State Engine. Below is the code for creating the header info and the state constants:

Listing 3 - Genrating Header and State Constants for our State Engine for the Basic Stamp II

private void GenerateFileHeader(StreamWriter sw, With_Class.StateDiagram stateDiagram)
{
// write basic stamp directives to the stream
sw.WriteLine(" \'{$STAMP BS2}";
sw.WriteLine(" \'{$PBASIC 2.5}");
sw.WriteLine("\' WithClass State Engine Generator for {0}", stateDiagram.Name);
sw.WriteLine("");
// write the line that creates the state variable
sw.WriteLine("State VAR Word ");
sw.WriteLine("";
}
private void GenerateStateConstants(StreamWriter sw, With_Class.StateDiagram stateDiagram)
{
stateDiagram.States.Restart();
// Loop through each state in the diagram and create a constant
// based on the state name and its internal Id in WithClass
while (stateDiagram.States.IsLast() == false)
{
With_Class.State nextState = stateDiagram.States.GetNext();
// Write next constant to stream
sw.WriteLine("{0} CON {1}", nextState.Name, nextState.Id);
}
sw.WriteLine("");
}

The crux of the state engine code is in the GenerateStateSelect method.  This method builds the Select statement by looping through each state in the diagram and then in each state, it loops through all transitions leaving the state.  The loops extract the information from the states and the transitions contained in WithClass and build BASIC code from the extracted information. Listing 4 shows how this is done using C# and .NET.

Listing 4 -The Select State Structure Generator

private void GenerateStateSelect(StreamWriter sw, With_Class.StateDiagram stateDiagram)
{
// assign the first state to the initial state in the state diagram in WithClass
sw.WriteLine("state = {0}", FindInitialState(stateDiagram));
sw.WriteLine("");
// create an infinite do loop around the state engine
sw.WriteLine("DO");
// start to build the select statement
sw.WriteLine("SELECT state");
stateDiagram.States.Restart();
// cycle through each state in the WithClass StateDiagram
// and build a CASE statement based on the name of the state
while (stateDiagram.States.IsLast() == false)
{
With_Class.State nextState = stateDiagram.States.GetNext();
sw.WriteLine("CASE {0}", nextState.Name);
// cycle through each transition leaving the state
// and build an if..then based on the event, condition, and action
// of the transition leaving the state
nextState.TransitionsOut.Restart();
while (nextState.TransitionsOut.IsLast() == false)
{
With_Class.Transition nextTrans = nextState.TransitionsOut.GetNext();
// write transition description
if (nextTrans.Description.Trim().Length > 0)
{
sw.WriteLine("\'{0}", nextTrans.Description);
}
// use the event and condition of the transition
// to build the true/false condition of the if statement
if ((nextTrans.Event.Trim().Length > 0) &&
(nextTrans.Condition.Trim().Length == 0))
{
sw.WriteLine("IF {0} THEN", nextTrans.Event.Trim());
}
else if ((nextTrans.Event.Trim().Length == 0) &&
(nextTrans.Condition.Trim().Length > 0))
{
sw.WriteLine("IF {0} THEN", nextTrans.Condition.Trim());
}
else if ((nextTrans.Event.Trim().Length > 0) &&
(nextTrans.Condition.Trim().Length > 0))
{
sw.WriteLine("IF ({0}) AND ({1}) THEN", nextTrans.Event.Trim(), nextTrans.Condition.Trim());
}
else
{
}
// write action inside the if..then..endif statement
sw.WriteLine(nextTrans.Action);
// write transition to the next state
if (nextTrans.DestState.Name != nextState.Name)
{
sw.WriteLine("State = {0}", nextTrans.DestState.Name);
}
// don't put an if, if both event and condition are blank
if ((nextTrans.Event.Trim().Length > 0) ||
(nextTrans.Condition.Trim().Length > 0))
{
sw.WriteLine("ENDIF");
}
}
// end while transition out
} // end select
sw.WriteLine("ENDSELECT");
// end infinite loop (kind of an oxymoron here ;-)
sw.WriteLine("LOOP");
}

Conclusion

The C# state generator code above will generate the code shown in Listing 1 of this article from our WithClass diagram shown in figure 3.  As long as the fields populated in our transition event, condition and action are compileable, the code generated will also be compileable.  This is a very simple example of how to design code with a state diagram for the Basic Stamp II, but you can certainly design much more complex state diagrams and use the same code generator in the download.  If you don't own WithClass, you can download the demo enterprise version and experiment with the code generator in this article.  And if you become enthusiastic about robotics and microcontrollers, you can purchase a Board of Education kit from Parallax for about $159 dollars.  Anyway, enjoy controlling your environment with this fantastic microcontroller and putting your stamp on the world with .NET.


Login to add your contents and source code to this article
 About the author
 
Mike Gold
Michael Gold is President of Microgold Software Inc., makers of the WithClass UML Tool. His company is a Microsoft VBA Partner and Borland Partner. Mike is a Microsoft MVP and founding member of C# Corner. He has a BSEE and MEng EE from Cornell University and has consulted for Chase Manhattan Bank, JP Morgan, Merrill Lynch, and Charles Schwab. Currently he is a senior developer at Finisar Corp. He has been involved in several .NET book projects, and is currently working on a book for using .NET with embedded systems. He can be reached at mike@c-sharpcorner.com
Looking for C# Consulting?
C# Consulting is founded in 2002 by the founders of C# Corner. Unlike a traditional consulting company, our consultants are well-known experts in .NET and many of them are MVPs, authors, and trainers. We specialize in Microsoft .NET development and utilize Agile Development and Extreme Programming practices to provide fast pace quick turnaround results. Our software development model is a mix of Agile Development, traditional SDLC, and Waterfall models.
Click here to learn more about C# Consulting.
 
Introducing MaxV - one click. infinite control. Hyper-V Hosting from MaximumASP.
Finally – a virtual platform that delivers next-generation Windows Server 2008 Hyper-V virtualization technology from a managed hosting partner you can truly depend on. Visit www.maximumasp.com/max for a FREE 30 day trial. Hurry offer ends soon. Climb aboard the MaxV platform and take advantage of High Availability, Intelligent Monitoring, Recurrent Backups, and Scalability – with no hassle or hidden fees. As a managed hosting partner focused solely on Microsoft technologies since 2000, MaximumASP is uniquely qualified to provide the superior support that our business is built on. Unparalleled expertise with Microsoft technologies lead to working directly with Microsoft as first to offer IIS 7 and SQL 2008 betas in a hosted environment; partnering in the Go Live Program for Hyper-V; and product co-launches built on WS 2008 with Hyper-V technology.
Dynamic PDF
ceTE software specializes in components for dynamic PDF generation and manipulation. The DynamicPDF™ product line allows you to dynamically generate PDF documents, merge PDF documents and new content to existing PDF documents from within your applications.
Go.NET
Build custom interactive diagrams, network, workflow editors, flowcharts, or software design tools. Includes many predefined kinds of nodes, links, and basic shapes. Supports layers, scrolling, zooming, selection, drag-and-drop, clipboard, in-place editing, tooltips, grids, printing, overview window, palette. 100% implemented in C# as a managed .NET Control. Document/View/Tool architecture with many properties&events. Optional automatic layout.
Dundas Software
Dundas Chart for .NET is the most advanced .NET charting package available today.  With an extremely complete feature set, elegant architecture and easy implementation, Dundas Chart can quickly add advanced Charting functionality to enhance and transform ASP.NET and Windows Forms applications.  Whether you are implementing charting into internal projects, or building applications for clients, Dundas Chart offers advanced technology and advanced results to get the most out of data.
Clickatell's SMS Gateway
Clickatell's Developer Solutions allow you to SMS enable any website or application via a range of API's. Learn More about our API connections.
Free access to .NET Memory Management video
Everything you need to know about Garbage Collection, Temporary Objects, Fragmentation, Finalization and common causes of memory leaks in .NET. Watch the video here.
Microsoft Visual Studio 2010 Professional
Microsoft Visual Studio 2010 Professional will launch on April 12, but you can beat the rush and secure your copy today by pre-ordering at the affordable estimated retail price of $549 (US). Pre-order now.
Nevron Chart for .NET 2010.1 Now Available
The leading .NET charting control now features PDF, Flash and Silverlight export, visualization of large datasets and more. Deliver true charting functionality to your BI, Scorecard, Presentation or Scientific apps. Download evaluation now.
Developer-Ready ASP.NET 2.0 Web Hosting with 3 MONTHS FREE
Now supporting .NET 3.0 Framework with Windows Workflow Foundation, Windows Communication Foundation (WCF), Windows Presentation Foundation (WPF), windows CardSpace (WCS)! Providing more flexibility for Developers with Web Services Support and a User/Permission Manger. Also supporting MS SQL 2005/2000 with Real-Time Backups, FREE Automated Attach .MDF Tool, FREE SQL Restore and Shrink SQL DB Tools, and SQL
 
   Print Read/Post comments Post a comment  Similar Articles  
   Email to a friend  Bookmark  Author's other articles  
Download Files:
BasicStampGenMG.zip
 
 Post a Feedback, Comment, or Question about this article
Subject:  
Comment:  
Become a Sponsor
 Comments

 Hosted by MaximumASP  |  Found a broken link?  |  Contact Us  |  Terms & conditions  |  Privacy Policy  |  Site Map  |  Suggest an Idea  |  Media Kit
Current Version: 5.2009.6.2
 © 2010  contents copyright of their authors. Rest everything copyright Mindcracker. All rights reserved.