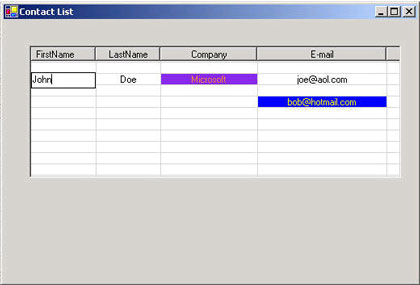
Figure 1 - The Editable GridView Control in Action
I've gotten a lot of e-mail about my GridView control Article, so I've decided to write a follow up article on a more powerful control that allows you to edit the cells within the control and change the colors of the cells. This GridView also adds the capability of specifying the column name instead of the column number when retrieving or populating a cell. The next articles to follow will show you how to save the data in the GridView and the next article will give the GridView printing capability. The final article will show you how to export the GridView into an Excel spreadsheet. Below is the design of the GridView class showing only public methods and attributes.
Figure 2 - Public properties and methods of the GridView Reverse engineered with WithClass 2000.
The GridView is inserted into a form as a control and is set up with the following initialization code in our example:
public Form1()
{
InitializeComponent();
// set the names of the columns in the grid
gridView1.SetColumnNames(new string[]
{ "FirstName", "LastName", "Company", "E-mail"});
gridView1.SetColumnWidth("FirstName", 10); // sets the width of the column in font units
gridView1.SetColumnWidth("LastName", 10); // sets the width of the column in font units
gridView1.SetColumnWidth("Company", 15); // sets the width of the column in font units
gridView1.SetColumnWidth("E-mail", 20); // sets the width of the column in font units
** Note all rows and columns are 1 based meaning the first column index is 1 and the first row index is 1.
// Size the Grid in the Form to fit the dimensiions of the Grid exactly
gridView1.SizeToFitGrid();
// populate a row #2 with data
gridView1.SetFullRow(2, new string[]
{"John", "Doe", "Microsoft", [email protected]});
// populate row 4, column 4 with an email
gridView1.SetCell(4, "E-mail", [email protected]);
// set color of row 4, column 4
gridView1.SetCellColor(4, 4, Color.Blue);
// set font color of row 4, column 4 cell
gridView1.SetCellTextColor(4, "E-mail", Color.Yellow);
// set background color of cell row 2, column 3 to BlueViolet
gridView1.SetCellColor(2, 3, Color.BlueViolet);
// set font color of the cell row 2, column 3 to Coral
gridView1.SetCellTextColor(2, 3, Color.Coral);
}
GridView Workings
Editing of the cell is accomplished by placing a textbox in the GridView control and superimposing it over the cell we want to edit. The information is extracted from the textbox and placed in the cell when the text is changed inside the textbox. Below is the listing for populating the cell in the ListView from the TextBox.
void
PopulateCell(int rowNum, int colNum)
{
if ((rowNum > -1) && (colNum > -1))
{
// Get the row of data for the CurrentRow in the list view
ListViewItem theRow = listView1.Items[rowNum];
// Get the specific SubItem in the ListView containing the Data and populate it with the TexBox
ListViewItem.ListViewSubItem theCell = theRow.SubItems[colNum];
theCell.Text = textBox1.Text;
}
}
If an Arrow Key is pressed in the ListView, the EditBox is moved according to which key is triggers the event. Below is the code that moves the EditBox. It basically moves the text box logically to the adjacent row or column and retrieves the text from the cell into the text box. If a letter character is pressed, it will go to the default case, and read the new character into the cell.
private void listView1_KeyDown(object sender, System.Windows.Forms.KeyEventArgs e){
// Move textbox according to key pressed
string result = e.KeyData.ToString();
MoveCell(e);
}
private void MoveCell(KeyEventArgs result)
{
string c = result.KeyData.ToString();
switch (c)
{
case "Left": // left arrow pressed, move textbox column - 1
if (CurrentColumn - 1 >= 0)
{
PerformCellMoveByRow(CurrentRow, CurrentColumn - 1);
}
break;
case "Right": // right arrow pressed, move textbox column + 1
if (CurrentColumn + 1 < listView1.Columns.Count)
{
PerformCellMoveByRow(CurrentRow, CurrentColumn + 1);
}
break;
case "Up":
if (CurrentRow - 1 >= 0) //up arrow pressed, move textbox row - 1
{
PerformCellMoveByRow(CurrentRow - 1, CurrentColumn);
}
break;
case "Down": //down arrow pressed, move textbox row + 1
if (CurrentRow + 1 < listView1.Items.Count)
{
PerformCellMoveByRow(CurrentRow + 1, CurrentColumn);
}
break;
default:
// Handle case when textbox does not have focus, but a character is pressed
if (textBox1.Focused == false)
{
if (result.KeyValue >=(int)'A' && result.KeyValue <= (int)'Z')
{
if (result.Shift == false)
{
textBox1.Text = ((char) ((int)c[0] - (int)'A' + (int)'a')).ToString();
}
else
{
textBox1.Text = c;
}
}
// Give focus to the TextBox and put the cursor on the end
textBox1.Focus();
textBox1.Select(textBox1.Text.Length, 1);
}
break;
} // End Switch
}
Hashtable
The GridView also has a convenient hashtable that maps the column names to column numbers in the row and is constructed as shown below.
private System.Collections.Hashtable ColumnMap = new Hashtable();
When the column names are initialized (In SetColumnName), the column map is populated at the same time with the following line:
ColumnMap[theColumnName] = columnNumber;
When you want to retrieve the column number from the hashtable, you can dereference it the same way:
// Make sure there is an entry in the ColumnMap
if (ColumnMap[strColumn] == null)
return;
// Use the column name key in the map to get the column number
int colNum = (int)ColumnMap[strColumn];
Conclusion
The GridView control takes a ListView and forces it to behave like a grid. There are some problems with this approach, one is that there are no easy methods to deal with the scrollbar that appears with the ListView. When using this control, it's best to size it to fit all columns and rows when you place it in the form. If you want to make this gridview sortable, feel free to read my article on sorting multicolumn listviews. By adding the code from this article, you can click on each column and have it sort the rows of the grid.