Figure 1 - GridView Imported Into Excel
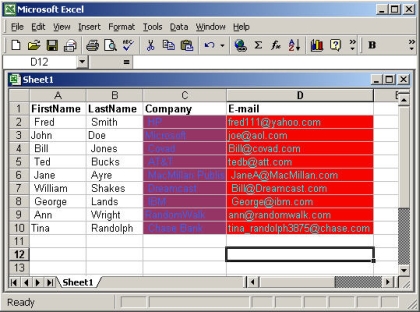
One of the nice things about .NET is that it maintains the compatibility of talking to COM supported applications as did VB and Visual C++. Not only can you still talk to applications with COM interfaces that support IDispatch or IMyInterface, but .NET builds a nice wrapper around the existing interface calls to the application so you can treat it like any other class in your C# arsenal. In this article we will take the contents of our GridView control and spill it into an Excel spreadsheet using this wrapper mechanism.
Excel has a nice hierarchy of useful interfaces. The objects used in this article are shown in the UML diagram below:
Figure 2 - UML Diagram of Excel Objects in the .NET assembly wrapper reverse engineered using WithClass 2000 and .NET Reflection
These objects make up the core functionality of working with an Excel Spreadsheet remotely. The table below contains a description of each class shown above and these objects are used in our GridView specifically for exporting the GridView contents to Microsoft Excel.
| Excel Object |
Description |
| Application |
Top Level Object, used to access workbooks in excel. |
| Workbook |
An excel file consisting of several spreadsheets. Used to access a collection of Worksheets or the active sheet |
| Worksheet |
This is an excel spreadsheet. Here is where we populate the spreadsheet through the Range object |
| Range |
A cell or set of cells. This object lets us populate a cell, a row, or a column. Any aspect of a cell, including color, can be changed through this object |
Table 1 - Core Excel Objects
The first step in having our GridView talk to Excel is to build the Excel Interoperability wrapper. The wrapper is created by adding a Excel 9.0 Object reference to the GridView through the Visual Studio.NET IDE: First Choose Project -> Add Reference from the Project Menu as shown in Figure 2.
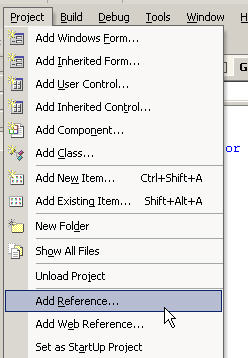
Figure 3 - Adding a Reference to the Project
This will bring up the Reference Dialog shown in Figure 3. This dialog allows us to either choose a .NET, COM, or Project reference. Our Excel Reference is located under Microsoft Excel 9.0 Object Library on the COM tab:
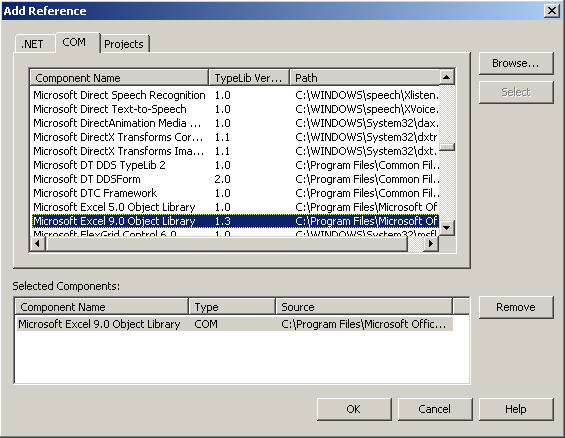
Figure 4 - Adding the Excel Reference to Create the Class Wrapper
Clicking ok produces an assembly that serves as a wrapper around Excel's automation calls. Now we are ready to use Excel in our GridView. The first step is to construct an Excel application object. Construction an excel application object will launch the excel application process. The construction behaves like a CreateObject in Visual Basic.
private
Excel.ApplicationClass ExcelApp = new Excel.ApplicationClass();
Now can access all the nice collections, objects, properties, and methods that are contained within the ExcelApp. The code for exporting the GridView into the Excel SpreadSheet is shown below. The first step to export the GridView is to copy the column headers over to Excel. This is accomplished in Listing 1 which opens the spreadsheet and sets up the columns. We've created a nice method called GetExcelIndexToLetter which takes a column number in the GridView and converts it to a corresponding column letter in the Excel Spreadsheet. Remember that putting information in an Excel spreadsheet is sort of like playing the game of Battleship. The cells are defined by a row of letters and column of numbers such as: "A1", "B2","G3", (except in this case we aren't trying to sink any battleships.)
Listing 1 - Setting up the GridView columns in Excel
private
void OpenSpreadsheet()
{
// Make Excel the Main Window Visible
ExcelApp.Visible = true;
object missing = System.Reflection.Missing.Value;
// Add a Worksheet to Excel
Excel.Workbook theWorkbook = ExcelApp.Workbooks.Add(Excel.XlWBATemplate.xlWBATWorksheet);
TheSheet = (Excel.Worksheet)theWorkbook.Worksheets[1];
// Get the first row of cells to populate the header
Excel.Range theRange = TheSheet.Cells.get_Range(GetExcelIndexToLetter(0) + "1",
GetExcelIndexToLetter(NumberOfColumns - 1) + "1");
// draw the column headers in the excel spreadsheet from the GridView
for (int i = 0; i < this.NumberOfColumns; i++)
{
// Copy the text of the GridView Header into the Excel Cell
((Excel.Range)theRange["1", GetExcelIndexToLetter(i)]).Value = listView1.Columns[i].Text;
// Set the width of the column in the Excel Spreadsheet to the Width of the GridView column
((Excel.Range)theRange["1", GetExcelIndexToLetter(i)]).ColumnWidth =
listView1.Columns[i].Width/listView1.Font.SizeInPoints;
// Set the Excel Cell To Bold Font
((Excel.Range)theRange["1", GetExcelIndexToLetter(i)]).Font.Bold = true;
}
}
The next step is to copy the cells of the GridView into the cells of the Excel Spreadsheet. The code for doing this looks similar to the previous listing accept in listing 2 we are accessing individual cells for our range inside of the Excel spreadsheet instead of a single row as in listing 1.
Listing 2 - Populating the cells in Excel from the GridView
private
void WriteExcelData()
{
try
{
for (int i = 1; i < this.NumberOfRows; i++)
{
for (int j = 0; j < this.NumberOfColumns; j++)
{
// Get the current cell in Excel
Excel.Range theRange = TheSheet.Cells.get_Range(GetExcelIndexToLetter(j) + (i + 1).ToString(),GetExcelIndexToLetter(j) + (i + 1).ToString());
// Copy the GridView cell's Text Value, background color and text color into the Excel Cell
theRange.Value = GetCell(i, j+1);
theRange.Interior.Color = this.GetCellColor(i, j+1).ToArgb();
theRange.Font.Color = this.GetCellTextColor (i, j+1).ToArgb();
// Redraw the cell borders, they seem to disappear after coloring in the cell
theRange.Borders.LineStyle = Excel.XlLineStyle.xlContinuous;
theRange.Borders.Color = Color.LightGray.ToArgb();
}
}
}
catch(Exception ex)
{
MessageBox.Show(ex.Message.ToString());
}
}
Unfortunately, the cell colors don't seem to map that well from .NET to Excel. Although the Excel documentation says to use RGB values, it seems that the color values that the Excel cell actually become when they are copied from the GridView are off a bit. This could be do to the small 56 color palette of an Excel Spreadsheet or it could be something I did wrong in the conversion. The grayscale, colors, however, do seem to map ok.
Summary
Thus ends our four part series. In this article we showed you how reference Microsoft Excel and export data from our GridView control into an Excel spreadsheet. Below are the links to the other three parts to the series if you haven't read them and wish to examine other aspects of the GridView.
An Editable GridView Control in C# and .NET - Part 1
An Editable GridView control in C# and .NET - Part II: Persisting in XML
Editable GridView Control in C# and .NET - Part III : Printing the GridView