Paper, paper, paper....The world is full of paper laden bureaucracy. If you actually figured out all of the applications you had to fill out on paper in a lifetime, it would probably fill several large bound volumes. It seems that we are slowly moving away from the paper form. The government allows for electronic filing of taxes now. Many forms can be filled out online. Even contracts are moving towards an electronic format. So how do we transfer all of these paper form headaches into bits and bytes of editable information? Enter the FormMaker program. This simple .NET program allows you to load a scanned form onto its area and then plop down controls in the places where you need to enter information. You can then save the form in an Xml file along with the contents of the controls.
(Note: This is a follow up on the article Printing out your W-2 Form, but unlike the W-2 Form application, this application can be used with any 1/2 page form).
The FormMaker.NET Application has an undo feature for removing controls you just placed on the form and a fine tuning placement mechanism for positioning the control through the arrow keys. You can also use the align buttons on the toolbar to align the current control with the last control that was placed on the form.
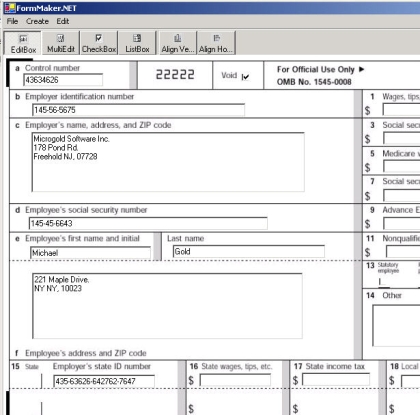
Figure 1 - The Volume Control Sample
The Application currently allows you to place four types of controls: an edit box, a multi-line edit box, a check box and a list box. The edit box and listbox is placed by clicking on the form and choosing the left and right sides of the box. The multiline box is placed by choosing the upper left and lower right hand corners of the box on the form. The check box is placed simply by clicking where you want the box on the form. Below is the state diagram that shows how the different controls are placed on the form:
As in the W-2 Form application, you can print and print preview the form in the FormMaker application.
Figure 2 - UML State Diagram of Creating Controls in DesignMode (Drawn using WithClass 2000)
The code for handling the mouse down event on the form is shown below. Note that it follows the state diagram by using a switch structure for each of the conditions determining which control is being designed. There is a State variable to determine which state to execute in the embedded switch statements for each condition.
Listing 1 - Mouse Down in Form
private void Form1_MouseDown(object sender,System.Windows.Forms.MouseEventArgs e)
{
// if not in design mode return
if (DesignMode == false)
return;
// mouse was pressed, act accordingly
// if right mouse button was pressed, action was canceled (also escape)
if (e.Button.ToString() == "Right")
{
State = DesignState.IDLE;
Invalidate();
return;
}
// Determine starting and ending points of the control
// from where the mouse was pressed in the form
// at a particular state
// state is determined by which control is selected
// in the toolbar, and at what point the mouse was pressed
switch (SelectedButton.Text)
{
case "EditBox":
switch(State)
{
case DesignState.IDLE:
StartPoint.X = e.X;
StartPoint.Y = e.Y;
CurrentControlHeight = kEditBoxHeight;
State = DesignState.STARTPOINT;
Invalidate();
break;
case DesignState.STARTPOINT :
EndPoint.X = e.X;
EndPoint.Y = e.Y;
CreateEditBox(StartPoint, EndPoint);
State = DesignState.ENDPOINT;
Invalidate();
break;
case DesignState.ENDPOINT:
State = DesignState.IDLE;
break;
default:
break;
}
break;
case "MultiEdit":
switch(State)
{
case DesignState.IDLE:
StartPoint.X = e.X;
StartPoint.Y = e.Y;
CurrentControlHeight = kEditBoxHeight;
State = DesignState.STARTPOINT_CORNER;
Invalidate();
break;
case DesignState.STARTPOINT_CORNER:
EndPoint.X = e.X;
EndPoint.Y = e.Y;
CreateMultiEditBox(StartPoint, EndPoint);
State = DesignState.ENDPOINT_CORNER;
Invalidate();
break;
case DesignState.ENDPOINT_CORNER:
State = DesignState.IDLE;
break;
default:
break;
}
break;
case "CheckBox":
CurrentControlHeight = kCheckBoxHeight;
CreateCheckBox(e.X, e.Y);
StartPoint.X = e.X - kCheckBoxHeight/2;
StartPoint.Y = e.Y - kCheckBoxHeight/2;
EndPoint.X = e.X + kCheckBoxHeight/2;
EndPoint.Y = e.Y - kCheckBoxHeight/2;
State = DesignState.ENDPOINT;
Invalidate();
break;
case "ListBox":
switch(State)
{
case DesignState.IDLE:
StartPoint.X = e.X;
StartPoint.Y = e.Y;
CurrentControlHeight = kListBoxHeight;
State = DesignState.STARTPOINT;
Invalidate();
break;
case DesignState.STARTPOINT :
EndPoint.X = e.X;
EndPoint.Y = e.Y;
reateListBox(StartPoint, EndPoint);
State = DesignState.ENDPOINT;
Invalidate();
break;
case DesignState.ENDPOINT:
State = DesignState.IDLE;
break;
default:
break;
}
break;
default:
break;
}
}
The Form data is saved using a class called ControlSerializer. This class allows you to load all the information to draw the form with its controls from an XML file. It also allows you to save the form you designed in an XML file. You can think of the file as almost an XML resource file because it contains a subset of the information that an rc file would contain in Visual C++. Below is the UML design relationship between the form and the ControlSerializer:

Figure 3 - UML Design of FormMaker program reverse engineered using WithClass 2000
I actually used the concepts from the GridPersister in the GridView Control Article - Part II to create and read the XML file we are using here. Below is the code for saving the EditBox. It writes out the position, width, height, and value of an editbox on the Form. Note that it also handles the case for the Multi-Line EditBox:
foreach (Control c in TheForm.Controls)
{
if (c.GetType().ToString() == "System.Windows.Forms.TextBox")
{
TextBox theText = (TextBox)c;
if (theText.Multiline == true)
{
xw.WriteStartElement("MultiTextBox");
}
else
{
xw.WriteStartElement("TextBox");
}
// Write out all of the attributes of the editbox similar to writing an resource entry in an rc file
xw.WriteAttributeString("X", theText.Left.ToString());
xw.WriteAttributeString("Y", theText.Top.ToString());
xw.WriteAttributeString("Width", c.Width.ToString());
xw.WriteAttributeString("Height", c.Height.ToString());
xw.WriteAttributeString("Value", theText.Text);
xw.WriteEndElement();
}
.......
}
Improvements
There are many ways in which the FormMaker can be improved. It would be nice to be able to select a previous control created on the form and moving its current position. Now you can only move newly created controls. Also it would be nice to have a multiple selection feature to align a group of controls. Also the ListBox currently has no way of adding values except directly into the XML file so this part still needs some work. Also the application needs to be expanded to handle full page forms by turning it into an MDI application. I'm looking forward to people trying this application out on some standard half-page forms. If you have any you would like to submit as an example, you can e-mail the form to me at the e-mail below. Look for an update of this application in the near future.