

Here, I will explain how to show a GridView with various types of paging in ASP.NET. We use C# code to bind the SQL data with a GridView control. The following simple steps will be used to make your ASP.NET GridView control with paging enabled. The GridView control provides you with an easy way to display the number of items on a page without taking up much space with the help of paging. First, we create an SQL Server database table.
Creating a table in SQL Server database
Now, create a table named Userinfo with columns UserID, UserName, and Country. Set the identity property=true for UserID. The table looks as follows.
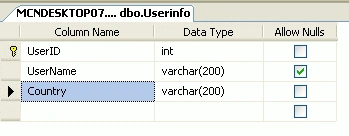
Now, insert data into the table.

First of all, drag the GridView control from the Data Controls menu. It will add the GridView control's HTML source code as given above.
<asp:GridView ID="GridView2" runat="server">
</asp:GridView>
Now add the following namespace.
using System.Data.SqlClient;
using System.Data;
Now, write the connection string to connect to the database.
string strConnection = "Data Source=.; uid=sa; pwd=wintellect; database=Rohatash;";
Now, double-click on the page and write the following code for binding the data with the GridView.
protected void Page_Load(object sender, EventArgs e) {
    BindData();
}
protected void BindData() {
    string strConnection = "Data Source=.; uid=sa; pwd=wintellect;database=Rohatash;";
    SqlConnection con = new SqlConnection(strConnection);
    con.Open();
    SqlCommand cmd = new SqlCommand("select * from Userinfo", con);
    DataSet ds = new DataSet();
    SqlDataAdapter da = new SqlDataAdapter(cmd);
    da.Fill(ds);
    GridView1.DataSource = ds;
    GridView1.DataBind();
    con.Close();
}
Implement PageIndexChanged
Once the event PageIndexChanging is executed, the event will be fired for PageIndexChanged paging. In this event, you can safely bind the grid again to access the second page. It is always preferable to cache the data used to bind the data source.
protected void GridView1_PageIndexChanging(object sender, GridViewPageEventArgs e) {
    GridView1.PageIndex = e.NewPageIndex;
    BindData();
}
There are four types of paging mode styles available in GridView. The following are the names of the types of paging mode styles.
- NumericFirstLast
- Numeric
- NextPrevious
- NextPreviousFirstLast
Now click on the GridView control to load the control properties at the right-side panel; press F4 and set the following properties of the GridView.
- Enable paging: EnablePaging property to True to get GridView Paging.
- PageSize: Number of rows from the data source to display per page.
- NumericFirstLast: Now, our GridView is ready with data, and I will explain how to use each paging option in our GridView. If you look at the code above, I have set the PagerSetting property for the GridView. Click on the GridView control, press F4, and set the following properties.
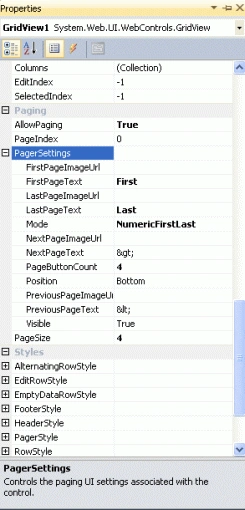
<PagerSettings Mode="NumericFirstLast" PageButtonCount="4" FirstPageText="First" LastPageText="Last" /> - Mode: This is a display type of paging to use.
- PageButtonCount: To display a number of pages in the paging.
- FirstPageText: This will display text on the first page Button.
- LastPageText: This will display text on the last page Button.
Now, run the application and test it.
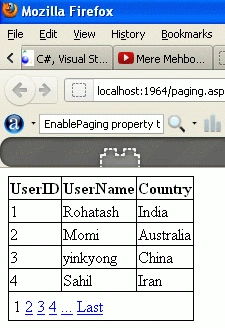
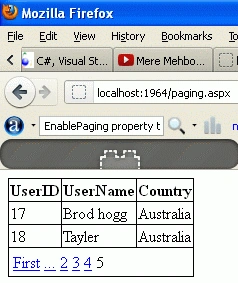
Now click on the last Button.
Numeric
By default, we will get this numeric paging; once we set AllowPaging and PageSize properties in the GridView to set this property to our GridView, write the PagerSetting property like this.
<PagerSettings
    Mode="Numeric"
    PageButtonCount="4"
/>
Now, run the application and test it.
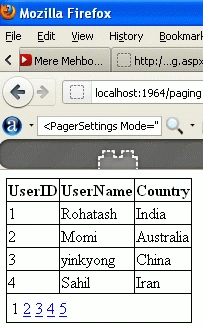
- NextPrevious: If we want to use this mode for paging in GridView, we need to change the PagerSettings mode to this.
- NextPageText: NextPageText property is used for the next page Button.
- PreviousPageText: PreviousPageText property is used for the next page Button.
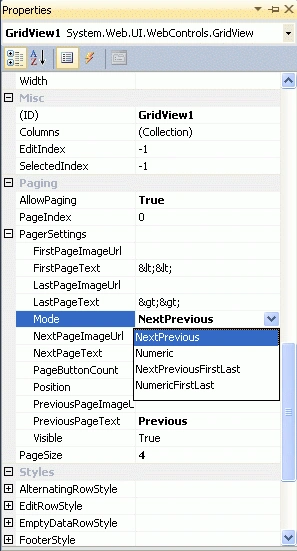
<PagerSettings
    Mode="NextPrevious"
    NextPageText="Next"
    PreviousPageText="Previous"
/>
Now, run the application and test it.
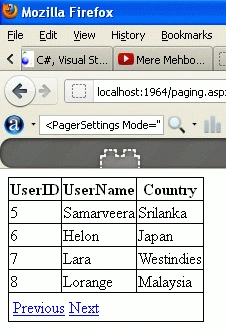
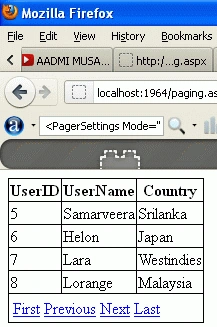
NextPreviousFirstLast
If we want to use this mode for paging in GridView, we need to change the PagerSettings mode to this.
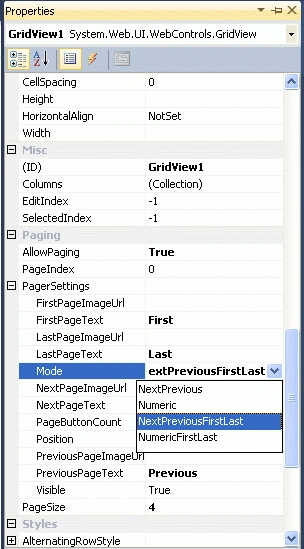
<PagerSettings
    FirstPageText="First"
    LastPageText="Last"
    Mode="NextPreviousFirstLast"
    NextPageText="Next"
    PreviousPageText="Previous"
/>
Now, run the application and test it.
Some Helpful Resources
siva nathanPosted Jul 28, 2017, 1:48 AM
Very good explanation...thank you
Aleena SaviourPosted Nov 22, 2016, 6:03 AM
Very good article...help full....
Ramesh PalaniappanPosted Aug 24, 2016, 10:17 AM
Nice
kalu singh raoPosted Jul 9, 2016, 11:29 AM
Nice...
Mohammad KhalidPosted Apr 21, 2015, 1:53 AM
Very Good Article... Simple and Clean
Govinda KudarpakePosted Sep 4, 2014, 7:32 AM
It's Working perfectly.... Thanks a lot...
raviPosted Jun 23, 2014, 6:50 AM
Thank you.........
Ah YewPosted Apr 22, 2014, 4:28 AM
no overload for matches delegate 'system.eventhandler' It comes with this error.
ketan italiyaPosted Oct 16, 2013, 2:08 AM
thanku sir,help a lot
Sanjaya FernandoPosted Jun 12, 2013, 2:52 AM
Thank you !
Ankit HapaniPosted May 23, 2013, 11:09 PM
Thank u.
susanta ghosheditedPosted Apr 22, 2013, 7:24 AMEdited Apr 22, 2013, 7:25 AM
gridStudent.PageIndex = e.NewSelectedIndex;LoadStudents(); htpp://www.travlet.in
jitendraPosted Jan 29, 2013, 6:25 AM
I hope that I use c# corner site , and also this article
Mohan kumarPosted Dec 12, 2012, 7:17 AM
Thank u.
Rohatash KumarPosted Oct 29, 2012, 5:30 AM
Thanks. Dhatchayini
Dhatchayini VijiPosted Oct 29, 2012, 3:34 AM
Very helpful information..Thank you so much.............
aravind sandiPosted Oct 10, 2012, 5:45 AM
am really very sorry its working
aravind sandiPosted Oct 10, 2012, 5:30 AM
this code is not working man
Andy.BrownPosted Sep 29, 2012, 5:13 AM
Thanks. You can find another tutorial <a href="http://www.wiseowl.co.uk/blog/s301/gridview.htm">here</a>.
kianu rieveseditedPosted Sep 18, 2012, 2:13 AMEdited Sep 18, 2012, 2:13 AM
Its really helpful. Thanks for sharing it. http://www.dapfor.com/en/net-suite/net-grid/tutorial/headers-and-columns
omid turboPosted Apr 21, 2012, 4:07 AM
its helpe me......taaaaaaaaaaaaaanks.
Bharat BhushanPosted Feb 1, 2012, 2:36 AM
Thanks...