Introduction:
In this article let's take an expedition through travel around how Anchoring, Docking Properties of Controls can be used in the Windows Forms.
Anchoring Property:
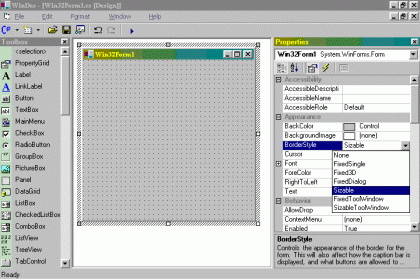
In creating a Form containing controls we have to decide whether the Forms should be resizable. Adjust any one of the values to the FormBorderStyle property to configure the reusability of the Form as shown in the figure below.
Need for Anchoring:
To resize controls dynamically with the form, we can use the Anchor property of Windows Forms controls. The Anchor property describes an anchor position for the control. When a control is anchored to a form and the form is resized, the control maintains the distance between the control and the anchor positions.
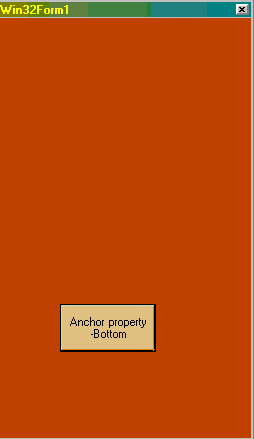
For example, if you have a Button control that is anchored to the left, right, and bottom edges of the form, as the form is resized, the button control resizes horizontally so that it matches the same distance from the right and left sides of the form. In addition, the control positions itself vertically so that its location is always the same distance from the bottom edge of the form. The Anchor property can be set to the controls as shown in the figure below in WinDes.exe
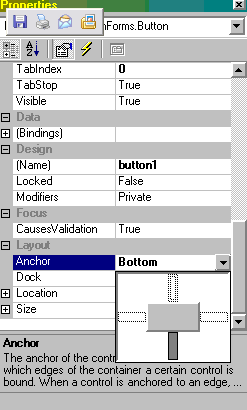
Picture 2: Anchor-bottom.gif
When the form is displayed at run time, the control resizes to remain positioned at the same distance from the edge of the form. But certain controls, such as the ComboBox control, have a limit to their height. Anchoring the control to the bottom of its form or container cannot force the control to exceed its height limit.
Controls are anchored to the top and left by default.
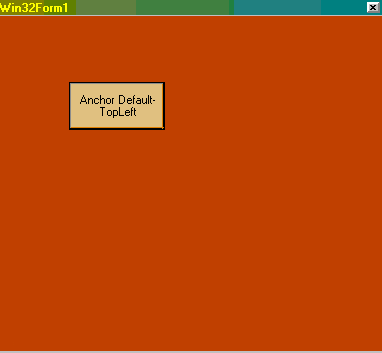
Picture 3: Anchor-Default.gif
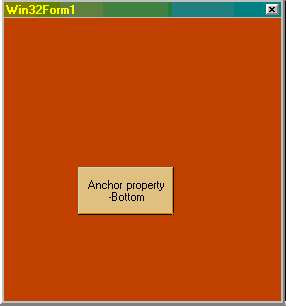
For example, if we configure a Button with the following Anchor value.
button1.Anchor = System.WinForms.AnchorStyles.Bottom;
The output is as follows:
Before Resized:
Picture 4: AnBottom1.gif
After Resized:
Picture 5: AnBottom2.gif
We see that the button maintains its position relative to the Bottom side of the form.
Docking Property:
We can dock controls to the edges of your form or have them fill the controls container (either a form or a container control). For example, Windows Explorer docks its TreeView control to the left side of the window and its ListView control to the right side of the window.
Members:
Member Name Description:
Bottom - The control's bottom edge is docked to the bottom of its containing control.
Fill - All the control's edges are docked to the all edges of its containing control and sized appropriately.
Left - The control's left edge is docked to the left edge of its containing control.
None - The control is not docked.
When a control is docked to an edge of it's container it will always be positioned flush against that edge while the container re-sizes. If more than one control is docked to an edge, the controls will not be placed on top of each other.
If Left or Right is selected, the left and right edge of the control is re-sized the same size as the containing control's edge. Likewise, if Top or Bottom is selected, the top and bottom edge of the control is re-sized to the same size as the containing control's edge. If Fill is selected, all sides of the control is re-sized to the same size as all the containing control's edges.
For example, to make a Button control fills the client area of its container,the code is as follows:
button1.Dock = DockStyle.Fill;
The control is automatically resized to fit the boundaries of the docked edge.
The output:
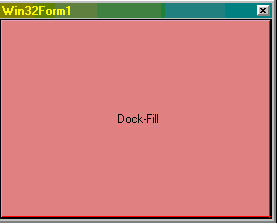
Picture 6: DockFill.gif
Now let us see a program which show you all the property.
The example: Form.cs
using System;
using System.ComponentModel;
using System.WinForms;
using System.Drawing;
public class Form : System.WinForms.Form
{
private System.WinForms.Button Sienna;
private System.WinForms.Button Indigo;
private System.WinForms.Button DarkGoldenrod;
private System.WinForms.Button Teal;
private System.WinForms.Button IndianRed;
private System.WinForms.Button OrangeRed;
private System.WinForms.Button HotPink;
private System.WinForms.Button Arun;
public Form() : base()
{
InitializeComponent();
}
public override void Dispose()
{
base.Dispose();
}
// Helper method for the constructor.
private void InitializeComponent()
{
EventHandler handler = new EventHandler(buttonClick);
Sienna = new Button();
Sienna.Text = "Sienna";
Sienna.Size = new System.Drawing.Size(50, 50);
Sienna.Anchor = AnchorStyles.BottomRight;
//The syntax below registers the delegate with the Click event of the button.
Sienna.Click += handler;
Controls.Add(Sienna);
Indigo = new Button();
Indigo.Text = "Indigo";
Indigo.Size = new System.Drawing.Size(50, 50);
Indigo.Anchor = AnchorStyles.BottomLeft;
Indigo.Click += handler;
Controls.Add(Indigo);
DarkGoldenrod = new Button();
DarkGoldenrod.Text = "DarkGoldenrod";
DarkGoldenrod.Size = new System.Drawing.Size(75, 50);
DarkGoldenrod.Anchor = AnchorStyles.TopLeft;
DarkGoldenrod.Click += handler;
Controls.Add(DarkGoldenrod);
Teal = new Button();
Teal.Text = "Teal";
Teal.Size = new System.Drawing.Size(50, 50);
Teal.Anchor = AnchorStyles.TopRight;
Teal.Click += handler;
Controls.Add(Teal);
IndianRed = new Button();
IndianRed.Text = " IndianRed";
IndianRed.Size = new System.Drawing.Size(55, 50);
IndianRed.Location = new System.Drawing.Point(200, 50);
IndianRed.Click += handler;
Controls.Add( IndianRed);
HotPink = new Button();
HotPink.Text = " HotPink";
HotPink.Size = new System.Drawing.Size(55, 50);
HotPink.Location = new System.Drawing.Point(200, 100);
HotPink.Click += handler;
Controls.Add( HotPink);
OrangeRed = new Button();
OrangeRed.Text = " OrangeRed";
OrangeRed.Size = new System.Drawing.Size(55, 50);
OrangeRed.Location = new System.Drawing.Point(200, 150);
OrangeRed.Click += handler;
Controls.Add( OrangeRed);
Arun = new Button();
Arun.Text = " Arun";
Arun.Dock=DockStyle.Bottom;
Arun.Size = new System.Drawing.Size(55, 50);
Arun.Location = new System.Drawing.Point(200, 150);
Arun.Click += handler;
Controls.Add( Arun);
}
private void buttonClick(object sender, EventArgs e)
{
if (sender == Sienna) this.BackColor = Color.Sienna ;
else if (sender == Indigo) this.BackColor = Color.Indigo;
else if (sender == Teal) this.BackColor = Color.Teal;
else if (sender == IndianRed) this.BackColor = Color. IndianRed;
else if (sender == HotPink) this.BackColor = Color. HotPink;
else if (sender == OrangeRed) this.BackColor = Color. OrangeRed;
else if (sender == DarkGoldenrod) this.BackColor = Color. DarkGoldenrod;
else if (sender == Arun)
{
MessageBox.Show(" The Author: Arun Ganesh",[email protected]);
}
}
public static void Main(string[] args)
{
Application.Run(new Form());
}
}
The output:
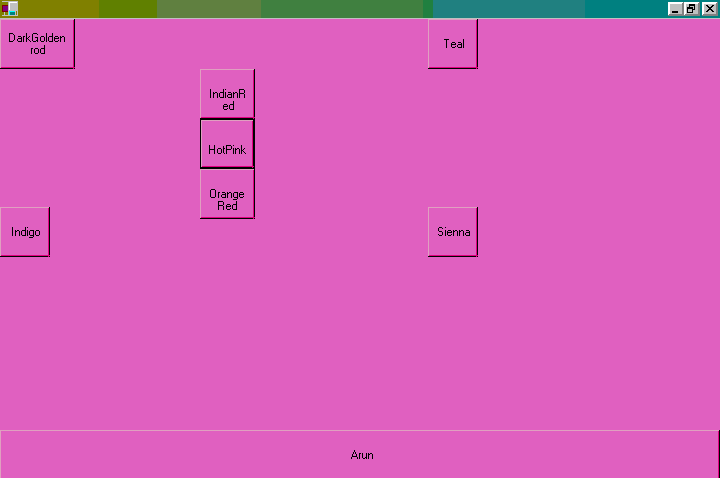
Picture 7: outputgif
Program Description:
In the above program I show the usage of Anchoring, Docking Properties of Controls, Positioning of controls on Forms. Already we see how to use the property of Anchoring, Docking of controls. Now let us see the positioning of controls.
Consider the below code:
private System.WinForms.Button IndianRed;
IndianRed = new Button();
IndianRed.Text = " IndianRed";
IndianRed.Size = new System.Drawing.Size(55, 50);
IndianRed.Location = new System.Drawing.Point(200, 50);
IndianRed.Click += handler;
Controls.Add( IndianRed);
First we declare the button, add the button using the new keyword. Then some properties such as text,size are initialised.Then Location of the control is done using the code.
IndianRed.Location = new System.Drawing.Point(200, 50);
Then we register the delegate with the Click event of the button.
You can also noticed that a button named "Arun" is docked on the bottom side of form.