

In this article we will be seeing how to use LINQ in SharePoint 2010 to retrieve
the list items and display the same in the SharePoint grid view.
In SharePoint 2010 you have the ability to use LINQ syntax to query the list
instead of using CAML query. In order to work with LINQ we need a command line
tool called SPMetal.exe.
This tool is used to generate the entity classes that is required to perform
object oriented queries towards SharePoint server. It is also required to get
the intellisense when we are working in Visual Studio 2010.This tool resides in
14\bin folder.
In this article we are going to create a visual web part where we will be
querying the items from the SharePoint list and display the result in the
SharePoint grid view.
Creating the entity classes:
- Open Command Prompt as an administrator.
- Change the path to C:\Program Files\Common Files\Microsoft Shared\Web Server Extensions\14\BIN.
- Run the following command to generate the
entity classes.
Spmetal.exe /web:http://servername:2010/sites/test/ /code:C:\MyEntityClass.cs
Create Visual webpart:
- Open Visual Studio 2010.
- Go to File => New => Project.
- Select Visual Web Part from the installed templates.
- Enter the Name and click Ok.
- Right click on the solution, select "Add an existing item".
- Add the MyEntityClass.cs class to the solution.
- Add the following namespaces.
using Microsoft.SharePoint.Linq;
using System.Linq; - Open VisualWebPart1UserControl.ascx.cs
file and replace the code with the following.
using System;
using System.Web.UI;
using System.Web.UI.WebControls;
using System.Web.UI.WebControls.WebParts;
using Microsoft.SharePoint.Linq;
using System.Linq;
using System.IO;
using System.Collections.Generic;namespace LinqToSQLWebpart.VisualWebPart1
{
public partial class VisualWebPart1UserControl : UserControl
{
protected void Page_Load(object sender, EventArgs e)
{
MyEntityClassDataContext myEntitiesDataContext = new MyEntityClassDataContext("http://servername:2010/sites/test/");//Querying the list
var listItem = from items in myEntitiesDataContext.A
select items;//Binding the result to the grid view
spGridView.DataSource = listItem;
spGridView.DataBind();
}
}
}
- Open VisualWebPart1UserControl.ascx file
and add the following code snippet.
<SharePoint:SPGridView ID="spGridView" runat="server" AutoGenerateColumns="false" >
<HeaderStyle HorizontalAlign="Left" VerticalAlign="Top" ForeColor="Red" Font-Bold="true" />
<Columns>
<SharePoint:SPBoundField DataField="Title" HeaderText="Title" ></SharePoint:SPBoundField>
</Columns>
</SharePoint:SPGridView>
- Build the solution.
- Deploy the solution.
Testing:
- Open the SharePoint site and go to any of the web part page.
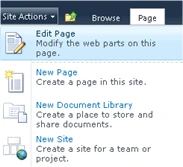
- Go to Site Actions => Edit page.
- Click on "Add a web part".

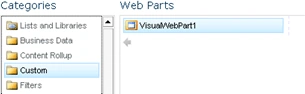
- In the Categories section, select the Custom.
- In the Web parts section, select the web
part which we have created.
- Click on Add.
- A custom web part is added displaying the
following result.

Join the conversation! Your thoughts help the community grow.