Introduction
This article is intended to illustrate how to implement optimistic concurrency control in ASP.NET. Optimistic concurrency control is a mechanism to check when multiple users concurrently access and change a common data item; they don't overwrite one another's change. I'm going to illustrate a common scenario in an enterprise application and to show how we can solve the concurrency problems using optimistic concurrency control and the underlying implementation using Microsoft technologies.
The business scenario
Let's suppose that we have a table named Department to record facts concerning to the department entity type such as department identifier, department name and location. The table schema is show in Listing 1.
create table dbo.Department(
DeptID int not null,
DeptName varchar(50) not null,
Location varchar(50) not null
constraint PK_Department primary key clustered(DeptID)
)
go
Listing 1
When two users simultaneously access a common row in this table as well as one user changes the department name (while the other user changes the location) and commits his changes using a transaction to the database. At this point, the database has the last committed value, but the other user stills thinks on the old value and he does not know about the changes that have happened before, and he may commit the new values (related to location field) to the database, thus overwriting the values of the first user. This situation can happen as well when one user is updating a row in a table which is being deleted by another user.
In the optimistic approach, we assume that this sort of concurrency problems are not likely to happen, but if a conflict arises; our application has to notify to the user that his changes can't be committed in this moment, because another user has modified the same data. An optimistic concurrency control might be appropriate for a large database in which transactions typically access only a few data items, and those accesses to the database are spread randomly over the database. This type of control might not be appropriate for database with several hotspots, that is, data items that are heavily accessed in conflicting way by many transactions.
There are several approaches to implement optimistic concurrency control and in this article, I will discuss the simple one supported by ADO.NET strongly typed DataSet which can be configured enabling a checkbox in the TableAdapter creation. This is implemented by extending the UPDATE and DELETE SQL statements' WHERE clause to include a comparison of all the original and new values of the underlying data row to be saved in the database. That's, you are allowed to update a table column to a particular data item, if only if the current values in the database are equal to the values originally retrieved from the database (see Listing 2).
update dbo.Department
set DeptName=@New_DeptName, Location=@New_Location
where DeptID=@Original_DeptID and DeptName=@Original_DeptName and Location=@Original_Location
Listing 2
Developing the solution
The first step is to create a Web application by opening Visual Studio.NET 2005 and select File | New | Web Site as the front-end project. Let's create a Class Library project for the data access layer components. This separation of objects (concerning their responsibilities) follows the best practices of enterprise applications development.
Let's add a strongly typed DataSet item to the Class Library project (see Figure 1).
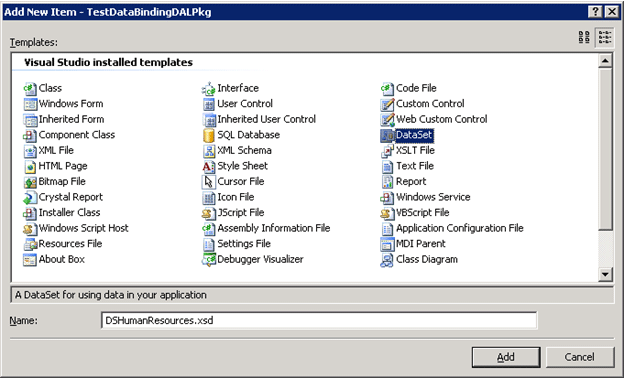
Figure 1
Let's define a TableAdapter item representing the logic to access the dbo.Department table in the test database by using a SQL statement (see Figure 2).
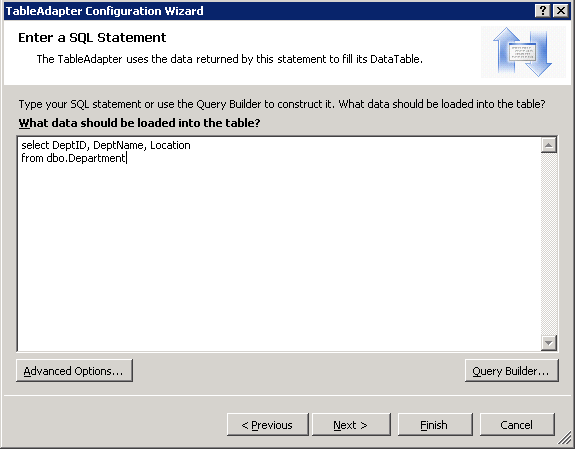
Figure 2
To enable Concurrency Control, you have to click on the Advanced Options button (see Figure 3).
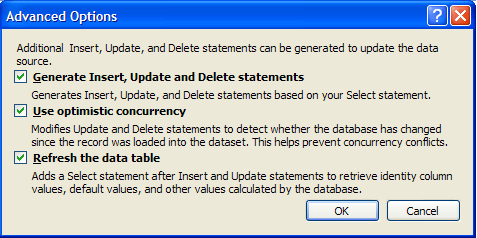
Figure 3
You can go to the definition of the TableAdapter and check the optimistic control SQL code for the underlying UPDATE (see Figure 4) and DELETE SQL statement (see Figure 5).
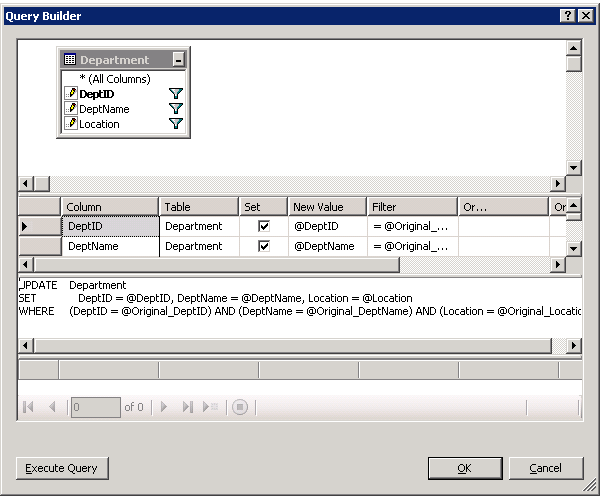
Figure 4
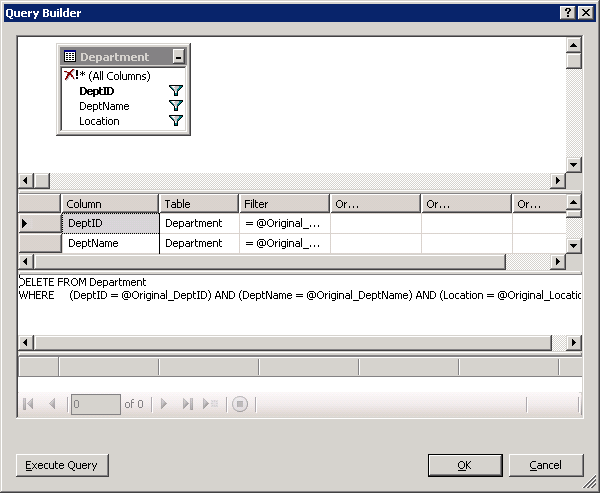
Figure 5
The result schema for the data access objects is shown in Figure 6.

Figure 6
You can call direct DB methods (see Figure 4 and Figure 5) but this sort of data access pattern does not throw the DBConcurrencyException exception, thus we need to add another abstraction to face with this situation. The solution is to develop a business object, representing the department entities, which enable the interaction with the data sources in order to handle the persistence of the department entities' state. Insert a new class to this project and name it DepartmentBO.cs (see Figure 7).
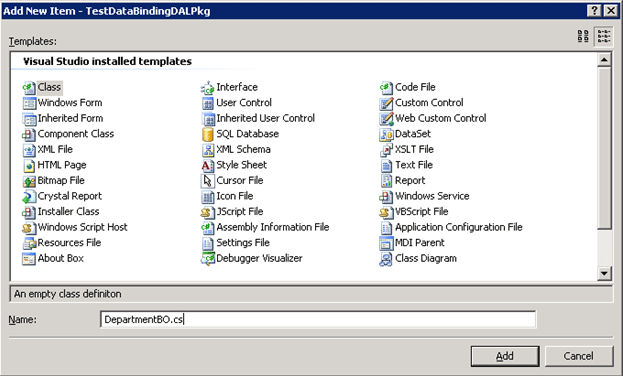
Figure 7
This business object has to be annotated with the System.Component.DataObjectAttribute attribute as well as each method has to be annotated with the System.Component.DataObjectMethodAttribute attribute indicating its method type (if select, insert, update or delete).
The delete method is very simple, you have to delete the row by receiving the original values of the row and then check if a row is deleted successfully. The update method is just a little complex, because we have to use batch updates in order to check for concurrency violations. The approach is to read a data row with the state of the desired department, assign the original values to this data row, call the AcceptChanges method of the underlying DataSet object to set the current values as the original ones, assign new values and call the Update method of the table adapter.
In order to get a data row representing a particular department, we need to extend the DepartmentTableAdapter table adapter with a new query (see Figure 8).

Figure 8
The code for the department business object is shown in Listing 3.
using System;
using System.Collections.Generic;
using System.Text;
using TestDataBindingDALPkg.DSHumanResourcesTableAdapters;
namespace TestDataBindingDALPkg
{
[System.ComponentModel.DataObjectAttribute]
public class DepartmentBO
{
private DepartmentTableAdapter m_objAdapter = null;
protected DepartmentTableAdapter DepartmentTableAdapter
{
get
{
if (this.m_objAdapter == null)
{
this.m_objAdapter = new DepartmentTableAdapter();
}
return this.m_objAdapter;
}
}
[System.ComponentModel.DataObjectMethodAttribute(System.ComponentModel.DataObjectMethodType.Select,true)]
public DSHumanResources.DepartmentDataTable GetDepartments()
{
return this.DepartmentTableAdapter.GetData();
}
[System.ComponentModel.DataObjectMethodAttribute(System.ComponentModel.DataObjectMethodType.Delete, true)]
public bool DeleteDepartment(int Original_DeptID,string Original_DeptName,string Original_Location)
{
int nRows = this.DepartmentTableAdapter.Delete(Original_DeptID, Original_DeptName,
Original_Location);
return nRows == 1;
}
[System.ComponentModel.DataObjectMethodAttribute(System.ComponentModel.DataObjectMethodType.Update, true)]
public bool UpdateDepartment(int DeptID, string DeptName, string Location, int Original_DeptID, string Original_DeptName, string Original_Location)
{
DSHumanResources dsHumanResourece = new DSHumanResources();
this.DepartmentTableAdapter.FillByDeptID(dsHumanResourece.Department, Original_DeptID);
if (dsHumanResourece.Department.Count == 0)
return false;
DSHumanResources.DepartmentRow rowDepartment = dsHumanResourece.Department[0];
rowDepartment.DeptName = Original_DeptName;
rowDepartment.Location = Original_Location;
dsHumanResourece.AcceptChanges();
rowDepartment.DeptName = DeptName;
rowDepartment.Location = Location;
int nRows = this.DepartmentTableAdapter.Update(dsHumanResourece);
return nRows == 1;
}
}
}
Listing 3
Now let's go to the Web front-end project and add a reference to the data access project (the Class Library project created before) and then add Web form to the project named OptimisticConcControl.aspx.
Now let's drag and drop a GridView control from the Toolbox onto the Web form, and set the ID property to gvDepartments.
Next drag and drop an ObjectDataSource from the Toolbox onto the Web form, set the ID property to odsDepartment, click on the smart tag and select the Configure Data Source option in order to launch the data source configuration wizard. In the first page (Choose a Business Object) you must select the previously created business object (see Figure 9).
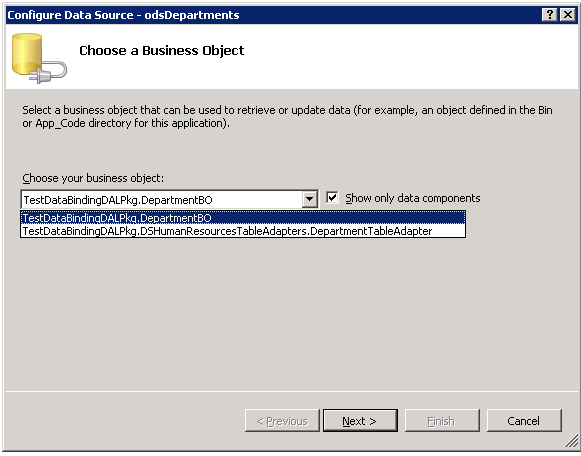
Figure 9
Click on the Next button to define the data methods page. Select the GetDepartments method (see Figure 10).
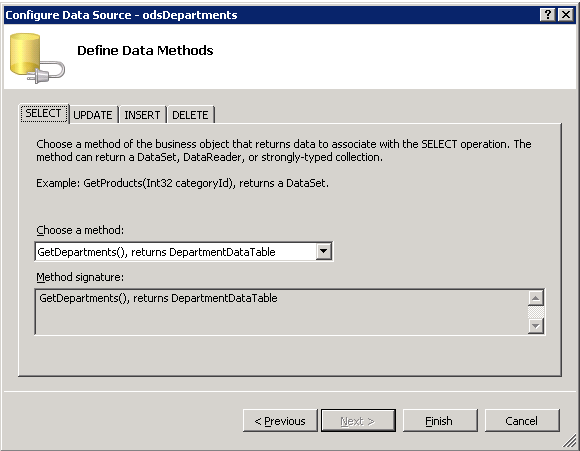
Figure 10
In the Update tab, select the UpdateDepartment method which receives parameters the new values and the original one (see Figure 11).
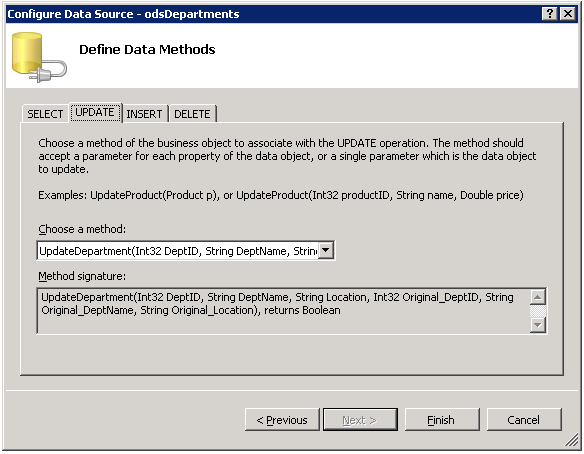
Figure 11
In the Delete tab, select the DeleteDepartment method of the TableAdapter (see Figure 12).
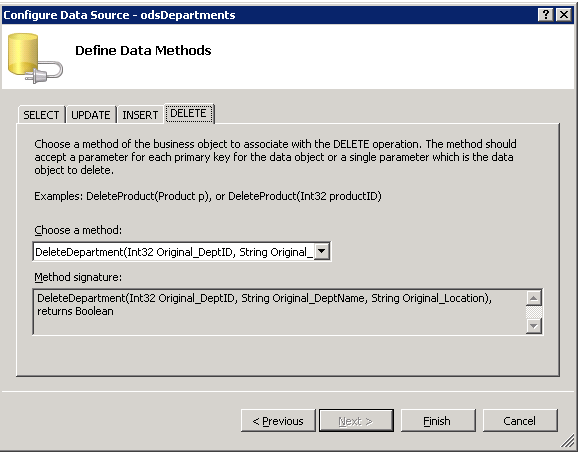
Figure 12
Click on the Finish button to finish the wizard.
There is a final property setting for the ObjectDataSource in order to correctly pass the original values to the TableAdapter methods. You have to set the ConflictDetention property to CompareAllValues (see Figure 13).
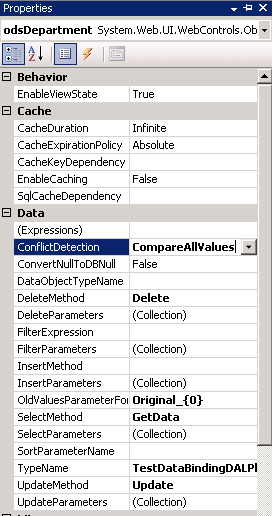
Figure 13
You can see in the generated code for the ObjectDataSource (see Listing 4) the parameters mapping (representing new and original values) from the object data source to the table adapter.
<asp:ObjectDataSource ID="odsDepartments" runat="server" ConflictDetection="CompareAllValues"
DeleteMethod="DeleteDepartment" OldValuesParameterFormatString="original_{0}"
SelectMethod="GetDepartments" TypeName="TestDataBindingDALPkg.DepartmentBO" UpdateMethod="UpdateDepartment">
<DeleteParameters>
<asp:Parameter Name="Original_DeptID" Type="Int32" />
<asp:Parameter Name="Original_DeptName" Type="String" />
<asp:Parameter Name="Original_Location" Type="String" />
</DeleteParameters>
<UpdateParameters>
<asp:Parameter Name="DeptID" Type="Int32" />
<asp:Parameter Name="DeptName" Type="String" />
<asp:Parameter Name="Location" Type="String" />
<asp:Parameter Name="Original_DeptID" Type="Int32" />
<asp:Parameter Name="Original_DeptName" Type="String" />
<asp:Parameter Name="Original_Location" Type="String" />
</UpdateParameters>
</asp:ObjectDataSource>
Listing 4
Now let's bind the gvDepartments GridView control to the odsDepartment ObjectDataSource and enable editing, deleting and paging features by clicking on the smart tag on the gvDepartments GridView control and selecting the Choose Data Source option and setting the fields in the wizard as shown (see Figure 14).
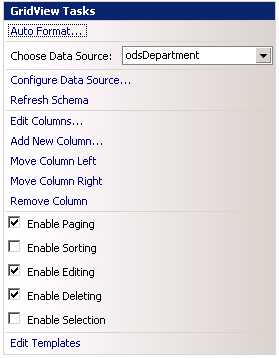
Figure 14
If you run the application and select a row and make of change to it while other user is changing the same row, then you will receive System.Data.DBConcurrencyException in an error page (see Figure 15).
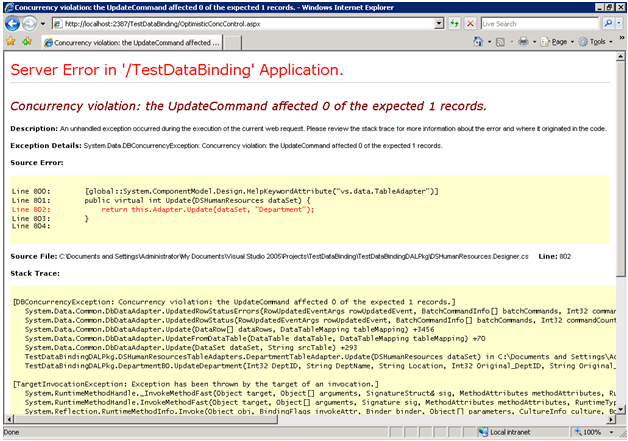
Figure 15
Now in order to deal with concurrency violations, we going to add label control to the page to provide an explanation of the error. Drag and drop a Label control from the Toolbox above the GridView control. Set the Visible property to false, the ForeColor property to red, the ID property to m_lbUpdateConcurrencyViolationInfo and a descriptive message in the Text property. In order deal with the exception, we're going to add an event handler for the GridView's RowUpdated events as well as we need to check if the DBConcurrencyException exception has been thrown (see Listing 5).
protected void gvDepartments_RowUpdated(object sender, GridViewUpdatedEventArgs e)
{
if (e.Exception!=null && e.Exception.InnerException != null && e.Exception.InnerException is DBConcurrencyException)
{
this.m_lbUpdateConcurrencyViolationInfo.Visible = true;
e.ExceptionHandled = true;
}
}
Listing 5
Now, the last step is to check concurrency violations when deleting records in a GridView control. If you check the code for the Department business object (see Listing 3), the DeleteDepartment method returns a Boolean value indicating whether a row was deleted or not due to concurrency violations. The value can be examined in the ObjectDataSource's Deleted event. We need to check if the ReturnedValue property is not null and is a Boolean value, and finally check if this value is false. Add another label control (the same way than the previous one for update errors) and set the Visible property to false, the ForeColor property to red, the ID property to m_lbDeleteConcurrencyViolationInfo and a descriptive message in the Text property. And finally, create the event handler for the ObjectDataSource's Deleted event (see Listing 6).
protected void odsDepartments_Deleted(object sender, ObjectDataSourceStatusEventArgs e)
{
if (e.ReturnValue != null && e.ReturnValue is bool)
{
bool bValue = (bool)e.ReturnValue;
if (!bValue)
{
this.m_lbDeleteConcurrencyViolationInfo.Visible = true;
}
}
}
Listing 6
Conclusion
In this article, I've discussed one of the techniques to implement optimistic concurrency control in ASP.NET 2.0. Now, you can apply this solution to your own business scenarios.