This article will demonstrate how to create the Navigation Based Windows Application in WPF.
There are two types of windows applications the first one is Standard Windows Application which is normally the same old style Stand alone or some time we say Desktop based application. The second one is called as Navigation Based Application which is kind of the Web type application. The behavior is some what as the Wizard Type of application where you can navigate between the windows and perform the task.
The WPF has given the way to create the Web Page kind of Windows application, where one can navigate between the Window or Page controls.
Normally when you create the WPF Application the XAML creates the Window control and which has the Title, Width, Height and Windows Startup attribute as shown below
Window1.xaml:
<Window x:Class="WpfApplication2.Window1" xmlns="http://schemas.microsoft.com/winfx/2006/xaml/presentation"
xmlns:x=http://schemas.microsoft.com/winfx/2006/xaml Title="ListView" Height="350" Width="400" Loaded="Window1_Loaded">
</Window>
But when you create the Navigation based application the control has the Page tag instead Window tag and it does can't have Title and few more properties/attributes. The Page tag looks like as below.
Page1.xaml:
<Page x:Class="WpfApplication2.Window1" xmlns="http://schemas.microsoft.com/winfx/2006/xaml/presentation"
xmlns:x=http://schemas.microsoft.com/winfx/2006/xaml WindowHeight="300" WindowWidth="300">
</Page>
Example 1: The below example show how to implement the Navigation based application. Basically once you put the Page tag, it will render the window with the Navigation Toolbar as shown in Figure 1.
Window1.xaml
<Page x:Class="wpfnavigationwindow_cs.Window1"
xmlns="http://schemas.microsoft.com/winfx/2006/xaml/presentation"
xmlns:x="http://schemas.microsoft.com/winfx/2006/xaml"
WindowHeight="300" WindowWidth="300"
>
<StackPanel>
<TextBlock HorizontalAlignment="Center" FontSize="25">My First Navigation App</TextBlock>
<StackPanel Orientation="Horizontal">
<Image Source="IMG116.jpg" Width="100px"/>
<TextBlock HorizontalAlignment="Center">This is my Network..</TextBlock>
</StackPanel>
<TextBlock>
Go <Hyperlink NavigateUri="Page1.xaml">Here</Hyperlink> to go to Next Page.
<TextBlock>
<Hyperlink NavigateUri="http://www./www.c-sharpcorner.com">Go to the Site</Hyperlink>
</TextBlock>
</TextBlock>
</StackPanel>
</Page>
Windows1.xaml.cs
using System;
using System.Collections.Generic;
using System.Text;
using System.Windows;
using System.Windows.Controls;
using System.Windows.Data;
using System.Windows.Documents;
using System.Windows.Input;
using System.Windows.Media;
using System.Windows.Media.Imaging;
using System.Windows.Shapes;
namespace wpfnavigationwindow_cs
{
/// <summary>
/// Interaction logic for Window1.xaml
/// </summary>
public partial class Window1 : System.Windows.Controls.Page
{
public Window1()
{
InitializeComponent();
}
}
}
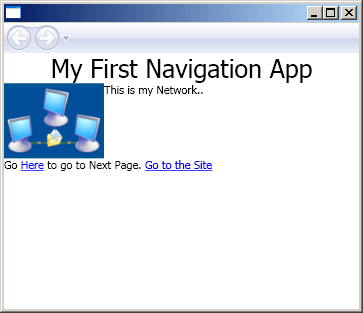
Figure 1
When you click on Here Link then it will navigate to Next Page as mentioned in the NavigationURI property of Hyperlink control. The URI has the Page control (XAML) file and once you move the next page it will enable the Navigation Toolbar as shown in the Figure 2
Page1.xaml
<Page x:Class="wpfnavigationwindow_cs.Page1"
xmlns="http://schemas.microsoft.com/winfx/2006/xaml/presentation"
xmlns:x="http://schemas.microsoft.com/winfx/2006/xaml"
>
<Grid>
<TextBlock>This is Page 1. Congratulations you made it.</TextBlock>
</Grid>
</Page>

Figure 2
But the good practice to make the Navigation based application use the NavigationWindowinstead of Page control. As Page Control is mostly used for the Web Based Application and other benefit you can have the Window Control Properties. Now you can set the Title Property for the NavigationWindow.
Another benefit is you can set the Soruce which will open the Windows Control inside the NavigationWindow Control. The XAML page will look like
Window2.xaml
<NavigationWindow x:Class="wpfnavigationwindow_cs.Window2"
xmlns="http://schemas.microsoft.com/winfx/2006/xaml/presentation"
xmlns:x="http://schemas.microsoft.com/winfx/2006/xaml"
Title="Here is my application" Height="300" Width="300" Source="Window1.xaml"
>
</NavigationWindow>
Note: The Source is set to the Window1.xaml, so it will open the window1.xaml inside the NavigationWindow
Now you can set the StartupUri attribute of App.xaml to Window2.xaml so the when you run the application it will open the NavigationWindow application.
App.xaml
<Application x:Class="wpfnavigationwindow_cs.App"
xmlns="http://schemas.microsoft.com/winfx/2006/xaml/presentation"
xmlns:x="http://schemas.microsoft.com/winfx/2006/xaml"
StartupUri="Window2.xaml"
>
<Application.Resources>
</Application.Resources>
</Application>