

Introduction
This blog is for beginners. It's mainly to teach you how to automate a Windows Application using C#, Winapp driver (Appium), & Selenium. In this blog, we are going to automate the Calculator app.
This blog is for beginners. It's mainly to teach you how to automate a Windows Application using C#, Winapp driver (Appium), & Selenium. In this blog, we are going to automate the Calculator app.
Winapp driver (Appium)
Winapp is a Product of Microsoft, using this driver we can automate Windows applications, classic Windows applications, universal Windows applications, and mobile applications. We can use this driver on the top of a Selenium library.
It is the latest Windows automation driver. It has advantages over Winum Driver & autoT.
Winapp is a Product of Microsoft, using this driver we can automate Windows applications, classic Windows applications, universal Windows applications, and mobile applications. We can use this driver on the top of a Selenium library.
It is the latest Windows automation driver. It has advantages over Winum Driver & autoT.
Set up required for this:
- Windows 10 OS
- Visual Studio 2013+
- Winapp driver.exe
- Inspect.exe for identifying your element value
- Calculator app for automate
- Your PC should be on Developer mode (ON)
Steps to follow,
- Download the Winapp driver from here,Download the WindowsApplicationDriver.msi
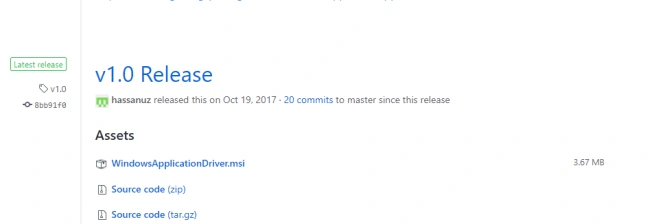
- Open the Download folder and process WindowsApplicationDriver.msi up to install Windows application driver.

- Click it for installation.
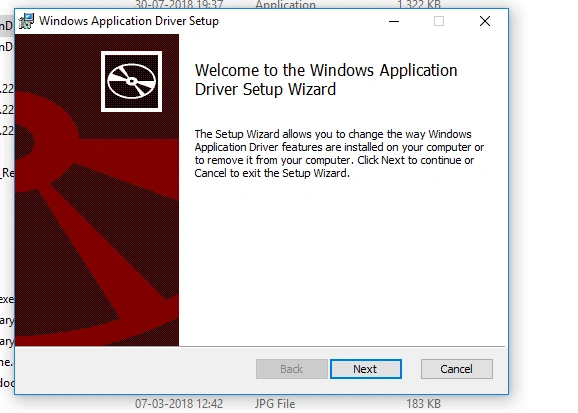
- After installation is complete go to C>>Program Files (x86) >>Windows Application Driver.
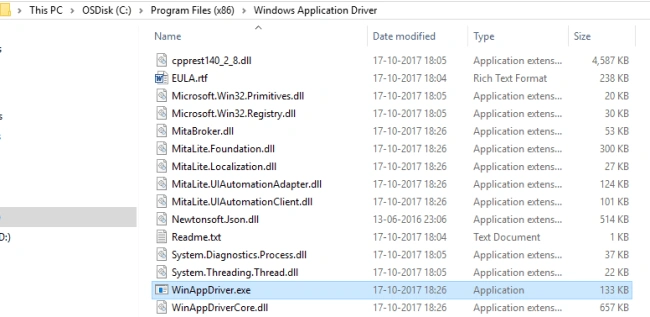
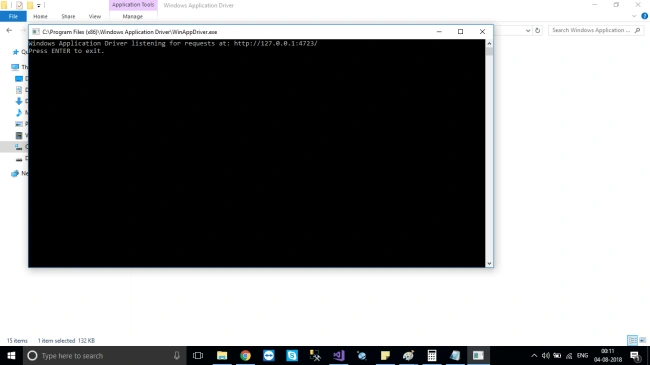
- Double click on WinAppDriver.exe for run the Windows application Driver as below:
- Now, time to install windows Inspect.exe.
To download inspect tool click here,
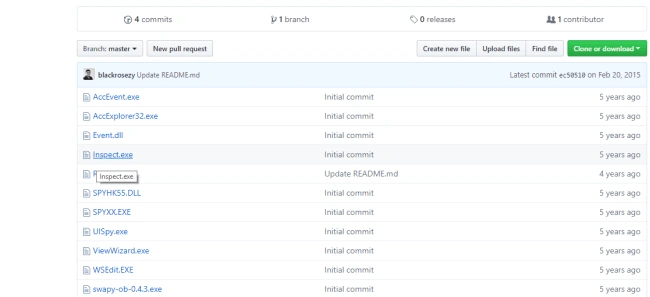
Note
You can download any tool to inspect elements or find elements. After downloading, run inspect.exe and see the control id, name, class etc.
You can download any tool to inspect elements or find elements. After downloading, run inspect.exe and see the control id, name, class etc.
Now, we will move to the coding part,
- Open Visual Studio
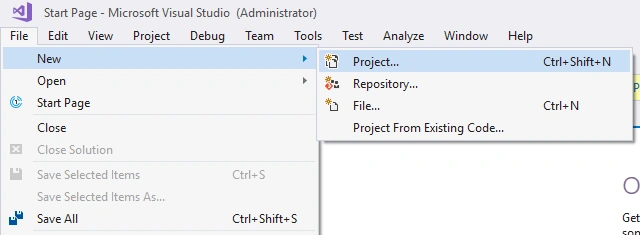
- Click on File>>New>>Project
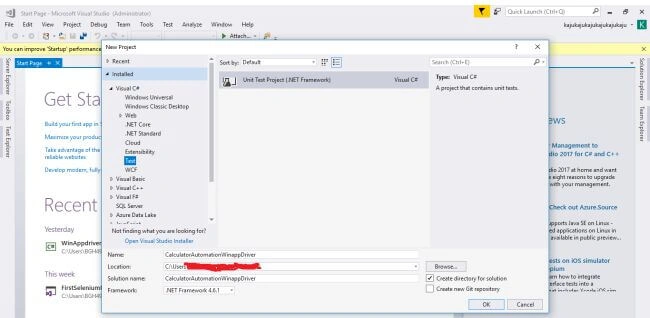
- Click on Test for creating a unit test project.
- Open NuGet Package Manager to install Appium Driver.
Installation steps
Click on Tools >>NuGetPackageManager>>Manage NuGet PackageFor Solution.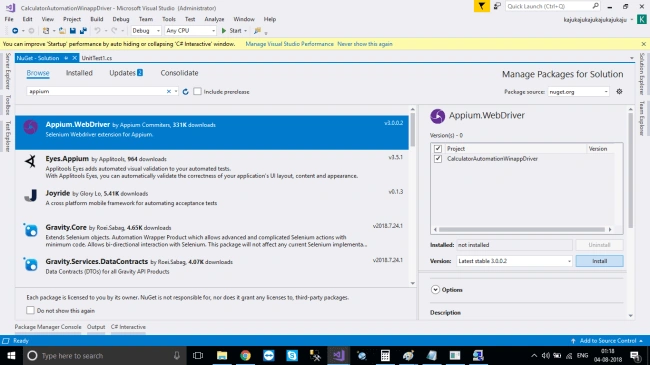
- using System;
- using System.Threading;
- using Microsoft.VisualStudio.TestTools.UnitTesting;
- using OpenQA.Selenium;
- using OpenQA.Selenium.Appium.Windows;
- using OpenQA.Selenium.Remote;
- namespace CalculatorAutomationWinappDriver
- {
- [TestClass]
- public class UnitTest1
- {
- //Appium Driver URL it works like a windows Service on your PC
- private const string appiumDriverURI = "http://127.0.0.1:4723";
- //Application Key of your UWA
- //U can use any .Exe file as well for open a windows Application
- private const string calApp = "Microsoft.WindowsCalculator_8wekyb3d8bbwe!App";
- protected static WindowsDriver<WindowsElement> calSession;
- [TestMethod]
- public void TestMethod1()
- {
- if (calSession == null)
- {
- DesiredCapabilities appCapabilities = new DesiredCapabilities();
- appCapabilities.SetCapability("app", calApp);
- appCapabilities.SetCapability("deviceName", "WindowsPC");
- //Create a session to intract with Calculator windows application
- calSession = new WindowsDriver<WindowsElement>(new Uri(appiumDriverURI), appCapabilities);
- //Automate Button and Get answer from Calculator
- //find by Name
- calSession.FindElement(By.Name("Nine")).Click();
- calSession.FindElement(By.Name("One")).Click();
- calSession.FindElement(By.Name("Two")).Click();
- calSession.FindElement(By.Name("Three")).Click();
- calSession.FindElement(By.Name("Multiply by")).Click();
- //find by automation id
- calSession.FindElementByAccessibilityId("num9Button").Click();
- calSession.FindElementByAccessibilityId("equalButton").Click();
- //getting value from textbox
- string ExpectedValue = calSession.FindElementByAccessibilityId("CalculatorResults").Text;
- string ExpectedValue1 = ExpectedValue.Replace("Display is ","").Replace(",","");
- //Testcases
- Assert.AreEqual(82107,Convert.ToInt64(ExpectedValue1));
- }
- }
- }
- }
Now, you can automate calculator.
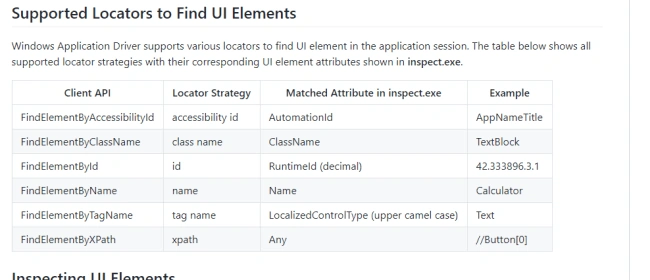
Some basic steps to find elements using Inspect.exe:
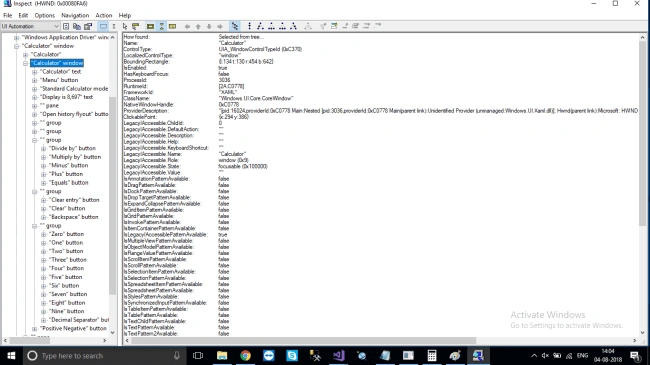
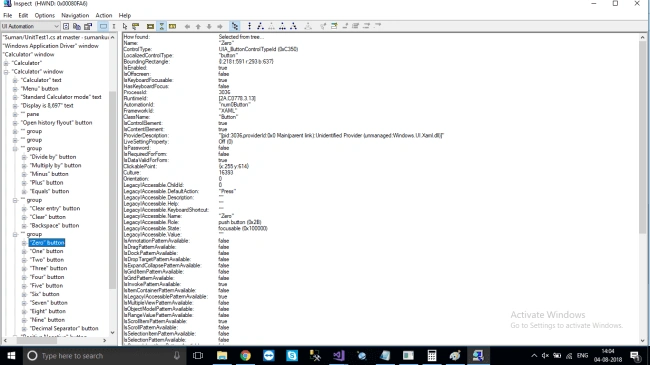
Now, we can automate any Windows application using C# as shown above. A very important note: Don't worry if you are new in identifying Elements on Inspect.exe.
Note
In the upcoming blog, I will be automating a classic Windows application.
In the upcoming blog, I will be automating a classic Windows application.
Suman Kumar SahuPosted Sep 16, 2021, 3:21 AM
using System; using System.Threading; using Microsoft.VisualStudio.TestTools.UnitTesting; using OpenQA.Selenium; using OpenQA.Selenium.Appium.Windows; using OpenQA.Selenium.Remote; namespace CalculatorAutomationWinappDriver { [TestClass] public class UnitTest1 { //Appium Driver URL it works like a windows Service on your PC private const string appiumDriverURI = "http://127.0.0.1:4723"; //Application Key of your UWA //U can use any .Exe file as well for open a windows Application private const string calApp = "Microsoft.WindowsCalculator_8wekyb3d8bbwe!App"; protected static WindowsDriver<WindowsElement> calSession; [TestMethod] public void TestMethod1() { DesiredCapabilities appCapabilities = new DesiredCapabilities(); appCapabilities.SetCapability("app", calApp); appCapabilities.SetCapability("deviceName", "WindowsPC"); //Create a session to intract with Calculator windows application var calSession1 = new WindowsDriver<WindowsElement>(new Uri(appiumDriverURI), appCapabilities); //Automate Button and Get answer from Calculator //find by Name calSession1.FindElement(By.Name("Nine")).Click(); calSession1.FindElement(By.Name("One")).Click(); calSession1.FindElement(By.Name("Two")).Click(); calSession1.FindElement(By.Name("Three")).Click(); calSession1.FindElement(By.Name("Multiply by")).Click(); //find by automation id calSession1.FindElementByAccessibilityId("num9Button").Click(); calSession1.FindElementByAccessibilityId("equalButton").Click(); //getting value from textbox string ExpectedValue = calSession1.FindElementByAccessibilityId("CalculatorResults").Text; string ExpectedValue1 = ExpectedValue.Replace("Display is ","").Replace(",",""); //Testcases Assert.AreEqual(82107,Convert.ToInt64(ExpectedValue1)); } } }
Manish kabraPosted Sep 14, 2021, 6:53 PM
Hi I am also finding the same issue mentioned by Juan Quiroga System.Net.WebException: Unable to connect to the remote server ---> System.Net.Sockets.SocketException: No connection could be made because the target machine actively refused it 127.0.0.1:4723 at System.Net.Sockets.Socket
Juan QuirogaPosted Mar 23, 2021, 5:41 PM
Hi my friend, am having the following issue while trying to run the code at the following line of code: calSession = new WindowsDriver<WindowsElement>(new Uri(appiumDriverURI), appCapabilities); The error is the following: OpenQA.Selenium.WebDriverException: 'Unexpected error. System.Net.WebException: Unable to connect to the remote server ---> System.Net.Sockets.SocketException: No connection could be made because the target machine actively refused it 127.0.0.1:4723 at System.Net.Sockets.Socket.DoConnect(EndPoint endPointSnapshot, SocketAddress socketAddress) at System.Net.ServicePoint.ConnectSocketInternal(Boolean connectFailure, Socket s4, Socket s6, Socket& socket, IPAddress& address, ConnectSocketState state, IAsyncResult asyncResult, Exception& exception) --- End of inner exception stack trace --- at OpenQA.Selenium.Appium.Service.AppiumCommandExecutor.Execute(Command commandToExecute) at OpenQA.Selenium.Remote.RemoteWebDriver.Execute(String driverCommandToExecute, Dictionary`2 parameters)'
TommyPosted Oct 1, 2020, 4:04 AM
Test method Calculator_Windows.UnitTest1.TestMethod1 threw exception: System.TypeLoadException: Method 'Dispose' in type 'OpenQA.Selenium.Appium.Service.AppiumCommandExecutor' from assembly 'appium-dotnet-driver, Version=3.0.0.2, Culture=neutral, PublicKeyToken=null' does not have an implementation.
TommyPosted Oct 1, 2020, 4:04 AM
I am getting below error msg on running above code
Andreas NeuberPosted Dec 2, 2019, 9:40 AM
Thanks for this great article! Just in case sb wonders how to find App ID of program - this worked for me: Powershell > get-StartApps | Where-Object {$_.Name -like '*<name of app>*'}
Ravi KiranPosted Aug 22, 2019, 1:12 AM
How to capture screenshot of the application under test? do we have some config settings just like we have in Coded UI?
Ronbar barPosted Jun 24, 2019, 1:38 PM
Do you know why the WinAppDriver doesn't work with Windows application form?
Rohit MaheshwariPosted Jan 15, 2019, 1:45 AM
Any alternative for Windows 7?
krishna rajuPosted Jan 4, 2019, 4:01 AM
How to get the appId for other applications.
Elias MathengePosted Sep 17, 2018, 3:03 AM
Our <a href="https://www.meldaresearch.com/5200-term-paper-writing-services-2/">term paper writing services</a> ensure that we have complied with these issues and ensured that all our clients had had their research papers on time.
Ciruthika KanesharajahPosted Aug 23, 2018, 5:47 PM
Nice explanation