
Introduction
A fragment is a reusable UI that is used to provide re-usability and for better management of screen space of a user's device. It was introduced in HONEYCOMB i.e. Android 3.0 (API level 11).
If you need to use fragments for API below 11 you will need to import android-support-v4.jar to your project dependencies.
Fragments can be used in two ways:
- Direct in XML.
- Dynamically adding the Fragment using code. This will need a frame layout to add the fragment.
Let's start with the application.
1. Create a new project and open the main XML file.
Paste this code into it.
activity_main.xml
- <LinearLayout xmlns:android="http://schemas.android.com/apk/res/android"
- xmlns:tools="http://schemas.android.com/tools"
- android:layout_width="match_parent"
- android:layout_height="match_parent"
- android:padding="10dp"
- android:orientation="vertical"
- >
- <fragment
- class="com.example.articlefragments.Fragment1"
- android:id="@+id/fragment1"
- android:layout_width="match_parent"
- android:layout_height="wrap_content"
- android:layout_marginBottom="40dp"/>
- <Button
- android:id="@+id/switchFragmentsButton"
- android:layout_height="wrap_content"
- android:layout_width="wrap_content"
- android:layout_gravity="center"
- android:layout_marginBottom="10dp"
- android:text="Switch Fragments"/>
- <FrameLayout
- android:id="@+id/frameForDynamicFragments"
- android:layout_width="match_parent"
- android:layout_height="wrap_content" >
- </FrameLayout>
- </LinearLayout>
2. Now create 3 XML files named fragment1.xml, fragment2.xml and fragment3.xml
fragment1.xml
- <?xml version="1.0" encoding="utf-8"?>
- <LinearLayout xmlns:android="http://schemas.android.com/apk/res/android"
- android:layout_width="match_parent"
- android:layout_height="match_parent"
- android:background="#ABABAB">
- <TextView
- android:layout_height="wrap_content"
- android:layout_width="match_parent"
- android:text="This is Static Fragment 1"
- android:textSize="20sp"
- />
- </LinearLayout>
- <?xml version="1.0" encoding="utf-8"?>
- <LinearLayout xmlns:android="http://schemas.android.com/apk/res/android"
- android:layout_width="match_parent"
- android:layout_height="match_parent"
- android:background="#A1A1A1" >
- <TextView
- android:layout_height="wrap_content"
- android:layout_width="match_parent"
- android:text="This is text for fragment 2"
- android:textSize="20sp"
- android:gravity="center"
- />
- </LinearLayout>
- <?xml version="1.0" encoding="utf-8"?>
- <LinearLayout xmlns:android="http://schemas.android.com/apk/res/android"
- android:layout_width="match_parent"
- android:layout_height="match_parent"
- android:background="#D1D1D1">
- <TextView
- android:layout_height="wrap_content"
- android:layout_width="match_parent"
- android:text="This is text for fragment 3"
- android:textSize="20sp"
- android:gravity="center"
- />
- </LinearLayout>
Fragment1.java
- import android.os.Bundle;
- import android.support.v4.app.Fragment;
- import android.view.LayoutInflater;
- import android.view.View;
- import android.view.ViewGroup;
- public class Fragment1 extends Fragment{
- @Override
- public View onCreateView(LayoutInflater inflater, ViewGroup container,
- Bundle savedInstanceState) {
- // TODO Auto-generated method stub
- View view = inflater.inflate(R.layout.fragment1, container, false);
- return view;
- }
- }
The three files are nearly the same, with just the difference of the layout called i.e. just replace the fragment XML file name "R.layout.fragment2" for "Fragment2.java" and "R.layout.fragment3" for "Fragment3.java".
4. Now open the MainActivity file
MainActivity.java
- import android.os.Bundle;
- import android.support.v4.app.FragmentActivity;
- import android.support.v4.app.FragmentManager;
- import android.support.v4.app.FragmentTransaction;
- import android.view.Menu;
- import android.view.View;
- import android.view.View.OnClickListener;
- import android.widget.Button;
- //The MainActivity extends FragmentActivity instead of normal Activity class.
- public class MainActivity extends FragmentActivity {
- Fragment2 fragment2;
- Fragment3 fragment3;
- Boolean isFragment2Showing;
- @Override
- protected void onCreate(Bundle savedInstanceState) {
- super.onCreate(savedInstanceState);
- setContentView(R.layout.activity_main);
- //Initialize fragment2 and fragment3
- fragment2 = new Fragment2();
- fragment3 = new Fragment3();
- // Add the fragment to the FrameLayout
- getSupportFragmentManager().beginTransaction()
- .add(R.id.frameForDynamicFragments, fragment2).commit();
- //This means that fragment2 is visible
- isFragment2Showing = true;
- //Set OnClickListener on button for switching the fragments
- ((Button)findViewById(R.id.switchFragmentsButton)).setOnClickListener(new OnClickListener() {
- @Override
- public void onClick(View v) {
- // TODO Auto-generated method stub
- switchFragments();
- }
- });
- }
- /*
- * Method to replace fragments with slide animation
- */
- private void switchFragments() {
- //Get the supported FragmentManager.
- //It is used for interaction with the Fragment. Remember that Fragments are only supported after API 11 and we have to add the android-support-v4.jar in project dependencies for backword compatability.
- FragmentManager manager = getSupportFragmentManager();
- FragmentTransaction ft = manager.beginTransaction();
- //Set the Fragment change animation
- ft.setCustomAnimations(android.R.anim.slide_in_left , android.R.anim.slide_out_right);
- //If fragment2 is showing then change to fragment3
- if (isFragment2Showing) {
- ft.replace(R.id.frameForDynamicFragments, fragment3);
- }
- //else back to fragment 2
- else {
- ft.replace(R.id.frameForDynamicFragments, fragment2);
- }
- ft.commit();
- isFragment2Showing = !isFragment2Showing;
- }
- @Override
- public boolean onCreateOptionsMenu(Menu menu) {
- // Inflate the menu; this adds items to the action bar if it is present.
- getMenuInflater().inflate(R.menu.activity_main, menu);
- return true;
- }
- }
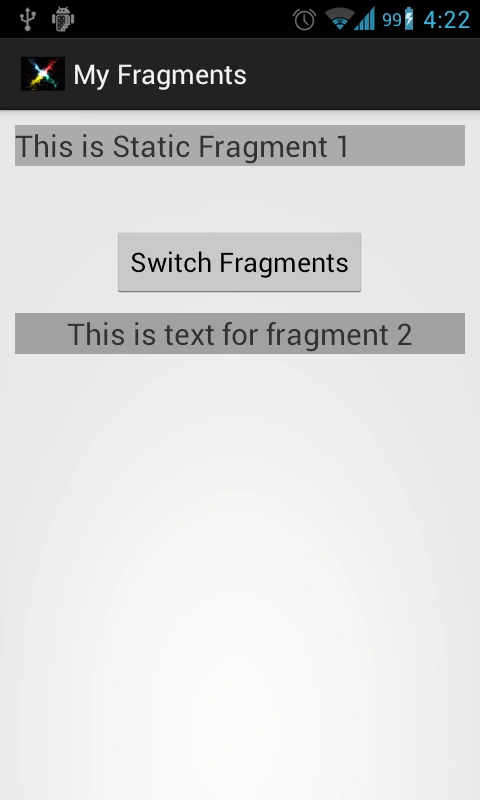
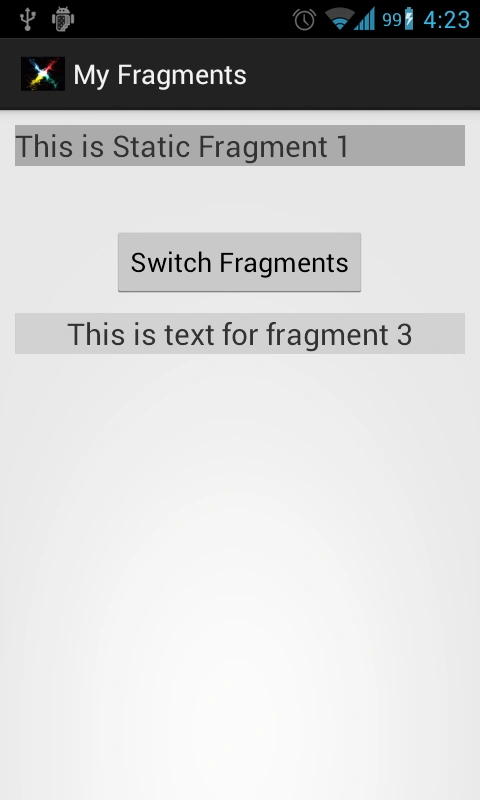
This should be the final result:
Join the conversation! Your thoughts help the community grow.