
Introduction
- onCreateOptionMenu(): the method that is called only before the optionMenu is displayed.
- getMenuInflator(): returns the MenuInflator
- onoptionsItemSelected(): called when you click on a menu item and display what you want in your Activity.
- <menu xmlns:android="http://schemas.android.com/apk/res/android" >
- <item
- android:id="@+id/menuitem3"
- android:orderInCategory="10"
- android:showAsAction="ifRoom"
- android:icon="@drawable/images"
- android:title="Refresh"
- />
- <item
- android:id="@+id/action_settings"
- android:title="Settings">
- </item>
- </menu>
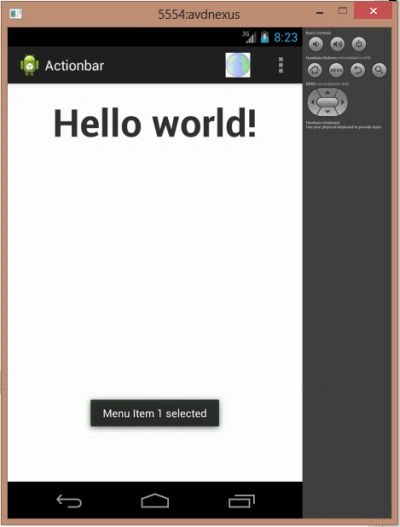
When you click on the menu item it will display a message on the Activity.
Step 1
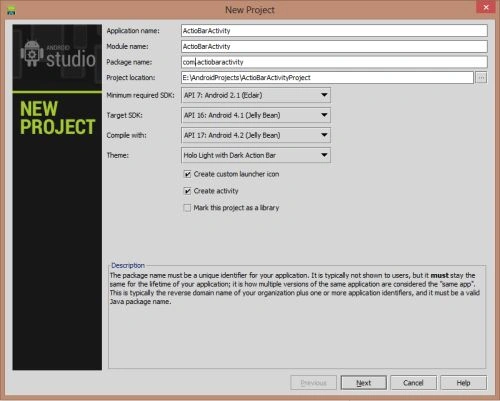
Create the project like this:
- <RelativeLayout xmlns:android="http://schemas.android.com/apk/res/android"
- xmlns:tools="http://schemas.android.com/tools"
- android:layout_width="match_parent"
- android:layout_height="match_parent"
- android:paddingLeft="@dimen/activity_horizontal_margin"
- android:paddingRight="@dimen/activity_horizontal_margin"
- android:paddingTop="@dimen/activity_vertical_margin"
- android:paddingBottom="@dimen/activity_vertical_margin"
- tools:context=".MainActivity">
- <TextView
- android:layout_width="wrap_content"
- android:layout_height="wrap_content"
- android:text="@string/hello_world"
- android:textSize="50dp"
- android:textStyle="bold"
- android:layout_centerHorizontal="true"
- />
- </RelativeLayout>
Create another XML file for the menu item as in the following:
Step 4
Create a Java class file and write this:
- <menu xmlns:android="http://schemas.android.com/apk/res/android" >
- <item
- android:id="@+id/menuitem3"
- android:orderInCategory="10"
- android:showAsAction="ifRoom"
- android:icon="@drawable/images"
- android:title="Refresh"
- />
- <item
- android:id="@+id/action_settings"
- android:title="Settings">
- </item>
- </menu>
- package com.actionbar;
- import android.app.ActionBar;
- import android.os.Bundle;
- import android.app.Activity;
- import android.view.Menu;
- import android.view.MenuItem;
- import android.widget.Toast;
- public class MainActivity extends Activity {
- @Override
- protected void onCreate(Bundle savedInstanceState) {
- super.onCreate(savedInstanceState);
- setContentView(R.layout.activity_main);
- }
- @Override
- public boolean onCreateOptionsMenu(Menu menu) {
- // Inflate the menu; this adds items to the action bar if it is present.
- getMenuInflater().inflate(R.menu.main, menu);
- return true;
- }
- @Override
- public boolean onOptionsItemSelected(MenuItem item) {
- switch (item.getItemId()) {
- case R.id.menuitem3:
- Toast.makeText(this, "Menu Item 1 selected", Toast.LENGTH_SHORT).show();
- break;
- /* case R.id.menuitem2:
- Toast.makeText(this, "Menu item 2 selected", Toast.LENGTH_SHORT)
- .show();
- break;*/
- default:
- break;
- }
- return true;
- }
- }
Step 5
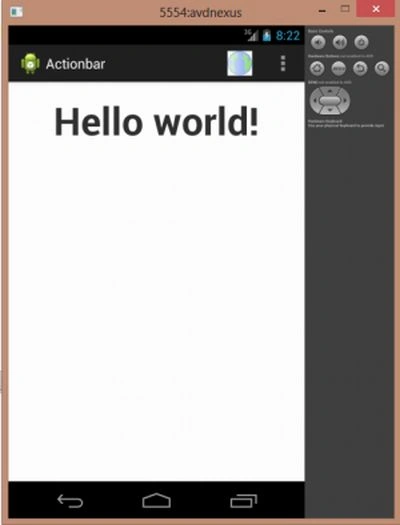 Step 6
When you click on the menu item:
Step 6
When you click on the menu item:
Join the conversation! Your thoughts help the community grow.