

jQuery UI Autocomplete enables users to quickly find and select from a pre-populated list of values as they type, leveraging searching and filtering.
jQuery UI Autocomplete can be applied on any input field, in other words any HTML field of type <input> or on a textarea, in other words <textarea>.
How does jQuery UI Autocomplete help?
It helps to do the intellisense or to display the available options to the user for a particular input field. Basically it acts as a plugin when integrated with any TextBox. Start searching for the matching records (filtering the records from the available or the provided source) and display it to the user for the selection. The user can filter the records for better matches by entering more precise values. It also helps in achieving some functionality like, on entering a specific zip code something is automatically filled in. The data source for the autocomplete can be local (present on the client side) or it can be remote (present on the server for example database).
Autocomplete also provides the user interaction with the list via the keyboard also. So basically the user can move up and down using arrow keys.
Applying styles on the Autocomplete box and the selection list
One can also customize the look and feel of the autocomplete TextBox and the selection list. By default the jQuery UI CSS styles are used and one can modify them by extending the CSS classes (by extending I mean overwriting the styles in the applied classes).
Various functionalities and properties (some of the frequently used properties) exposed by jQuery UI Autocomplete are:
- Autofocus: If this property is set to "true" then the first item in the selection list is automatically selected when the options are shown.
- Delay: One can set the delay required, this allows configuration of how much time the available options are shown in the selection list or the drop down that is opened below the input field. So if the input is local then the filtration on the local data source is performed after the specified delay and then the filtered records are displayed. And if the data source is a remote data source then the server is made to get the filtered records from the database after the specified delay. It helps in preventing the frequent server hits to the server or minimizes the filtration processing if the data source is local. What actually happens is that if the delay is 1000 ms and the user continues to enter the values (characters) in the TextBox then the server hit occurs after the 1000 ms when the user stops entering the values.
- Minlength: This property specifies the minimum required characters that the user should input before looking for the available optionvalues. So if it is set to 3 then the filtered records (if any are present matching those characters depending upon your filtration criteria) are shown only when the user enters three characters.
- Position: Position of the selection list can be specified relative to the input field. Some of the available options are LeftTop, LeftBottom, RightTop, RightBottom. The position of the selection list can also be specified relative to the other elements present on the same mask.
- Source: This is the actual data source of the options available to the user. It can be Local or Remote. To specify the local data source, one must provide an array of items (items can be just a string or can be an object with a label and value properties, label if the property for the value that will be shown in the selection list or the drop down list whereas value is the property for the value or the string that will be shown inside the input field when the user selects an option. If one of them is specified then it applies to both properties). To specify the remote data source one has to give a URL string (that returns the JSON data) to the source. The server can get the value the user entered (on which the filtration can be performed on the server dynamically) in a query string parameter named "term" when an AJAX get request is made.
Various Methods exposed by jQuery UI Autocomplete
Some methods available help in controlling the selection list via script (in other words JavaScript or jQuery scripting). I will not go into too much details of it since they are self-explanatory (by their names) and not used very frequently since one rarely needs to play around with the Autocomplete box via script.
- Close: This method closes the auto complete selection list
- Disable: This method disables the autocomplete feature on an input field
- Enable: If you disable the autocomplete feature then there must be some way to enable it, this is the method for doing that.
- Option (3 Overloads): One to get a specified option (by label; I hope you can now understand the difference between label and value in autocomplete), one to set the value of specified option, and one to get the entire option hash (in other words the data source or one can say the filtered data source if the user tried to filter it depending upon some input in the input box)
- Search: You can forcefully make a search (maybe on a click of some button present in your form) on a particular value or the value in the input field entered by the user using the "this" method.
Various Events exposed or triggered by jQuery UI Autocomplete
These events will help one in achieving custom functionalities or to do something on the back end when the user starts playing (or using) the control.
- Change Event: As the name indicates and for the developers familiar with the JavaScript onchange event, this is triggered if the focus is moved out and the value gets changed in the input field.
- Close Event: This event is fired when the selection list or the drop down list showing the available option to the user is closed.
- Create Event: This event is fired on the creation of autocomplete much more like an init event. For those who are familiar with the init event they can easily use it but for those unfamiliar with it, this is the event that every control exposes (independent of the technology) and is fired when the control is created.
- Focus Event: This event is fired when a particular option in the selection list is focussed on by the user by using keyboard keys (Arrow keys up or down). Don't confuse it with the mouse hover. It is fired for keyboard interaction, is only fired when the user is focussing a particular option by moving into the available option list up and down. It is not fired on selection. The default functionality attached to this event is to place the focussed option value into the input field or the text field.
- Open Event: This event is fired whenever the new search is performed and the selection list is opened with the filtered items. So this event is also fired when the search is performed and there are no suggested options that can be presented to the user. Consider that this event is fired in case of an update of the filtered options (presented to the user).
- Response Event: This event is fired when the search is performed before the available options are shown to the user. So if one wants to manipulate the result set or write down some custom login to modify the result or to do anything before the result is shown to the user, this event is the best place.
- Search Event: Once the user enters the minimum characters required to make a search then the search request is made to get the suggestion data (In case of a delay, the specified search is made after a delay interval from the mentioned scenario). So just before making the request to get the suggestion data Search event is fired. If one needs to do anything custom before making a request to get the suggestion data, this event is helpful.
- Select Event: On this event the selected item from the selection list is populated to the input field or the text field and the selection list is closed. This is the default behaviour for this event. By user selection I mean that a user is traversing down the available options by keyboard keys and then presses enter to select a particular item or user selects an item from the list via mouse click.
This is most of the details of the jQuery UI Autocomplete; I think we can now go into the technical details of how we can implement it. I am a guy from the .Net background (using C#), so I am sorry but my implementation examples somehow will be in the same technology or language (especially the server side code showing the remote search). But it doesn't mean that it will not work in Java Web forms (JSP) or may be some other pages. Here I will be presenting how it can be implemented in simple HTML pages.
Some of the prerequisites for using jQuery UI Autocomplete are:
- jQuery Library: Can be downloaded from CDN (Content Delivery Network: http://code.jquery.com/jquery-1.9.1.js) or one can give link directly.
- jQuery UI Library: Can be downloaded from CDN (Content Delivery Network: http://code.jquery.com/ui/1.10.3/jquery-ui.js) or one can give link directly.
- jQuery UI CSS: Can be downloaded from CDN (Content Delivery Network: http://code.jquery.com/ui/1.10.3/themes/smoothness/jquery-ui.css) or one can give link directly.
One can also use the minified version of all of these or any other version (Just ensure that they are using the required version of the dependent library).
Example of Local Data Source
The HTML page complies with HTML5 standards.
HTML
<!doctype html>
<html>
<head>
<title>Local Data Source Sample</title>
<link rel="stylesheet" href="http://code.jquery.com/ui/1.10.3/themes/smoothness/jquery-ui.css" />
<script src="http://code.jquery.com/jquery-1.9.1.js" type="text/javascript" language="javascript"></script>
<script src="http://code.jquery.com/ui/1.10.3/jquery-ui.js" type="text/javascript"
language="javascript"></script>
</head>
<body>
<input id="txtTest" type="text" />
</body>
<script type="text/javascript"
language="javascript">
$("#txtTest").autocomplete({
source: ["Test Value 1", "Test Value 2", "Test Value 3", "Unique Value"]
});
</script>
</html>
Screenshot of the running sample:
This is a very simple example with the static data source.
Example of Remote Data Source
Here I will show you the use of some of the properties and events of the Autocomplete. We will make an AJAX request on the server to get the data during runtime in JSON format. Values from the client will be passed in the form of a query string and a HTTP Handler will be created to serve the request.
HTML
<!doctype html>
<html>
<head>
<title>Remote Data Source Sample</title>
<link rel="stylesheet" href="http://code.jquery.com/ui/1.10.3/themes/smoothness/jquery-ui.css" />
<script src="http://code.jquery.com/jquery-1.9.1.js" type="text/javascript" language="javascript"></script>
<script src="http://code.jquery.com/ui/1.10.3/jquery-ui.js" type="text/javascript"
language="javascript"></script>
</head>
<body>
<input id="txtTest" type="text" />
</body>
<script type="text/javascript" language="javascript">
$("#txtTest").autocomplete({
source: function (request, response) {
$.ajax({
url: "/default.Test", //Request is being made to the handler for extension test
dataType: "json",
data: {
term: request.term//You can also send more query string parameters here seperated by comma. request.term will send the value present in the textbox
},
success: function (data) {
if (data != null && data != '') {
response($.map(data, function (item) {
return {
label: item.FirstName + ' ' + item.LastName,
value: item.FirstName + ' ' + item.LastName //You can add more properties here
};
}));
} else {
$('ul[class*=ui-autocomplete]').hide();
}
}
});
},
minLength: 3,
cache: false,
select: function (event, ui) {
if (ui != null && ui.item != null) {
$("#txtTest").val(ui.item.value);
}
//The below code is written to prevent the execution of default button functionality on press of ENTER key
var code = (event.keyCode ? event.keyCode : event.which);
if (code == 13) {
event.preventDefault();
event.stopPropagation();
}
return false;
}
});
</script>
</html>
The sample is to get the users from the server and to show their first name and the last name in the selection list of autocomplete.
In the preceding sample you can see that the source is a function in which we are making an AJAX GET request to get the data from the server in JSON format. An AJAX request is being made to the HTTP Handler with extension "*.Test". The value that the user entered in the TextBox is passed as a query string parameter "term" and "request.term" helps us in getting the value present in the TextBox and to send it to the server. If the Request is successful and we receive some data from the server then we return the array of objects (the objects contain two properties as we discussed earlier, "label" and "value", as of now both of these properties contain the first name and the last name separated by a space).
I have used three properties and an event in the sample above.
- Source: Discussed in the preceding paragraph
- Minlength: Already Discussed
- Cache
- Select Event: Already Discussed
Cache is the property that helps in specifying that if the request needs to be made on the server again to get the data, or it can be served locally. So suppose there is a user "Abhishek Jain". If the user enters "abh" for the first time then the server hit is made sending "abh" in the term query string and gets the data. There is one suggested user "Abhishek Jain". Now if the user deletes "abh" and enters something else then another request will be made to the server, but if the user enters "abh" again in the TextBox then the server hit is not made and the data that was fetched initially for "abh" will be shown. Other properties that I mentioned above can also be used in a similar way.
I will now explain how to create a HTTP Handler. Before starting it one should understand what a HTTP Handler is and why I have created a handler in this case.
HTTP Handler
HttpHandler is an extension-based processor, in other words pre-processing logic is executed depending on file extensions. So any request coming to the server for a particular file extension will be served a particular handler for that extension. We can also create custom HTTP handlers to serve our request for a special extension. HTTP Handlers can be synchronous or asynchronous. My example will focus on how to create an Asynchronous HTTP handler.
Why I Created a HTTP Handler
Actually I wanted to make an server request, either I can make it to a Web Method included in some page, or I can make that request to some service endpoint to get the data in JSON format, or, as I have chosen to, create a HTTP handler to serve my request. My motivation behind this is that whenever I want a similar kind of Autocomplete box, I create a user control with this functionality so in any application of mine that I want a similar behaviour I can use that control and can just register this HTTP Handler for that side and the Autocomplete control will be running with the same functionality, although it can also be done using Web Services or any other services but that will be a time-consuming task and I don't prefer to create a service just to return data for a autocomplete TextBox.
How to create a HTTP Handler (specific to .Net)
First of all create a class defining the handler. In my scenario suppose "TestHandler.cs". Now inherit that class from an interface "IHttpHandler" but in my case since I want an asynchronous HTTP handler I will inherit it from "IHTTPAsyncHandler". `Now here I need to implement three methods, two from IHttpAsyncHandler, in other words BeginProcessRequest and EndProcessRequest and the third one from IHttpHandler, in other words ProcessRequest. This class will actually be creating a new operation instance (Operation is the entity that will actually be accomplishing the task and returning the result). I will explain in the next block how to create an Operation class or Entity. The Handler class will look like:
public class TestHandler : IHttpAsyncHandler
{
#region Public Members
/// <summary>
/// Is reusable property of the handler
/// </summary>
public bool IsReusable { get { return false; } }
#endregion
#region IHttpAsyncHandler Members
/// <summary>
/// begin process request event fired on the starting of the handler request
/// </summary>
/// <param name="httpContext"></param>
/// <param name="asyncCallback"></param>
/// <param name="extraData"></param>
/// <returns></returns>
public IAsyncResult BeginProcessRequest(HttpContext httpContext, AsyncCallback asyncCallback, Object extraData)
{
IAsyncResult handlerResult = null;
//Checks if the user is an authenticated user
if (httpContext != null && httpContext.User != null && httpContext.User.Identity != null && httpContext.User.Identity.IsAuthenticated)
{
//Instance of Operation entity which will actually be accomplishing the task
TestOperation testOperation = new TestOperation(asyncCallback, httpContext, extraData);
testOperation.StartAsyncWork();
handlerResult = testOperation;
}
return handlerResult;
}
/// <summary>
/// end process request event fired on the end of the handler request
/// </summary>
/// <param name="result"></param>
public void EndProcessRequest(IAsyncResult result)
{
}
#endregion
#region IHttpHandler Members
/// <summary>
/// Process Request, handle something which needs to be done on http contect request processing
/// </summary>
/// <param name="context"></param>
public void ProcessRequest(HttpContext context)
{
}
#endregion
}
If you want more details of the methods and properties that are present in this class then please refer to the MSDN. This is out of the scope of my article.
Now I will create an Operation class that looks like this:
public class TestOperation : IAsyncResult
{
#region Private Members
private bool completed;
private Object state;
private AsyncCallback callback;
private HttpContext context;
bool IAsyncResult.IsCompleted { get { return completed; } }
WaitHandle IAsyncResult.AsyncWaitHandle { get { return null; } }
Object IAsyncResult.AsyncState { get { return state; } }
bool IAsyncResult.CompletedSynchronously { get { return false; } }
#endregion
#region CTOR
/// <summary>
/// Test operation constructor
/// </summary>
/// <param name="asyncCallback"></param>
/// <param name="httpContext"></param>
/// <param name="objectState"></param>
public TestOperation(AsyncCallback asyncCallback, HttpContext httpContext, Object objectState)
{
callback = asyncCallback;
context = httpContext;
state = objectState;
completed = false;
}
#endregion
#region Public Methods
/// <summary>
/// Starts Asynchronous work
/// </summary>
public void StartAsyncWork()
{
ThreadPool.QueueUserWorkItem(new WaitCallback(StartAsyncTask), null);
}
#endregion
#region Private Methods
/// <summary>
/// Starts the actual task
/// </summary>
/// <param name="workItemState"></param>
private void StartAsyncTask(Object workItemState)
{
context.Response.ContentType = "application/json";
context.Response.ContentEncoding = Encoding.UTF8;
string searchBy = context.Request.QueryString["term"] != null ?
context.Request.QueryString["term"] : string.Empty;
string result = string.Empty;//Result string which will contain the result in JSON format
//Get the data from the database or some other data source (Either get the filtered data using searchBy string or filter it here by using searchBy string)
context.Response.Write(result);
completed = true;
callback(this);
}
#endregion
}
With this we are done with the creation of the handler, now build the project in which these two classes are present (a DLL will be created that we will mention while registering the handler for a particular site on the server).
Registration of the created handler on a particular site
There are two ways of registering it as in the following:
- Register it in IIS (Internet Information Server)
- Do the registration via Web.Config file
Registering a Handler on IIS
Open IIS, select your site under it and for that particular site open the "Handler Mapping" section and click on "Add Managed Handler".

By this <Namespace> I mean the full namespace of that class if any.
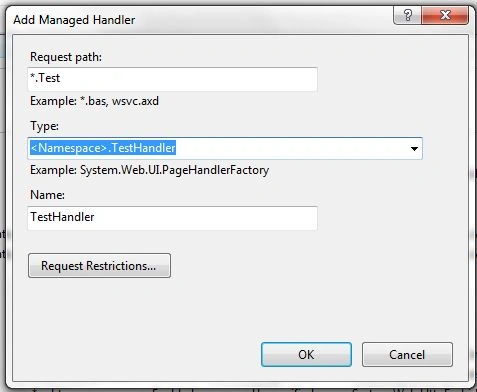
Registration via Web.Config
Open up the web.config file and make the following handler mapping in the Handler section:
<system.webServer>
<handlers>
<add name="TestHandler" path="*.Test" verb="*" type=""<Namespace>.TestHandler" preCondition="integratedMode" />
</handlers>
</system.webServer>
One this is done we are good to go and one will see the Autocomplete working with the Data from the server.
Dinesh BeniwalPosted Aug 7, 2013, 1:05 AM
Good Start Abhishek, Welcome to the C# Corner.