

Introduction
This article explains how to dynamically bind the data of a view to the model and retrieve the data from the model by the controller in a Web API.
Let's see the example of dynamically binding the view data.
Step 1
First create a Web API application as in the following:
- Start Visual Studio 2012.
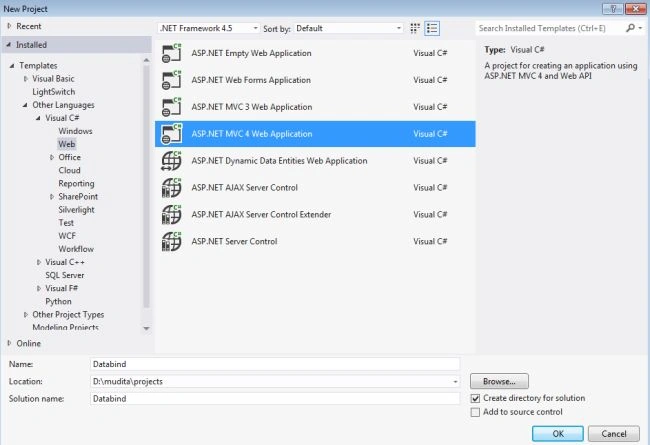
- From Start Window select "Installed" -> "Visual C#" -> "Web".
- Select "ASP.NET MVC 4 Web Application" and click the "OK" button.
- From the "MVC4 Project" Window select "Web API".
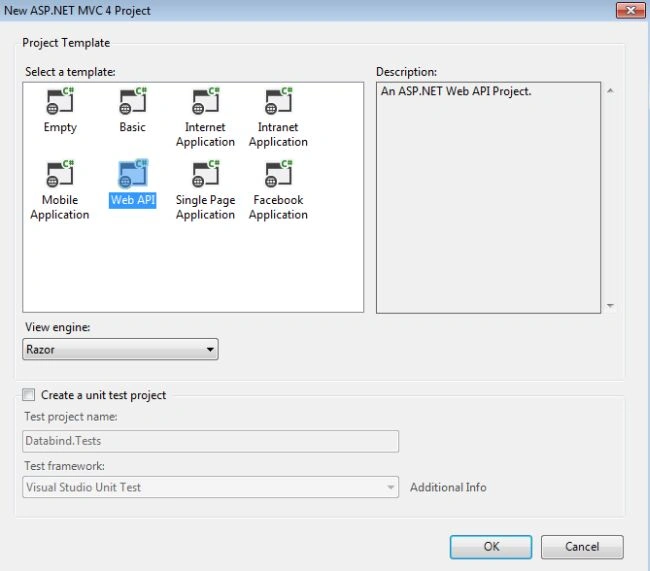
- Click the "OK" button.
Step 2
Create a model class "Bind.cs".
- In the "Solution Explorer".
- Right-click on the "Model" then seelct "Add" -> "Class".
- Select "Installed" -> "Visual C#" and select "Class".
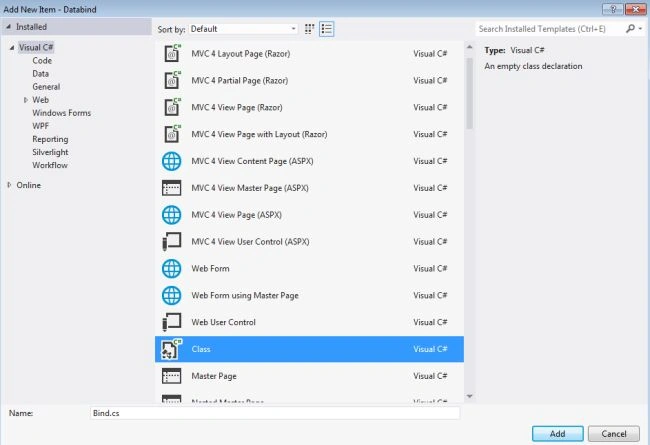
- Click the "OK" button.
Add the following code:
- using System;
- using System.Collections.Generic;
- using System.ComponentModel;
- using System.Linq;
- using System.Web;
- namespace Databind.Models
- {
- public class Bind
- {
- [DisplayName("Your Name:")]
- public string F_Name
- {
- get;
- set;
- }
- [DisplayName("Your Last name")]
- public string L_Name
- {
- get;
- set;
- }
- [DisplayName("Your Address")]
- public string Add
- {
- get;
- set;
- }
- [DisplayName("Your State")]
- public string state
- {
- get;
- set;
- }
- }
- }
Step 3
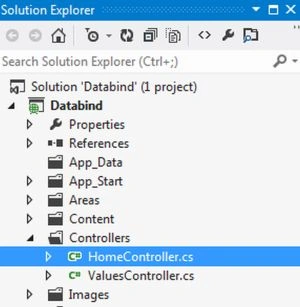
In the "HomeController.cs" file write some code. This file exists:
- In the "Solution Explorer".
- Select "Controller" -> "HomeController".
Add the following code:
- using System;
- using System.Collections.Generic;
- using System.Linq;
- using System.Web;
- using System.Web.Mvc;
- using Databind.Models;
- namespace Databind.Controllers
- {
- public class HomeController : Controller
- {
- public ActionResult Index()
- {
- return View();
- }
- [HttpPost]
- public ActionResult ClientInfo(Bind bind)
- {
- return View(bind);
- }
- }
- }
Step 4
Create a View Page, "Index.aspx" as in the following:
-
In the "Solution Explorer".
-
Right-click on "Home" then select "Add" -> "New Item".
-
Select "Installed" -> "Visual C#" -> "Web" and select "MVC4 View Page (ASPX)".
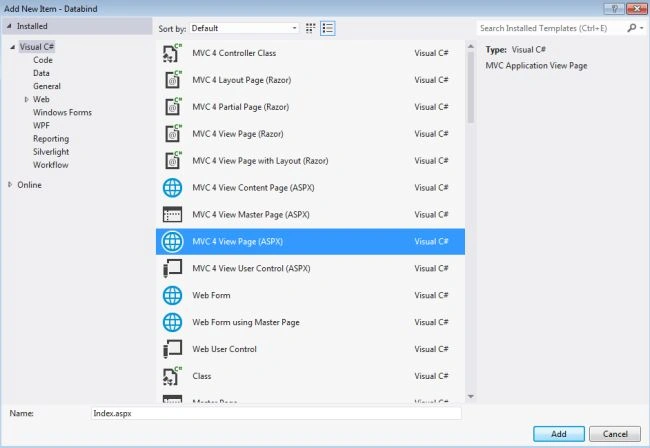
Click the "Add" button.
Add the following code:
- <%@ Page Language="C#" Inherits="System.Web.Mvc.ViewPage<Databind.Models.Bind>" %>
- <!DOCTYPE html>
- <html>
- <head runat="server">
- <meta name="viewport" content="width=device-width" />
- <title></title>
- </head>
- <body>
- <% using (Html.BeginForm("ClientInfo","Home",FormMethod.Post)) %><%{ %>
- <div>
- <center>
- <h2>Enter Details:</h2>
- <table style="font-family:Calibri" >
- <tr>
- <td> <%: Html.LabelFor(m => m.F_Name) %> </td>
- <td> <%: Html.TextBoxFor(m => m.F_Name) %> </td>
- </tr>
- <tr>
- <td> <%: Html.LabelFor(m => m.L_Name) %> </td>
- <td> <%: Html.TextBoxFor(m => m.L_Name) %> </td>
- </tr>
- <tr>
- <td> <%: Html.LabelFor(m => m.Add) %> </td>
- <td> <%: Html.TextBoxFor(m => m.Add) %> </td>
- </tr>
- <tr>
- <td> <%: Html.LabelFor(m=>m.state) %></td>
- <td> <%: Html.TextBoxFor(m => m.state) %> </td>
- </tr>
- <tr>
- <td colspan="3" align="center">
- <input type="submit" value="Submit"/>
- </td>
- </tr>
- <% } %>
- </table>
- </center>
- </div>
- </body>
- </html>
Step 5
Create another View Page "ClientInfo.aspx". We use the same procedure as in Step 3.
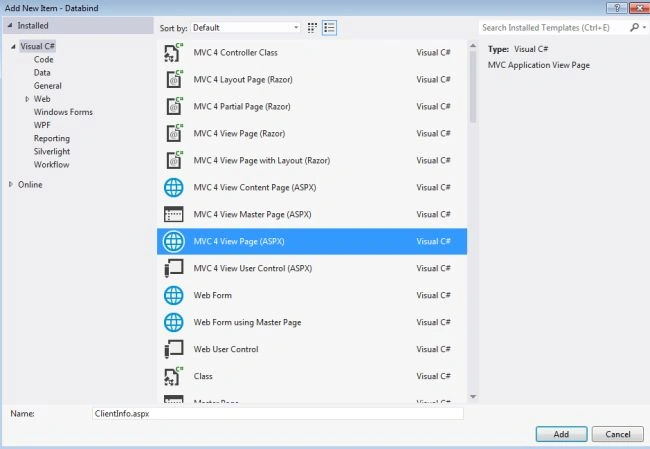
Add the following code:
- <%@ Page Language="C#" Inherits="System.Web.Mvc.ViewPage<Databind.Models.Bind>" %>
- <!DOCTYPE html>
- <html>
- <head runat="server">
- <meta name="viewport" content="width=device-width" />
- <title>ClientInfo</title>
- </head>
- <body>
- <div>
- <h2>Welcome! <%: Html.Label(ViewData.Model.F_Name)%>
- <%: Html.Label(ViewData.Model.L_Name)%></h2>
- <h2>Belongs to <%: Html.Label(ViewData.Model.Add)%>
- <%: Html.Label(ViewData.Model.state) %>
- </h2>
- </div>
- </body>
- </html>
Step 6
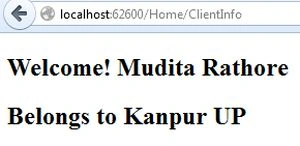
Execute the application; press "F5". The output looks as in the following:
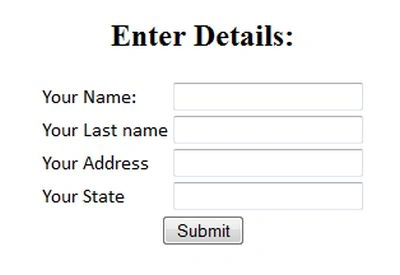
Fill in the following detail:
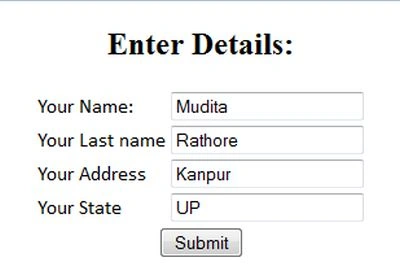
Click the "Submit" button.
Gowtham RajamanickamPosted Apr 14, 2016, 11:16 PM
Good info..
Mukesh KumarPosted Oct 20, 2015, 12:50 AM
Good Job
vikas vyasPosted Jan 21, 2015, 3:44 AM
nice