
Introduction
Ajax (Asynchronous
JavaScript and XML) is new web development technique use for the interactive
website. AJAX help we can developed web application and retrieve small amount of
data from web server. AJAX consist a different type of technology.
- JavaScript
- XML
- Asynchronous Call to the server
TextBoxWatermarkExtender Control
The TextBoxWatermark is an ASP.NET AJAX extender that can be attached to an ASP.NET TextBox control to get "watermark" behavior. When a watermarked TextBox is empty, it displays a message to the user with a custom CSS Style. The watermark is typically used to provide more information to the user about the TextBox itself without cluttering up the rest of the page. The Watermark displays some text and style which are specified whether that value is present or not in the textbox.
Property
- TargetControlID
- BehaviorID
- Watermarkcssclass
- Watermarktext
Step 1 : Open Visual Studio 2010.
- Go to File->New->WebSite
- Select ASP.NET Empty WebSite
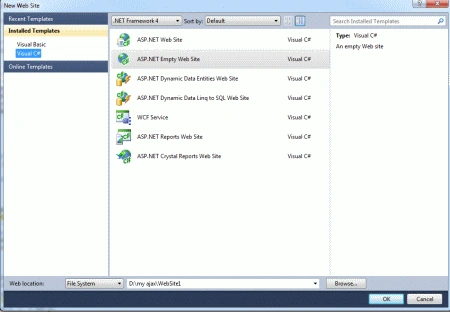
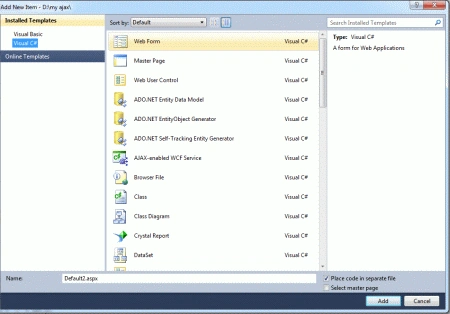
Step 2 : Go to Solution Explorer and right-click.
- Select Add->New Item
- Select WebForm
- Default.aspx page open
Step 3 : Go to Default.aspx page and click on the [Design] option and drag control from Toolbox.
- Drag a Updatepanel, ScriptManager, TextBox, Label and a Button
ContentTemplate for UpdatePanel
Step 4 : Go to Default.aspx
page[Source]option and define <contentTemplate> for the UpdatePanel.
Code
<ContentTemplate>
Name
<asp:TextBox
ID="TextBox1"
runat="server"></asp:TextBox>
<br
/>
<br
/>
<asp:TextBoxWatermarkExtender
ID="TextBoxWatermarkExtender1"
runat="server"
TargetControlID
="TextBox1" WatermarkText="textthe
my name" WatermarkCssClass="watermarked">
</asp:TextBoxWatermarkExtender>
Age
<asp:TextBox
ID="TextBox2"
runat="server"></asp:TextBox>
</ContentTemplate>
Step 5 : Go to
Default.aspx page[Design] option and go to UpdatePanel property.
- Define childrenTriggerproperty is "True"
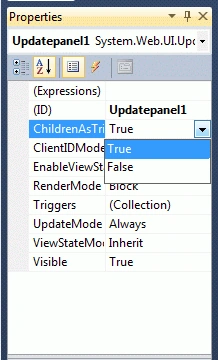
Step 6 : Now go to Default.aspx[Design]option and drag TextBoxWatermarkExtender control from Toolbox.
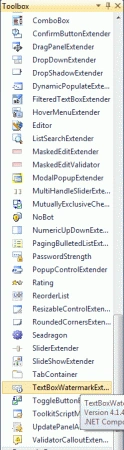
Step 7 : Go to Default.aspx[Source] option and define TargetcontrolID, WatermarkText, WatermarkTextCssClass and write a code.
Code
<asp:TextBoxWatermarkExtender
ID="TextBoxWatermarkExtender1"
runat="server"
TargetControlID
="TextBox1" WatermarkText="textthe
my name" WatermarkCssClass="watermarked">
</asp:TextBoxWatermarkExtender>
Step 8 : Go to
Default.aspx.cs file and write a code.
Code
using
System;
using
System.Collections.Generic;
using
System.Linq;
using System.Web;
using
System.Web.UI;
using
System.Web.UI.WebControls;
public
partial class
_Default : System.Web.UI.Page
{
protected void
Page_Load(object sender,
EventArgs e)
{
Button1_Click(null,
null);
}
protected void
Button1_Click(object sender,
EventArgs e)
{
string name = ((""
== TextBox1.Text) ? "[blank]" :
TextBox1.Text);
string age = ((""
== TextBox2.Text) ? "[blank]" :
TextBox2.Text);
Label1.Text = HttpUtility.HtmlEncode(string.Format("Hello
{0} {1}!", name, age));
}
}
Step 9 :
Go to Default.aspx page option and write a
code.
Code
<form
id="form1"
runat="server">
<asp:ScriptManager
ID="ScriptManager1"
runat="server">
</asp:ScriptManager>
<div
style="background-color:
#86DF9C">
<br
/>
MY AJAX APPLICATION WITH ASP.NET
<br
/>
<br
/>
<asp:updatepanel
ID="Updatepanel1"
runat="server"
ChildrenAsTriggers="true">
<ContentTemplate>
Name
<asp:TextBox
ID="TextBox1"
runat="server"></asp:TextBox>
<br
/>
<br
/>
<asp:TextBoxWatermarkExtender
ID="TextBoxWatermarkExtender1"
runat="server"
TargetControlID
="TextBox1" WatermarkText="textthe
my name" WatermarkCssClass="watermarked">
</asp:TextBoxWatermarkExtender>
Age
<asp:TextBox
ID="TextBox2"
runat="server"></asp:TextBox>
<br
/>
<br
/>
<asp:TextBoxWatermarkExtender
ID="TextBoxWatermarkExtender2"
runat="server"
TargetControlID
="TextBox2" WatermarkCssClass
="watermarked"
WatermarkText ="textage">
</asp:TextBoxWatermarkExtender>
<br
/>
<br
/>
<asp:Button
ID="Button1"
runat="server"
Text="Submission"
onclick="Button1_Click"
/>
<br
/>
<br
/>
<asp:Label
ID="Label1"
runat="server"
Text="Label"></asp:Label>
</ContentTemplate>
</asp:updatepanel>
</div>
</form>
Step 10 :
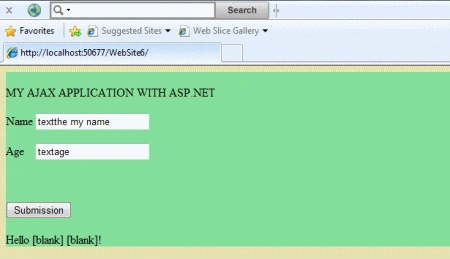
Now run the application by Pressing F5.
Step 11 :
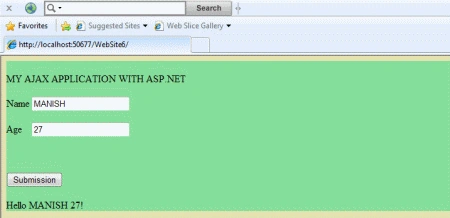
Now we define name, age and click on
submission button then following output show.
Resource
Manish SinghPosted Jan 18, 2012, 3:07 PM
Really good explanation