

In this article I will integrate or use the Timer in a Windows Store Application Using XAML and C#. Sometimes the developer needs to do work at some time interval and to delay until that time they need to have a mechanism to automatically trigger an event at a specific time interval. So, this article will help those who want to run their particular block of code at a regular time interval.
So, here I will use the DispatcherTimer class to do that in a Windows Store Application.
Introduction of DispatcherTimer
The DispatcherTimer can be used to run code on the same thread that produces the UI thread. This provides a timer that is integrated into the Dispatcher queue, which is processed at a specified interval of time and at a specified priority.
Here I will discuss some necessary members of this class.
Methods of DispatcherTimer Class.
There are mainly two types of methods of this class.
- Start: Starts the DispatcherTimer with specified members.
- Stop: Stops the DispatcherTimer.
Properties of DisptacherTimer Class.
- Interval: It specified the time interval of the trigger. In the other words it gets or sets the amount of time between interval ticks.
- IsEnabled: It gets a value that indicates whether the timer is running or not. It returns Boolean, true if the timer is enabled; otherwise, false. By default it sets false.
Event
DispatcherTimer has a Tick event.
- Tick: The Tick event fires after the time specified the for the interval has elapsed.
Note: Tick continues firing at the same interval until the Stop method is called.
So, I think you are now all familiar with the DispatcherTimer Class from the preceding description.
Now, let's start to create an application in which I integrated the DispatcherTimer Class.
First, choose Blank Template of the Windows Store using XAML.
Step 1
After that, I design my UI interface in XAML file, as in:
<Page
x:Class="TimerInWindowsStoreApps.MainPage"
xmlns="http://schemas.microsoft.com/winfx/2006/xaml/presentation"
xmlns:x="http://schemas.microsoft.com/winfx/2006/xaml"
xmlns:local="using:TimerInWindowsStoreApps"
xmlns:d="http://schemas.microsoft.com/expression/blend/2008"
xmlns:mc="http://schemas.openxmlformats.org/markup-compatibility/2006"
mc:Ignorable="d" Loaded="Page_Loaded_1" >
<Grid Background="{StaticResource ApplicationPageBackgroundThemeBrush}">
<StackPanel Orientation="Vertical" Margin="20,50" HorizontalAlignment="Center">
<TextBlock x:Name="TimerLog" FontSize="30"></TextBlock>
<TextBlock x:Name="TimerStatus" FontSize="25"></TextBlock>
<StackPanel Orientation="Horizontal">
<Button x:Name="TimerStart" Content="Start" Click="TimerStart_Click_1"></Button>
<Button x:Name="TimerStop" Content="Stop" Click="TimerStop_Click_1"></Button>
</StackPanel>
</StackPanel>
</Grid>
</Page>
In the above code I use two buttons for starting and stopping the timer and texblocks to display the status of the timer.
Step 2
Now, let's explore the DispatcherTimer Class in .cs file.
First I create a method that sets up all the necssary members of the DispatcherTimer class. Here we need to follow some steps.
- Create object of DispatcherTimer Class:
DispatcherTimer dispatcherTimer = newDispatcherTimer();
- Registered Tick event:
dispatcherTimer.Tick += dispatcherTimer_Tick;
- Set the Interval property:
dispatcherTimer.Interval = newTimeSpan(0, 0, 1);
- At last, start the timer using Start() method:
dispatcherTimer.Start();
- And, stop the timer using Stop() method:
dispatcherTimer.Stop();
Complete code for understanding the entire thing:
using System;
using Windows.UI.Xaml;
using Windows.UI.Xaml.Controls;
using Windows.UI.Xaml.Controls.Primitives;
using Windows.UI.Xaml.Input;
using Windows.UI.Xaml.Media;
using Windows.UI.Xaml.Navigation;
namespace TimerInWindowsStoreApps
{
public sealed partial class MainPage : Page
{
public MainPage()
{
this.InitializeComponent();
}
DispatcherTimer dispatcherTimer;
int timesTicked = 1;
int timesToTick = 50;
public void DispatcherTimerSetup()
{
dispatcherTimer = new DispatcherTimer();
dispatcherTimer.Tick += dispatcherTimer_Tick;
dispatcherTimer.Interval = new TimeSpan(0, 0, 1);
dispatcherTimer.Start();
TimerStatus.Text = "dispatcherTimer.IsEnabled = " + dispatcherTimer.IsEnabled + "\n";
}
void dispatcherTimer_Tick(object sender, object e)
{
TimerLog.Text = timesTicked.ToString();
if (timesTicked > timesToTick)
{
TimerStatus.Text = "Calling dispatcherTimer.Stop()\n";
dispatcherTimer.Stop();
TimerStatus.Text = "dispatcherTimer.IsEnabled = " + dispatcherTimer.IsEnabled + "\n";
}
timesTicked++;
}
private void TimerStart_Click_1(object sender, RoutedEventArgs e)
{
TimerStatus.Text = "Calling dispatcherTimer.Start()\n";
DispatcherTimerSetup();
}
private void TimerStop_Click_1(object sender, RoutedEventArgs e)
{
TimerStatus.Text = "Calling dispatcherTimer.Stop()\n";
dispatcherTimer.Stop();
TimerStatus.Text = "dispatcherTimer.IsEnabled = " + dispatcherTimer.IsEnabled + "\n";
}
private void Page_Loaded_1(object sender, RoutedEventArgs e)
{
TimerStatus.Text = "dispatcherTimer.IsEnabled = False";
}
}
}
Step 3
Finally, let's run the application and see what happened.
You now click on the Start button to start the timer. It will show you that the timer is enabled.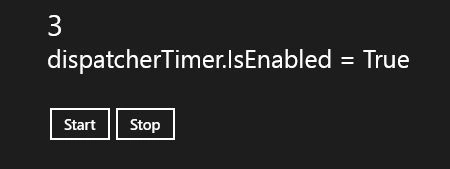
And, when you click the stop button, it will show you that the timer is disabled. This means that the timer is not in the running mode.
Georgie WebberPosted Apr 18, 2013, 2:37 AM
Windows Store Applicatio is now converted to Windows 8 App by Microsoft in .NET fRAMEWORK 4.5 WITH VISUAL STUDIO 2102..
Nikolay PraysPosted Mar 19, 2013, 3:15 PM
What is "Windows Store Application"? Where is it in Visual Studio?