

Today, in this article we will overlook at two main keywords i: e IS and AS functionalities and we will implement practically to understand better.
- IS Keyword :
This Keyword is used to check the passed object compatibility with the give type. It evaluates the code if it is true or false and executes the expected operation.
- AS Keyword:
This Keyword is used to check the compatibility with the given references types. It performs casting operation and double checks whether the passed values is null or not null. This then executes the block of code based on the decision.
Now, it's time for us to go and do some
practical implementations using these keywords. Let's See how better we can
implement and such that it should be also easy to understand.
Code Toolbox Requirements:
- Grid View and Button
Complete Code of WebForm1.aspx looks like
this:
<%@ Page Language="C#" AutoEventWireup="true" CodeBehind="WebForm1.aspx.cs" Inherits="AS_and_IS_Keyword_Application.WebForm1" %>
<!DOCTYPE html PUBLIC "-//W3C//DTD XHTML 1.0 Transitional//EN" "http://www.w3.org/TR/xhtml1/DTD/xhtml1-transitional.dtd"><html xmlns="http://www.w3.org/1999/xhtml">
<head id="Head1" runat="server">
<title></title>
</head>
<body>
<form id="form1" runat="server">
<div>
<center>
<asp:GridView ID="GridView1" runat="server" BackColor="White" BorderColor="#999999"
BorderStyle="None" BorderWidth="1px" CellPadding="3" GridLines="Vertical">
<AlternatingRowStyle BackColor="#DCDCDC" />
<FooterStyle BackColor="#CCCCCC" ForeColor="Black" />
<HeaderStyle BackColor="#000084" Font-Bold="True" ForeColor="White" />
<PagerStyle BackColor="#999999" ForeColor="Black" HorizontalAlign="Center" />
<RowStyle BackColor="#EEEEEE" ForeColor="Black" />
<SelectedRowStyle BackColor="#008A8C" Font-Bold="True" ForeColor="White" />
<SortedAscendingCellStyle BackColor="#F1F1F1" />
<SortedAscendingHeaderStyle BackColor="#0000A9" />
<SortedDescendingCellStyle BackColor="#CAC9C9" />
<SortedDescendingHeaderStyle BackColor="#000065" />
</asp:GridView>
<br />
<br />
<asp:Button ID="Button1" runat="server" Text="Button" OnClick="Button1Click" />
</center>
</div>
</form>
</body>
</html>
Complete Code of WebForm1.aspx.cs looks like this:
using
System;
using
System.Collections.Generic;
using
System.Linq;
using
System.Web;
using
System.Web.UI;
using
System.Web.UI.WebControls;
using
System.Data.SqlClient;
using
System.Data;
namespace
AS_and_IS_Keyword_Application
{
public partial
class WebForm1 : System.Web.UI.Page
{
protected void
PageLoad(object sender,
EventArgs e)
{
}
protected void
Button1Click(object sender,
EventArgs e)
{
if (Button1 is
Button)
{
var con = new
SqlConnection(@"Data
Source=VIJAY-PC\SQLEXPRESS;Initial Catalog=Candidate;Integrated Security=True");
var da = new
SqlDataAdapter("Select
PersonId, FirstName, LastName, Age from Student", con);
var ds = new
DataSet();
da.Fill(ds,
"s");
GridView1.DataSource = ds;
GridView1.DataBind();
Button1.Visible = false;
}
else
{
Response.Write("It's Not a Button");
}
var y = Button1 as
Button;
Response.Write(y
== null ? "Hello
It's not of Type Button" : "<h1><center>Hello
It's of Type Button</center></h1>");
}
}
}
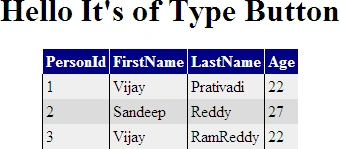
The Output of the Application looks like this:

After Button Click:
I hope this article is useful for you.
Join the conversation! Your thoughts help the community grow.