

Introduction
- Client-Side Chart Widget in HTML 5: Part 1 (Bar Chart)
- Client-Side Chart Widget in HTML 5: Part 2 (Pie Chart)
- Client-Side Chart Widget in HTML 5: Part 3 (Line Chart)
- Client-Side Chart Widget in HTML5: Part 4 (Doughnut Chart)
Now we will explain a client-side Doughnut Chart widget in HTML5.
Background
Please download the necessary files here http://www.chartjs.org/.
Using the code
A simple HTML
- <!DOCTYPE html>
- <html xmlns="http://www.w3.org/1999/xhtml">
- <head>
- <title> Polar Area Chart Using Chart.js</title>
- </head>
- <body></body>
- </html>
Included JavaScript file
- <script src="Chart.js"></script>
Call the Chart Function
- window.onload = function () {
- var canvasObject = document.getElementById("myChart").getContext("2d");
- window.myPolarArea = new Chart(canvasObject).PolarArea(polarChartData, {
- responsive: true
- });
- }
Here we are loading the chart in myChart.
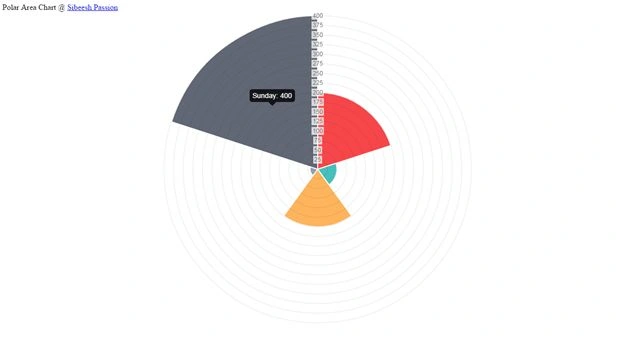
As you can see in the preceding code, polarChartData is the data we will load into the chart.
- var polarChartData = [
- {
- value: 200,
- color: "#F7464A",
- highlight: "#FF5A5E",
- label: "Monday"
- },
- {
- value: 50,
- color: "#46BFBD",
- highlight: "#5AD3D1",
- label: "Tuesday"
- },
- {
- value: 150,
- color: "#FDB45C",
- highlight: "#FFC870",
- label: "Wednesday"
- },
- {
- value: 20,
- color: "#949FB1",
- highlight: "#A8B3C5",
- label: "Saturday"
- },
- {
- value: 400,
- color: "#4D5360",
- highlight: "#616774",
- label: "Sunday"
- }
- ];
Properties
- value
- color
- highlight
- label
Here you can change the properties as you want.
Complete HTML
- <!DOCTYPE html>
- <html xmlns="http://www.w3.org/1999/xhtml">
- <head>
- <title>Doughnut Chart Using Chart.js</title>
- <script src="Chart.js"></script>
- <script>
- var polarChartData = [
- {
- value: 200,
- color: "#F7464A",
- highlight: "#FF5A5E",
- label: "Monday"
- },
- {
- value: 50,
- color: "#46BFBD",
- highlight: "#5AD3D1",
- label: "Tuesday"
- },
- {
- value: 150,
- color: "#FDB45C",
- highlight: "#FFC870",
- label: "Wednesday"
- },
- {
- value: 20,
- color: "#949FB1",
- highlight: "#A8B3C5",
- label: "Saturday"
- },
- {
- value: 400,
- color: "#4D5360",
- highlight: "#616774",
- label: "Sunday"
- }
- ];
- window.onload = function () {
- var canvasObject = document.getElementById("myChart").getContext("2d");
- window.myPolarArea = new Chart(canvasObject).PolarArea(polarChartData, {
- responsive: true
- });
- }
- </script>
- </head>
- <body>
- <div>
- Polar Area Chart @ <a href="www.sibeeshpassion.com">Sibeesh Passion</a>
- <canvas id="myChart"></canvas>
- </div>
- </body>
- </html>
Conclusion
Join the conversation! Your thoughts help the community grow.