

Section 1: Understanding the Canvas
Introduced in the summer of 2004 by Apple in its Safari Browser, Canvas is now supported by many browsers. While Internet Explorer does not directly support the tag as of yet, there are JavaScript Libraries that emulate <canvas> syntax using Microsoft's Vector Markup Language (VML). From a markup point of view, you simply put the element in the page, name it with an id attribute, and define its dimensions with height and width attributes:
After you place a <canvas> tag in a document, your next step is to use JavaScript to access and draw on the element. For example, the following fetch the object by its id value and creates a two-dimensional drawing context:
Once we have drawing objects for a game we have various methods used for the Canvas but we are focused on a few methods.
For example, the "strokeRect(x,y,width,height)" method takes x and y coordinates and height and width, all specified as numbers representing pixels.
- <canvas id="canvas" width="300" height="300">
- <strong>Canvas Supporting Browser Required</strong>
- </canvas>
- var canvas = document.getElementById("canvas");
- var context = canvas.getContext("2d");
For example:
context.strokeRect(10,10,150,50);
Will draw a simple rectangle of 150 pixels by 50 pixels starting at the coordinates 10,10 from the origin of the placed <canvas> tag.
If you wanted to set a particular color for the stroke then you might set it with the "strokeStyle()" method, like so:
You can use the "fillRect(x,y,width,height)" method to make a rectangle, but this time in a solid manner:
- context.strokeStyle = "blue";
- context.strokeRect(10,10,150,50);
context.fillRect(150,30,75,75);
By default, the fill color will be black, but you can define a different fill color using the "fillColor()" method.
For example:
context.fillStyle = "#da0000";
Also, use standard CSS color functions, which may include opacity.
For example, the opacity of the reddish fill is set to 40 percent:
context.fillStyle = "rgba(218,112,214,0.4)";
Now:
- Open Notepad
- Write a simple program using <canvas>
- Save it with a .htm or .html extension.

Code used
- <!DOCTYPE html>
- <html>
- <head>
- <meta http-equiv="Content-Type" content="text/html; charset=utf-8">
- <title>HTML5 canvas example</title>
- <script type="text/javascript">
- window.onload = function () {
- var canvas = document.getElementById("canvas");
- var context = canvas.getContext("2d");
- context.strokeStyle = "orange";
- context.strokeRect(10, 10, 150, 50);
- context.fillStyle = "rgba(218,0,0,0.4)";
- context.fillRect(150, 30, 75, 75);
- }
- </script>
- </head>
- <body>
- <h1>
- Simple Canvas Examples</h1>
- <canvas id="canvas" width="300" height="300">
- <strong>Canvas Supporting Browser Required</strong>
- </canvas>
- </body>
- </html>
2. Save


Section 2: Drawing and Styling Lines and Shapes
What the path API is?
For example, the following draws a V shape using "lineTo()":
If you were to add a "context.closePath()" before "context.stroke()", the V shape would turn into a triangle, because closePath() would connect the last point and the first point. Also, by calling "fill()" instead of "stroke()", the triangle will be filled in with whatever the fill color is, or black if none is specified. Of course, you can call both "fill()" and "stroke()" on any drawn shape if you want to have a stroke around a filled region. Thus, to style the drawing, you can specify the Fill Style and Stroke Style and maybe even define the width of the line using line width, see the following:
You can change the color by setting the fillColor property. In addition to the CSS color values, you can also set the fillColor to a gradient object. A gradient object can be created using "createLinearGradient()" or "createRadialGradient()". The following example creates a simple linear gradient that will be applied to a rectangle using the "createLinearGradient(x1,y1,x2,y2)" method. The gradient is positioned at 10,150 and is set to go 200 pixels in both directions.
- context.beginPath();
- context.lineTo(20,100);
- context.lineTo(120,300);
- context.lineTo(220,100);
- context.stroke();
- context.strokeStyle = "blue";
- context.fillStyle = "red";
- context.lineWidth = 10;
- context.beginPath();
- context.lineTo(200,10);
- context.lineTo(200,50);
- context.lineTo(380,10);
- context.closePath();
- context.stroke();
- context.fill();
var lg = context.createLinearGradient(10,150,200,200);
Next, the gradient colors are added using the "addColorStop()" method. This specifies a color and the offset position in the gradient where the color should occur. The offset must be between 0 and 1.
Of course, you could use the rgba CSS function to create a gradient with transparency as well. Finally, the fillColor is set to the gradient. Here is the complete code snippet, followed by a visual example:
To create a radial gradient using "createRadialGradient(x1,y1,r1,x2,y2,r2)", you must set the position and radius of two circles to serve as the gradient.
- lg.addColorStop(0,"#B03060");
- lg.addColorStop(0.75,"#4169E1");
- lg.addColorStop(1,"#FFE4E1");
- var lg = context.createLinearGradient(10,150,200,200);
- lg.addColorStop(0,"#B03060");
- lg.addColorStop(0.5,"#4169E1");
- lg.addColorStop(1,"#FFE4E1");
- context.fillStyle = lg;
- context.beginPath();
- context.rect(10,150,200,200);
- context.fill();
For example:
Consider this entire example:
- var rg = context.createRadialGradient(350,300,80,360,250,80);
- rg.addColorStop(0,"#A7D30C");
- rg.addColorStop(0.9,"#019F62");
- rg.addColorStop(1,"rgba(1,159,98,0) ");
- context.fillStyle = rg;
- context.beginPath();
- context.fillRect(250,150,200,200);
- <!DOCTYPE html>
- <html>
- <head>
- <meta http-equiv="Content-Type" content="text/html; charset=utf-8">
- <title>HTML5 canvas lines and shapes example</title>
- <script type="text/javascript">
- window.onload = function () {
- var canvas = document.getElementById("canvas");
- var context = canvas.getContext("2d");
- context.strokeStyle = "blue";
- context.fillStyle = "red";
- context.lineWidth = 10;
- context.beginPath();
- context.lineTo(200, 10);
- context.lineTo(200, 50);
- context.lineTo(380, 10);
- context.closePath();
- context.stroke();
- context.fill();
- var lg = context.createLinearGradient(10, 150, 200, 200);
- lg.addColorStop(0, "#B03060");
- lg.addColorStop(0.5, "#4169E1");
- lg.addColorStop(1, "#FFE4E1");
- context.fillStyle = lg;
- context.beginPath();
- context.rect(10, 150, 200, 200);
- context.fill();
- var rg = context.createRadialGradient(50, 50, 10, 60, 60, 50);
- rg.addColorStop(0, "#A7D30C");
- rg.addColorStop(0.9, "#019F62");
- rg.addColorStop(1, "rgba(1,159,98,0)");
- context.fillStyle = rg;
- context.beginPath();
- context.fillRect(0, 0, 130, 230);
- context.beginPath();
- context.lineTo(250, 150);
- context.lineTo(330, 240);
- context.lineTo(410, 150);
- context.stroke();
- }
- </script>
- </head>
- <body>
- <h1>
- Simple Shapes on canvas Example</h1>
- <canvas id="canvas" width="500" height="500">
- <strong>Canvas Supporting Browser Required</strong>
- </canvas>
- </body>
- </html>


Section 3: Canvas Perspective
Let us consider the new canvas code for the 3d perspective:
- <!DOCTYPE html>
- <html>
- <head>
- <meta http-equiv="Content-Type" content="text/html; charset=UTF-8">
- <title>Canvas Cube Example</title>
- <style type="text/css" media="screen">
- body
- {
- background-color: #E67B34;
- }
- </style>
- <script type="text/javascript">
- window.onload = function () {
- var context = document.getElementById("canvas").getContext("2d");
- context.fillStyle = "#fff";
- context.strokeStyle = "black";
- context.beginPath();
- context.moveTo(188, 38);
- context.lineTo(59, 124);
- context.lineTo(212, 197);
- context.lineTo(341, 111);
- context.lineTo(188, 38);
- context.closePath();
- context.fill();
- context.stroke();
- context.fillStyle = "#ccc";
- context.strokeStyle = "black";
- context.beginPath();
- context.moveTo(341, 111);
- context.lineTo(212, 197);
- context.lineTo(212, 362);
- context.lineTo(341, 276);
- context.lineTo(341, 111);
- context.closePath();
- context.fill();
- context.stroke();
- context.fillStyle = "#999";
- context.strokeStyle = "black";
- context.beginPath();
- context.moveTo(59, 289);
- context.lineTo(59, 124);
- context.lineTo(212, 197);
- context.lineTo(212, 362);
- context.lineTo(59, 289);
- context.closePath();
- context.fill();
- context.stroke();
- }
- </script>
- </head>
- <body>
- <h1>
- Canvas Perspective</h1>
- <canvas id="canvas" width="400" height="400">
- <strong>Canvas Supporting Browser Required</strong>
- </canvas>
- </body>
- </html>
Step 1


Section 4: Now learn about Arcs & Curves
Now for a very interesting example.
To start your face drawing, use "arc()" to draw the head as a circle:
context.arc(150,150,100,0,Math.PI*2,true);
Use the "quadraticCurveTo(cpx,cpy,x,y)" method to draw the nose and the mouth.
This function starts at the last point in the path and draws a line to (x,y). The control point (cpx,cpy) pulls the line in that direction, resulting in a curved line. Call "moveTo()" first to set the last point in the path. Look at the following.
A line was drawn from (155,130) to (155,155). Because the x-coordinate of the control point (130,145) is to the left, the line is pulled in that direction. Because the y-coordinate is between the y-coordinates, the pull is roughly in the middle.
You call "bezierCurveTo(cp1x,cp1y,cp2x,cp2y,x,y)" to draw the eyes. This function is similar to quadraticCurveTo() except that it has two control points and has a line that is pulled toward both of them.
Lastly, use "arcTo(x1,y1,x2,y2,radius)" to draw a frame around the face.
- context.moveTo(155,130);
- context.quadraticCurveTo(130,145,155,155);
- context.moveTo(100,175);
- context.quadraticCurveTo(150,250,200,175);
- context.moveTo(80,110);
- context.bezierCurveTo(95,85,115,85,130,110);
- context.moveTo(170,110);
- context.bezierCurveTo(185,85,205,85,220,110);
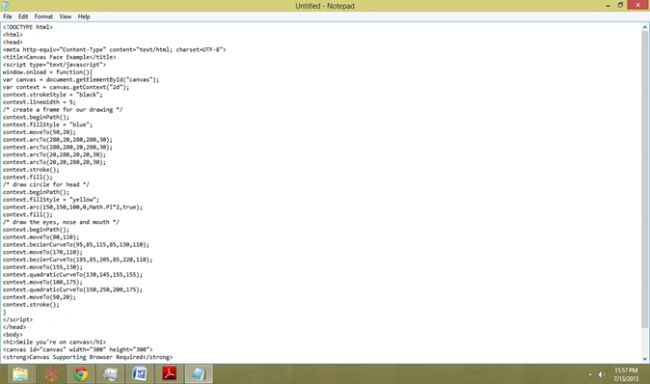
Time to see the final program example here. Feel excited. Canvas is a power of HTML 5.
- <!DOCTYPE html>
- <html>
- <head>
- <meta http-equiv="Content-Type" content="text/html; charset=UTF-8">
- <title>Canvas Face Example</title>
- <script type="text/javascript">
- window.onload = function () {
- var canvas = document.getElementById("canvas");
- var context = canvas.getContext("2d");
- context.strokeStyle = "black";
- context.lineWidth = 5;
- /* create a frame for our drawing */
- context.beginPath();
- context.fillStyle = "blue";
- context.moveTo(50, 20);
- context.arcTo(280, 20, 280, 280, 30);
- context.arcTo(280, 280, 20, 280, 30);
- context.arcTo(20, 280, 20, 20, 30);
- context.arcTo(20, 20, 280, 20, 30);
- context.stroke();
- context.fill();
- /* draw circle for head */
- context.beginPath();
- context.fillStyle = "yellow";
- context.arc(150, 150, 100, 0, Math.PI * 2, true);
- context.fill();
- /* draw the eyes, nose and mouth */
- context.beginPath();
- context.moveTo(80, 110);
- context.bezierCurveTo(95, 85, 115, 85, 130, 110);
- context.moveTo(170, 110);
- context.bezierCurveTo(185, 85, 205, 85, 220, 110);
- context.moveTo(155, 130);
- context.quadraticCurveTo(130, 145, 155, 155);
- context.moveTo(100, 175);
- context.quadraticCurveTo(150, 250, 200, 175);
- context.moveTo(50, 20);
- context.stroke();
- }
- </script>
- </head>
- <body>
- <h1>
- Smile you're on canvas</h1>
- <canvas id="canvas" width="300" height="300">
- <strong>Canvas Supporting Browser Required</strong>
- </canvas>
- </body>
- </html>
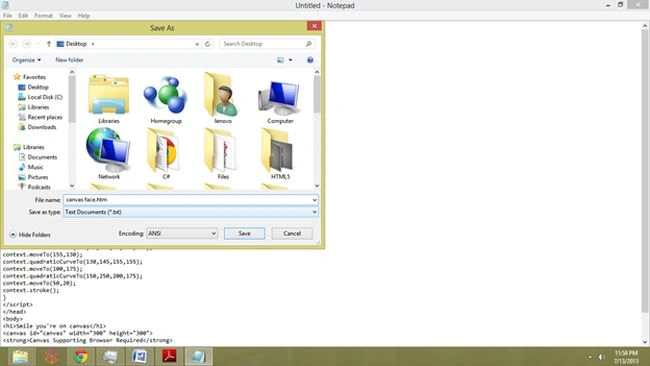
Open Notepad and write this code piece
Kunal VaishyaPosted Jul 18, 2013, 5:21 AM
Nice article
Tripti TiwariPosted Jul 17, 2013, 12:58 PM
Dinesh Sir Thank you!!
Akshay RajputPosted Jul 17, 2013, 12:09 PM
nice work....
Dinesh BeniwalPosted Jul 17, 2013, 10:58 AM
Good Start Tripti.
Gohil JayendrasinhPosted Jul 16, 2013, 6:50 AM
NICE
Vikas AhlawatPosted Jul 16, 2013, 3:16 AM
Nice Article.... & Nice start.. :)
Tripti TiwariPosted Jul 15, 2013, 5:25 AM
Thanks to all... :) :)
Akhil MittalPosted Jul 14, 2013, 11:34 PM
Good Effort tripti.Nice Article.Welcome to c-sharpcorner :-)
Sanjeeb LenkaPosted Jul 14, 2013, 1:13 PM
welcome Tripti. good work
Sourav KayalPosted Jul 14, 2013, 11:08 AM
Welcome to c-sharpcorner. keep it up.