

Introduction:
In this article we will help fresher candidates to understand how to do perform validation using Data Annotation in ASP.NET MVC 5.

Objective of this article
- Reduce the use of regular expression in ASP.NET MVC project.
- Build application with proper error messages in minimum code.
Background
In old web form to do validations, developerS use regular expression, to display error message they use different types of strings & on button click event they write their login for validation on server side so it takes a lot of time to check validation.
In MVC architecture by using namespace System.ComponentModel.DataAnnotations; we can achieve validation in minimum code. To do validation using DataAnnotations techniques here are the steps,
Step 1:
Create a simple MVC application using VS 2013. Create one controller & give name to that controller. Write two action methods in above controller as one to take inputs from user & another to check validation on post method.
- public ActionResult Index()
- {
- return View();
- }
- public ActionResult GetData()
- {
- return View("Index");
- }
Create a model as follows. To achieve validation add namespace System.ComponentModel.DataAnnotations; in model. Now as per your project requirement you can achieve validation or you can also give mandatory fields with proper data type.
- public class Employee
- {
- [Required]
- [Display(Name = "Employee Id")]
- public int Id
- {
- get;
- set;
- }
- [Required]
- [Display(Name = "Employee Name")]
- public string Name
- {
- get;
- set;
- }
- [Required]
- [Display(Name = "Email Id")]
- [DataType(DataType.EmailAddress)]
- public string Email
- {
- get;
- set;
- }
- [Required]
- [Display(Name = "Phone Number")]
- [DataType(DataType.PhoneNumber)]
- public string Mobile
- {
- get;
- set;
- }
- [Required]
- [Display(Name = "Postal Code")]
- [DataType(DataType.PostalCode)]
- public int PostalCode {
- get;
- set;
- }
- [Required]
- [Display(Name = "Creation Date")]
- [DataType(DataType.Date)]
- public DateTime CreateDate
- {
- get;
- set;
- }
- [Required]
- [Display(Name = "Credit Card Details")]
- [DataType(DataType.CreditCard)]
- public string Address {
- get;
- set;
- }
- [Required]
- [Display(Name = "Password")]
- [DataType(DataType.Password)]
- public string Password {
- get;
- set;
- }
- [Required]
- [Display(Name = "URL")]
- [DataType(DataType.Url)]
- public string URL
- {
- get;
- set;
- }
- }
Create view for above methods by simply right click on each action method.
For first view add model reference on top, some javascript files in Script folder & drag three files in the following sequence in first view after title tag as in the following,
- <script src="~/Scripts/jquery-1.7.1.js"></script>
- <script src="~/Scripts/jquery.validate.js"></script>
- <script src="~/Scripts/jquery.validate.unobtrusive.js"></script>
- <div>
- @Html.ValidationSummary() @using (Html.BeginForm("GetData","Home", FormMethod.Post)) { @Html.EditorForModel()
- <br />
- <input id="submit" type="submit" /> }
- </div>
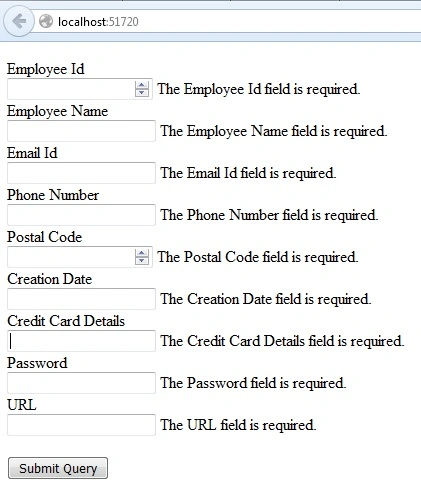
Now run our application & without entering any value click on submit button and you will see the following error messages.
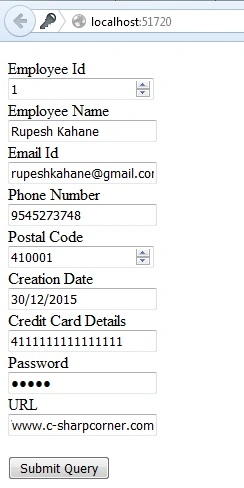
Now enter valid values and then click submit.
Summary
This article will help fresher candidates to understand how to do validation using Data Annotation in ASP.NET MVC 5.
Hope you enjoyed this one.
Shabbir HusainPosted Feb 2, 2018, 4:41 AM
Can u please upload the source code as well for ua every article in .rar or zip??
Anil kumarPosted Oct 9, 2017, 6:47 AM
Hi Rupesh Kahane , I'm trying to do validation using DataAnnotations almost done but validation messages not displaying can you please help. @using (Html.BeginForm("Index", "Home", FormMethod.Post, new { @class = "form-horizontal", role = "form" })){@*@Html.AntiForgeryToken()*@@Html.ValidationSummary(false) <div class="form-group"> @Html.Label("Employee Name", new { @class = "col-md-2 control-label" }) <div class="col-md-10"> @Html.TextBoxFor(m => m.objemployeeinfo.EmployeeName, new { @class = "form-control", Name = "EmployeeName" }) @Html.ValidationMessageFor(m => m.objemployeeinfo.EmployeeName) </div> </div> <div class="form-group"> @Html.Label("Email ID", new { @class = "col-md-2 control-label" }) <div class="col-md-10"> @Html.TextBoxFor(m => m.objemployeeinfo.EmailID, new { @class = "form-control",Name= "EmailID" }) @Html.ValidationMessageFor(m => m.objemployeeinfo.EmailID) </div> </div> <div class="form-group"> @Html.Label("Contact Number", new { @class = "col-md-2 control-label" }) <div class="col-md-10"> @Html.TextBoxFor(m => m.objemployeeinfo.ContactNumber, new { @class = "form-control", Name = "ContactNumber" }) @Html.ValidationMessageFor(m => m.objemployeeinfo.ContactNumber) </div> </div> <div class="form-group"> <div class="col-md-offset-2 col-md-10"> <input type="submit" class="btn btn-default" value="Save" /> </div> </div> } ===============Model Class========================= public class EmployeeInfo { public int EmployeeID { get; set; } [Display(Name = "Employee name")] [Required (ErrorMessage ="Employee name required.")] public string EmployeeName { get; set; } [Required(ErrorMessage = "Email id required.")] public string EmailID { get; set; } [Required(ErrorMessage = "Contact Number required.")] public string ContactNumber { get; set; } public string Department { get; set; } public string EmployeeType { get; set; } public string Roles { get; set; } } .
Rupesh KahanePosted Dec 30, 2015, 10:06 PM
thanks to Ankur Mistry, sreenivasa k & Raja T sir also
Raja TPosted Dec 30, 2015, 9:58 PM
Nice, thanks for sharing
sreenivasa kPosted Dec 30, 2015, 4:13 PM
good article
Ankur MistryPosted Dec 30, 2015, 1:07 PM
Helpful article Rupesh Kahane
Rupesh KahanePosted Dec 30, 2015, 9:13 AM
Thanks to Humayun Kabir Mamun and @Santhakumar also
Humayun Kabir MamunPosted Dec 30, 2015, 7:13 AM
Nice...
Santhakumar MunuswamyPosted Dec 30, 2015, 6:17 AM
Thanks for nice share