
Introduction
A Grid View is a graphical control element that presents a tabular view of data. A Grid View is used to represent a list of data items by binding data fields to columns and displaying columns. A typical Grid View supports features like click, drag and drop, in place edit and so on.
Here I explain step-by-step how to retrieve data in a Grid View.
Step 1
Start Visual Studio.
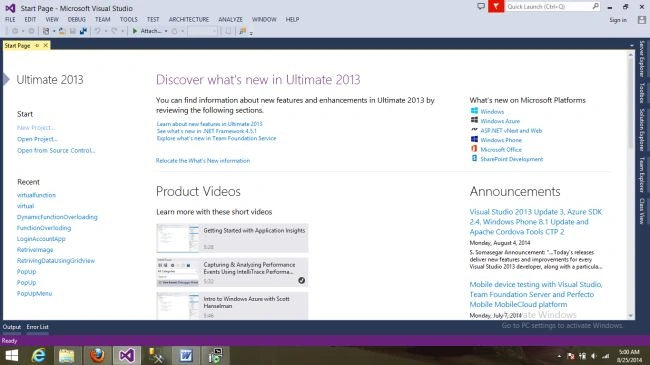
Step 2
Select the project from the File menu.
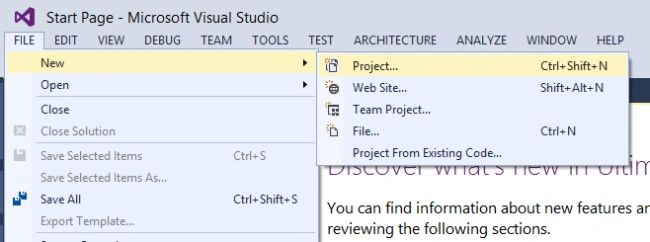
Step 3
Choose web and select ASP.NET Web Application.

Step 4
Now add an empty project template for creating the ASP.NET Web Application.

Step 5
Select the project located in the menu bar and choose ADD NEW ITEM and select WEB PAGE and provide a meaningful name.

Place the following code in your web form page:
- <asp:GridView ID="grid1" runat="server" AutoGenerateColumns="False" CellPadding="4" ForeColor="#333333" GridLines="None" >
- <AlternatingRowStyle BackColor="White" />
- <columns>
- <asp:TemplateField HeaderText="EmployeeID">
- <ItemTemplate>
- <asp:Label ID="LblCompanyId" runat="server" Text='<%#Bind("c_id") %>'></asp:Label>
- </ItemTemplate>
- </asp:TemplateField>
- <asp:TemplateField HeaderText="Name">
- <ItemTemplate>
- <asp:Label ID="LblCompanyName" runat="server" Text='<%#Bind("c_name") %>'></asp:Label>
- </ItemTemplate>
- </asp:TemplateField>
- <asp:TemplateField HeaderText="Address">
- <ItemTemplate>
- <asp:Label ID="LblCompanyAddress" runat="server" Text='<%#Bind("c_address") %>'></asp:Label>
- </ItemTemplate>
- </asp:TemplateField>
- <asp:TemplateField HeaderText="Phone">
- <ItemTemplate>
- <asp:Label ID="Label3" runat="server" Text='<%#Bind("c_mobile") %>'></asp:Label>
- </ItemTemplate>
- </asp:TemplateField>
- <asp:TemplateField HeaderText="Date Time">
- <ItemTemplate>
- <asp:Label ID="LblDate" runat="server" Text='<%#Bind("Date") %>'></asp:Label>
- </ItemTemplate>
- </asp:TemplateField>
- </columns>
- <EditRowStyle BackColor="#2461BF" />
- <FooterStyle BackColor="#507CD1" Font-Bold="True" ForeColor="White" />
- <HeaderStyle BackColor="#507CD1" Font-Bold="True" ForeColor="White" />
- <PagerStyle BackColor="#2461BF" ForeColor="White" HorizontalAlign="Center" />
- <RowStyle BackColor="#EFF3FB" />
- <SelectedRowStyle BackColor="#D1DDF1" Font-Bold="True" ForeColor="#333333" />
- <SortedAscendingCellStyle BackColor="#F5F7FB" />
- <SortedAscendingHeaderStyle BackColor="#6D95E1" />
- <SortedDescendingCellStyle BackColor="#E9EBEF" />
- <SortedDescendingHeaderStyle BackColor="#4870BE" />
- </asp:GridView>
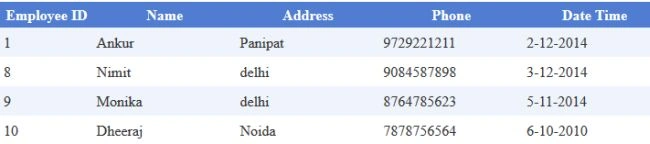
This function is used to fetch data from the company table and display it on the Grid View. It fills in the data in a DataTable object and binds it to a GridView control using the DataSource property. In the end, the code calls the GridView. DataBind method to apply the binding.
Code
- public partial class Asp : System.Web.UI.Page
- {
- SqlConnection con;
- public Asp()
- {
- con = new SqlConnection("Your Connection String");
- }
- protected void Page_Load(object sender, EventArgs e)
- {
- if (!IsPostBack)
- {
- DisplayRecord();
- }
- }
- public DataTable DisplayRecord()
- {
- SqlDataAdapter Adp = new SqlDataAdapter("select * from company", con);
- DataTable Dt = new DataTable();
- Adp.Fill(Dt);
- grid1.DataSource = Dt;
- grid1.DataBind();
- return Dt;
- }
- }
Output
Mohd AnishPosted Sep 25, 2019, 10:33 PM
Hi there, how I add paging in gridview
Prashanth AkulaPosted Jul 22, 2017, 2:33 PM
Thank u bro its working
Shashikant singhPosted Oct 24, 2015, 2:16 AM
good
Sujeet SumanPosted Oct 13, 2015, 5:15 AM
Nice Article..................
Saineshwar BageriPosted Aug 28, 2014, 1:14 AM
nice start
Chirag RahejaPosted Aug 26, 2014, 10:36 AM
Keep it up
Nimit JoshiPosted Aug 26, 2014, 4:15 AM
Good Start..