

It is a common requirement for any project to display data in a tabular format. The easiest way to do this is by using HTML tables, but soon this gets complex, you need a way to support sorting (single & multi columns), resizable columns, inline editing, filtering, pagination (client-side and server-side) and so on. There is a way to bind data to a HTML Table in AngularJs, but when it comes to sorting, paging, editing and dragging the columns, the grid choice is useful. ng-grid is Angular's native implementation of the Grid. There are many plugins from third-parties that can be integrated into AngularUI Pages, but ng-grid exists inside the AngularJs framework and is very rich in functionality and compatibility.
Let us create a sample ng-grid and understand how ng-grid works.
Example-1
- <!DOCTYPE html>
- <html ng-app="myApp">
- <head>
- <title>NG Grid Demo</title>
- <>
- .gridStyle
- {
- border: 5px solid #d4d4d4;
- width: 400px;
- height: 200px;
- }
- </style>
- <link rel="stylesheet" type="text/css" href="http://angular-ui.github.com/ng-grid/css/ng-grid.css" />
- <script src="https://ajax.googleapis.com/ajax/libs/jquery/1.8.0/jquery.min.js"></script>
- <script src="https://ajax.googleapis.com/ajax/libs/angularjs/1.0.2/angular.min.js"></script>
- <script type="text/javascript" src="http://angular-ui.github.com/ng-grid/lib/ng-grid.debug.js"></script>
- <script type="text/javascript">
- var app = angular.module('myApp', ['ngGrid']);
- app.controller('MyCtrl', function ($scope) {
- $scope.Data = [{ Name: "Sachin", Skill: "ASP.NET" ,location:"Delhi"},
- { Name: "Ramesh", Skill: "C#.NET, VB", location: "Chenai" },
- { Name: "Pradeep", Skill: "ASP.NET MVC", location: "Bangalore" },
- { Name: "Manas", Skill: "SQL Server", location: "Chenai" },
- { Name: "Sachin", Skill: "ASP.NET", location: "Bangalore" }, ];
- $scope.gridOptions = { data: 'Data' };
- });
- </script>
- </head>
- <body ng-controller="MyCtrl">
- <div>
- <labl><b> Sample Demo to NG Grid</b></labl>
- </div>
- <div class="gridStyle" ng-grid="gridOptions"></div>
- </body>
- </html>
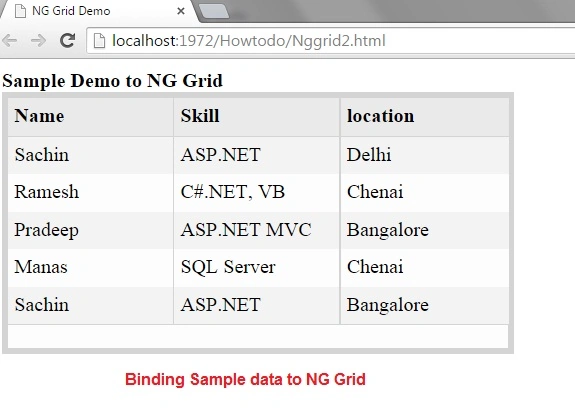
There are four steps to show a sample grid, if we observe the preceding code.
Passed "ngGrid" as dependency to the module
- var app = angular.module('myApp', ['ngGrid']);
Assign some data to scope
- [{Name: "Sachin", Skill: "ASP.NET" ,location:"Delhi"},];
Set the data of the scope to gridOptions as
- $scope.gridOptions = {data: ‘Data’};
It is like assigning a datasource to nggrid, similar to Gridview1.datasource=dataset in ASP.NET.
Bind the data to the page
- <div class="gridStyle" ng-grid="gridOptions"></div>
It is like binding data to a GridView, similar to Gridview1.dataBind() in ASP.NET.
Don't forget to add the scripts and styles needed for ng-grid in the head section of the code.
Let us create a DB and Bind data to ng-grid by web API calls.
Example-2
Step 1
Let us create an Employee Table.
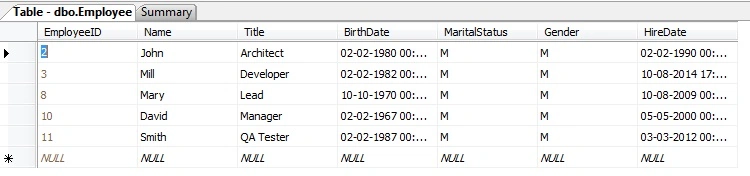
We will create a web API that will return the employee data.
- public class EmployeeAPIController : ApiController
- {
- private EmployeeEntities db = new EmployeeEntities();
- public IEnumerable<Employee> GetEmployees()
- {
- return db.Employees.AsEnumerable();
- }
- }
Step 3
Add module service controller and html code.
Module
- var app;
- (function () {
- app = angular.module("EmployeeModule", ['ngGrid']);
- })();
Service
- app.service('EmployeeService', function ($http) {
- this.getAllEmployee = function () {
- return $http.get("/api/EmployeeAPI");
- }
- });
Controller
- app.controller('EmployeeController', function ($scope, EmployeeService) {
- GetAllRecords();
- function GetAllRecords() {
- var promiseGet = EmployeeService.getAllEmployee();
- promiseGet.then(function (pl) { $scope.Employees = pl.data, $scope.Data=pl.data },
- function (errorPl) {
- $log.error('Some Error in Getting Records.', errorPl);
- });
- }
- $scope.gridOptions = { data: 'Data' };
- });
Index.html
- <html data-ng-app="EmployeeModule">
- <head>
- <style type="text/css">
- .gridStyle
- {
- border: 5px solid #d4d4d4;
- width: 1000px;
- height: 200px;
- }
- </style>
- </head>
- <body data-ng-controller="EmployeeController">
- <div class="gridStyle" ng-grid="gridOptions"></div>
- </body>
- </html>
- <script src="~/Scripts/angular.js"></script>
- <script src="~/Scripts/EmployeeScripts/Module.js"></script>
- <script src="~/Scripts/EmployeeScripts/Service.js"></script>
- <script src="~/Scripts/EmployeeScripts/Controller.js"></script>
- <link rel="stylesheet" type="text/css" href="http://angular-ui.github.com/ng-grid/css/ng-grid.css" />
- <script src="https://ajax.googleapis.com/ajax/libs/jquery/1.8.0/jquery.min.js"></script>
- <script type="text/javascript" src="http://angular-ui.github.com/ng-grid/lib/ng-grid.debug.js"></script>
Output
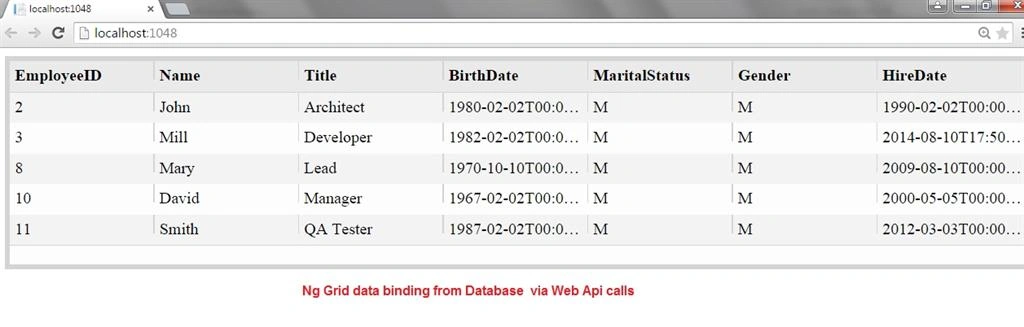
Now, we have seen data from the database and binding to an ng-grid. Let us see now what the features are in ng-grid to make it more useful. We will do a sample ng-grid binding, editing, paging, sorting and grouping the records.
Example-3
- <!DOCTYPE html>
- <html ng-app="myApp">
- <head>
- <meta charset="utf-8" />
- <title>Working With NG-Grid </title>
- <style type="text/css">
- .gridStyle
- {
- border: 1px solid rgb(212, 212, 212);
- width: 800px;
- height: 370px;
- margin-left: 50px;
- color: coral;
- }
- .red {
- background-color: green;
- color: red;
- }
- </style>
- <script src="http://ajax.googleapis.com/ajax/libs/angularjs/1.3.8/angular.min.js"></script>
- <link rel="stylesheet" type="text/css" href="http://angular-ui.github.com/ng-grid/css/ng-grid.css" />
- <script src="https://ajax.googleapis.com/ajax/libs/jquery/1.8.0/jquery.min.js"></script>
- <script src="https://ajax.googleapis.com/ajax/libs/angularjs/1.0.2/angular.min.js"></script>
- <script type="text/javascript" src="http://angular-ui.github.com/ng-grid/lib/ng-grid.debug.js"></script>
- <script>
- var app = angular.module('myApp', ['ngGrid']);
- app.controller(
- 'MyCtrl',
- function ($scope) {
- var Company;
- var Model;
- var Price;
- var Stocks;
- var x;
- $scope.submit = function () {
- Company = $scope.Company;
- Model = $scope.Model;
- Price = $scope.Price;
- Stocks = $scope.Stocks;
- $scope.myData.push({
- Company: Company,
- Model: Model,
- Price: Price,
- Stocks: Stocks
- });
- };
- $scope.myData = [{ "Company": "Samsung", "Model": "Samsung Galaxy Grand 2", "Price": 5000, "Stocks": 4 },
- { "Company": "Samsung", "Model": "Samsung Galaxy S3 Neo", "Price": 9000, "Stocks": 41 },
- { "Company": "Samsung", "Model": "Samsung Galaxy Grand Max", "Price": 11000, "Stocks": 4 },
- { "Company": "MicroMax", "Model": "Micromax Canvas Blaze", "Price": 6300, "Stocks": 0 },
- { "Company": "MicroMax", "Model": "Micromax Canvas Duddle", "Price": 11000, "Stocks": 3 },
- { "Company": "MicroMax", "Model": "Micromax Canvas Duddle- SPL", "Price": 11000, "Stocks": 3 },
- { "Company": "Blackberry", "Model": "Blackberry Z30", "Price": 19000, "Stocks": 10 },
- { "Company": "Blackberry", "Model": "Micromax bold 9780", "Price": 12900, "Stocks": 20 },
- ],
- $scope.gridOptions = {
- data: 'myData',
- pagingOptions: $scope.pagingOptions,
- enablePinning: true,
- enablePaging: true,
- showFooter: true,
- enableColumnResize: true,
- enableCellSelection: true,
- columnDefs: [
- {
- field: "Company",
- width: 180,
- pinned: true,
- enableCellEdit: true
- },
- {
- field: "Model",
- width: 200,
- enableCellEdit: true
- },
- {
- field: "Price",
- width: 100,
- enableCellEdit: true
- },
- {
- field: "Stocks",
- width: 120,
- enableCellEdit: true,
- cellTemplate: basicCellTemplate
- },
- {
- field: "Action",
- width: 200,
- enableCellEdit: false,
- cellTemplate: '<button id="editBtn" type="button" class="btn btn-xs btn-info" ng-click="updateCell()" >Click a Cell for Edit </button>'
- }]
- };
- $scope.selectedCell;
- $scope.selectedRow;
- $scope.selectedColumn;
- $scope.editCell = function (row, cell, column) {
- $scope.selectedCell = cell;
- $scope.selectedRow = row;
- $scope.selectedColumn = column;
- };
- $scope.updateCell = function () {
- // alert("checking");
- $scope.selectedRow[$scope.selectedColumn] = $scope.selectedCell;
- };
- var basicCellTemplate = '<div class="ngCellText" ng-class="col.colIndex()" ng-click="editCell(row.entity, row.getProperty(col.field), col.field)"><span class="ui-disableSelection hover">{{row.getProperty(col.field)}}</span></div>';
- $scope.filterOptions = {
- filterText: "",
- useExternalFilter: true
- };
- $scope.gridOptions.sortInfo = {
- fields: ['Company', 'Price'],
- directions: ['asc'],
- columns: [0, 1]
- };
- $scope.totalServerItems = 0;
- $scope.pagingOptions = {
- pageSizes: [5, 10, 20],
- pageSize: 5,
- currentPage: 1
- };
- $scope.changeGroupBy = function (group1, group2) {
- $scope.gridOptions.$gridScope.configGroups = [];
- $scope.gridOptions.$gridScope.configGroups.push(group1);
- $scope.gridOptions.$gridScope.configGroups.push(group2);
- $scope.gridOptions.groupBy();
- }
- $scope.clearGroupBy = function () {
- $scope.gridOptions.$gridScope.configGroups = [];
- $scope.gridOptions.groupBy();
- }
- });
- </script>
- </head>
- <body ng-controller="MyCtrl">
- <div class="panel panel-danger">
- <div class="panel-heading"></div>
- <div class="panel-body">
- <form class="input" ng-submit="submit()" role="form">
- <div style="border: 2px solid gray;width:600px;" >
- <labl> <b> Add a New Model: NG GRID DEMO </b></labl>
- <div class="form-group">
- <label"><b>Company:</b></label>
- <input id="inputs" class="form-control" type="text" ng-model="Company">
- </div>
- <div class="form-group">
- <label><b>Model :</b></label>
- <input id="Number1" class="form-control" type="text" ng-model="Model">
- </div>
- <div class="form-group">
- <label>Price</label>
- <input id="Date1" class="form-control" type="number" ng-model="Price">
- </div>
- <div class="form-group">
- <label>Stocks</label>
- <input id="Number2" class="form-control" type="number" ng-model="Stocks">
- </div>
- <div class="form-group">
- <input
- type="submit" value="submit" id="but" class="btn btn-success">
- <button type="button" ng-click="changeGroupBy('Company','Price')">Company By Name and Price</button>
- <button type="button" ng-click="clearGroupBy()">Clear Group</button>
- </div>
- </div>
- </form>
- </div>
- </div>
- <div class="panel panel-danger">
- <div class="panel-heading"><b><p style="padding-left:50px;">Model and Stocks Information</p></b></div>
- <div style="width: 500px;">
- <div class="gridStyle" ng-grid="gridOptions"></div>
- </div>
- </div>
- </body>
- </html>
Output
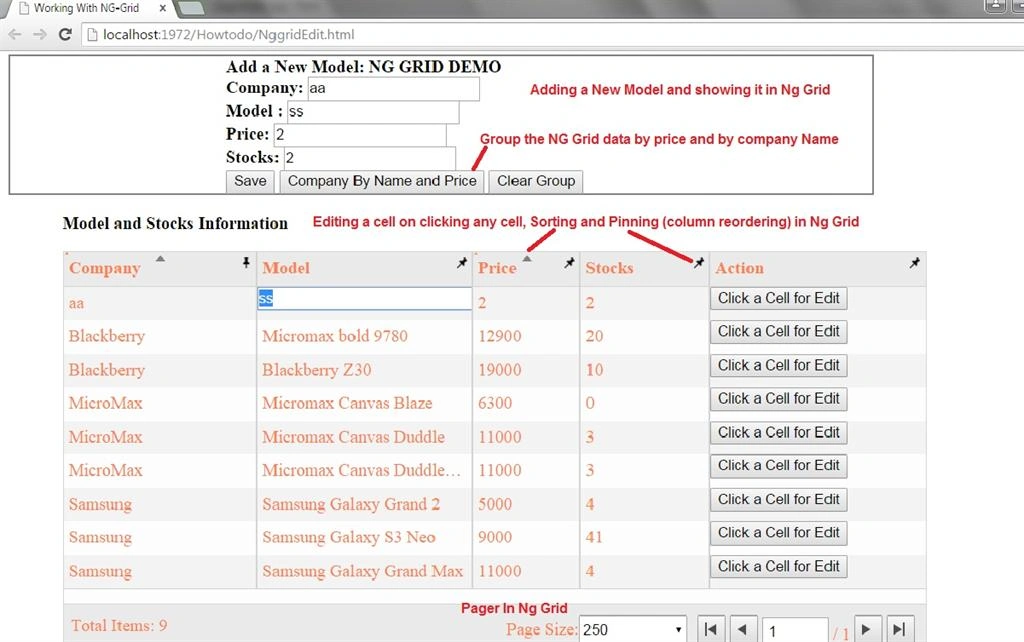
When doing a grouping, the screen arranges the grouping by Name and Price.
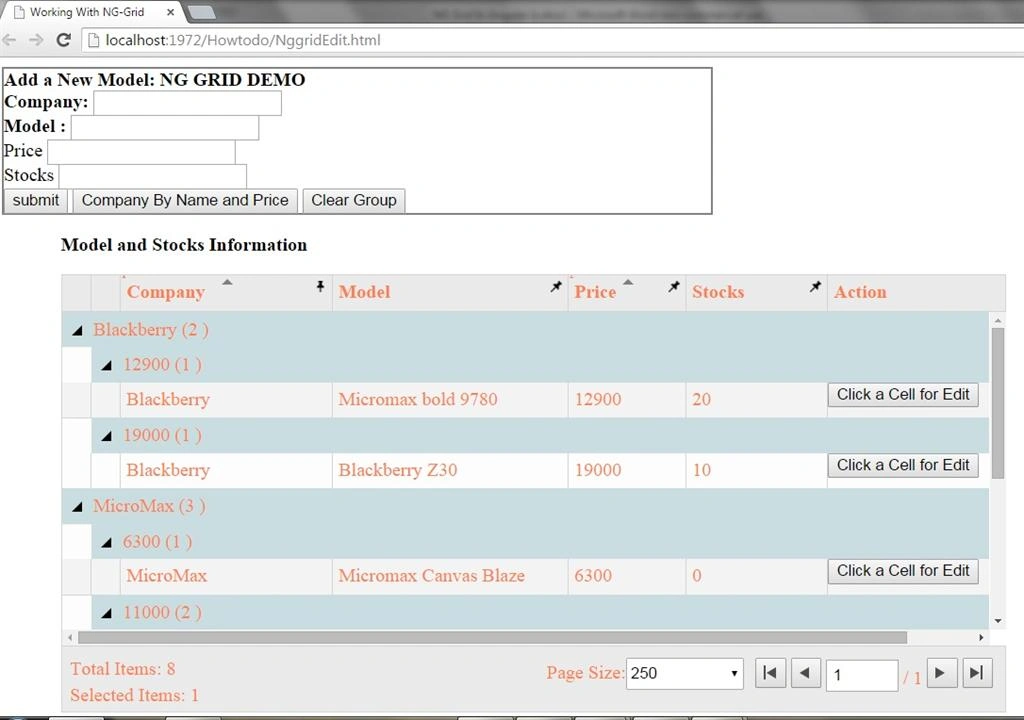
Added data to scope
- $scope.myData = [{ "Company": "Samsung", "Model": "Samsung Galaxy Grand 2", "Price": 5000, "Stocks": 4 },
- { "Company": "Samsung", "Model": "Samsung Galaxy S3 Neo", "Price": 9000, "Stocks": 41 },
- { "Company": "Samsung", "Model": "Samsung Galaxy Grand Max", "Price": 11000, "Stocks": 4 },
- { "Company": "MicroMax", "Model": "Micromax Canvas Blaze", "Price": 6300, "Stocks": 0 },
- { "Company": "MicroMax", "Model": "Micromax Canvas Duddle", "Price": 11000, "Stocks": 3 },
- { "Company": "MicroMax", "Model": "Micromax Canvas Duddle- SPL", "Price": 11000, "Stocks": 3 },
- { "Company": "Blackberry", "Model": "Blackberry Z30", "Price": 19000, "Stocks": 10 },
- { "Company": "Blackberry", "Model": "Micromax bold 9780", "Price": 12900, "Stocks": 20 },
- ],
We can add a different property to ng-grid, such as paging, sorting, pinning of columns we need to display, enable scrolling and controlling a cell property value such as styling and events.
- $scope.gridOptions = {
- data: 'myData',
- pagingOptions: $scope.pagingOptions,
- enablePinning: true,
- enablePaging: true,
- showFooter: true,
- enableColumnResize: true,
- enableCellSelection: true,
- columnDefs: [
- {
- field: "Company",
- width: 180,
- pinned: true,
- enableCellEdit: true
- },
- {
- field: "Model",
- width: 200,
- enableCellEdit: true
- },
- {
- field: "Price",
- width: 100,
- enableCellEdit: true
- },
- {
- field: "Stocks",
- width: 120,
- enableCellEdit: true,
- cellTemplate: basicCellTemplate
- },
- {
- field: "Action",
- width: 200,
- enableCellEdit: false,
- cellTemplate: '<button id="editBtn" type="button" class="btn btn-xs btn-info" ng-click="updateCell()" >Click a Cell for Edit </button>'
- }]
- };
Added the cell edit code on scope
- var basicCellTemplate = '<div class="ngCellText" ng-class="col.colIndex()" ng-click="editCell(row.entity, row.getProperty(col.field), col.field)"><span class="ui-disableSelection hover">{{row.getProperty(col.field)}}</span></div>';
Added the grouping code on scope and calling it on click of “CompanyByName and Price” button.
- $scope.changeGroupBy = function (group1, group2) {
- $scope.gridOptions.$gridScope.configGroups = [];
- $scope.gridOptions.$gridScope.configGroups.push(group1);
- $scope.gridOptions.$gridScope.configGroups.push(group2);
- $scope.gridOptions.groupBy();
- }
This is all about the basics of ng-grid. I hope you have understood what ng-grid is and how to use it. Thanks for reading.
Marcio RodriguesPosted Apr 25, 2017, 1:18 PM
The example 2, no found data, in other words, no bind with my api controller. How do you do that controller request APIController for return data.???
Former memberPosted Apr 11, 2017, 7:21 AM
How can u write $scope.gridOptions = { data: 'Data' }; because data is a property of $scope. so when you assign $scope.gridOptions = { data: 'Data' }; then how angular will be able to understand that you try to point data property of scope ? $scope.Data = [{ Name: "Sachin", Skill: "ASP.NET" ,location:"Delhi"}, { Name: "Ramesh", Skill: "C#.NET, VB", location: "Chenai" }, { Name: "Pradeep", Skill: "ASP.NET MVC", location: "Bangalore" }, { Name: "Manas", Skill: "SQL Server", location: "Chenai" }, { Name: "Sachin", Skill: "ASP.NET", location: "Bangalore" }, ]; $scope.gridOptions = { data: 'Data' }; see this line promiseGet.then(function (pl) { $scope.Employees = pl.data, $scope.Data=pl.data }, and $scope.gridOptions = { data: 'Data' }; here $scope.Data=pl.data declared in different scope so how you can access data from outer scope like $scope.gridOptions = { data: 'Data' }; please guide me to understand your code. thanks
Pradeep SahooPosted May 19, 2016, 10:32 PM
Hello Smith , Steps have been mentioned please follow the steps .;will be useful for me to help you if you mention where do you face the issue .....
DyansmithPosted May 19, 2016, 10:23 PM
Thanks for writting this article .....helpful for me ..you saved my day...
DyansmithPosted May 19, 2016, 10:22 PM
I am looking to implement this functionality ...Can you please help me out...
jenip shresthaPosted May 13, 2016, 2:28 AM
nice one
Rajeev PunhaniPosted Mar 31, 2016, 7:19 AM
Good example.
monika bishtPosted Mar 10, 2016, 12:07 AM
Hi , i m looking for the functionality where on the button click whole row can be edited . please help.
Asfend YarPosted Feb 29, 2016, 2:17 PM
great job
Mehul HPosted Feb 29, 2016, 10:34 AM
Where is the Source Code for this. The Example ain't working, Kindly upload the working Source Code.
Pradeep SahooPosted Feb 9, 2016, 10:35 PM
Please Put the debugger and check what is the reason you are getting 404 error. did you enable "CORS" in your server code.
Mark ColePosted Feb 9, 2016, 8:04 PM
I'm getting a 404 on the employeeservice API. Am I missing a step?
Pradeep SahooPosted Dec 15, 2015, 4:26 AM
Hi Joginder. What error you are getting . Please let me know the exact error you get .
Joginder BangerPosted Sep 28, 2015, 6:11 AM
Above example Not working, plz check and change the code or remove this articles..
Grant SpiteriPosted Aug 18, 2015, 11:40 PM
Nice one
Debendra DashPosted Jun 19, 2015, 10:32 AM
good one ..
Rahul Kumar SaxenaPosted May 21, 2015, 3:30 AM
Good Show..
Santhakumar MunuswamyPosted May 20, 2015, 3:00 PM
Good work