

If you come from a Windows Forms background, you must have heard of shaped Windows Forms or non-rectangular Windows Forms. A non-rectangular Windows Forms has a user interface that is not a typical rectangular Window you see in Windows user interfaces. The window can be of any shape such as a drawing, a fruit, a stereo player and so on.
In WPF, there is no concept of Windows Forms. Every user interface in WPF is represented by a Window. In this article, you will learn how to create non-rectangular shaped Windows in WPF.
In Windows Forms, to create non-rectangular shaped Forms, we used to create a Path and set the Path property of a Path.
Creating non-rectangular interfaces in WPF is actually simpler than in Windows Forms. We just have to set the AllowsTransparency property of a Window to True and the Background to Transparent. After that whatever you place on that Window does not have a typical Window background.
- <Window x:Class="NonRectWindowSample.Window1"
- xmlns="http://schemas.microsoft.com/winfx/2006/xaml/presentation"
- xmlns:x="http://schemas.microsoft.com/winfx/2006/xaml"
- Title="Window1"
- AllowsTransparency="True"
- Background="Transparent">
- </Window>
So let's say we need to create a user interface that looks like Figure 1. We simply have to create a Path with the similar UI and place it on a transparent Window. That will do the trick.
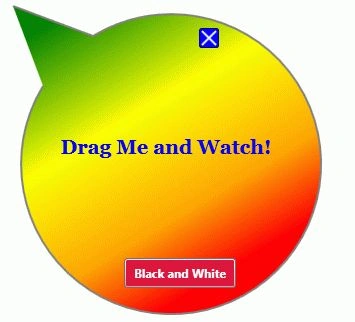
Figure 1
The complete code of the Window in XAML looks like Listing 1.
- <Window x:Class="NonRectWindowSample.Window1"
- xmlns="http://schemas.microsoft.com/winfx/2006/xaml/presentation"
- xmlns:x="http://schemas.microsoft.com/winfx/2006/xaml"
- Title="Window1" SizeToContent="WidthAndHeight"
- MouseLeftButtonDown="Window_MouseLeftButtonDown"
- WindowStyle="None"
- AllowsTransparency="True"
- Background="Transparent">
- <Canvas Width="400" Height="400" Name="RootLayout" >
- <Path Stroke="Gray" StrokeThickness="2" Name="UIPath" >
- <Path.Fill>
- <LinearGradientBrush StartPoint="0.2,0" EndPoint="0.8,1" >
- <GradientStop Color="Green" Offset="0" />
- <GradientStop Color="Yellow" Offset="0.35" />
- <GradientStop Color="Orange" Offset="0.65" />
- <GradientStop Color="Red" Offset="0.85" />
- </LinearGradientBrush>
- </Path.Fill>
- <Path.Data>
- <PathGeometry >
- <PathFigure StartPoint="50,100">
- <ArcSegment Size="150,150" RotationAngle="45" IsLargeArc="True"
- SweepDirection="CounterClockwise" Point="100,50" />
- <LineSegment Point="20,20"/>
- </PathFigure>
- </PathGeometry>
- </Path.Data>
- </Path>
- <Label Width="226" Height="68" FontSize="20" FontFamily="Georgia" FontWeight="Bold"
- HorizontalContentAlignment="Center" VerticalContentAlignment="Center"
- Canvas.Left="60" Canvas.Top="127"
- Foreground="Blue" >
- Drag Me and Watch!
- </Label>
- <Button Canvas.Left="206" Canvas.Top="42" Height="0" Width="0"
- ToolTip="Click me to close the form." Name="CloseButton" Click="CloseButton_Click">
- <Button.Template>
- <ControlTemplate>
- <Canvas>
- <Rectangle Width="20" Height="20" Stroke="DarkBlue" RadiusX="2" RadiusY="2">
- <Rectangle.Fill>
- <SolidColorBrush x:Name="myAnimatedBrush" Color="Blue" />
- </Rectangle.Fill>
- </Rectangle>
- <Line X1="3" Y1="3" X2="17" Y2="17" Stroke="White" StrokeThickness="2"></Line>
- <Line X1="17" Y1="3" X2="3" Y2="17" Stroke="White" StrokeThickness="2"></Line>
- </Canvas>
- </ControlTemplate>
- </Button.Template>
- </Button>
- <Button Canvas.Left="131" Canvas.Top="272" Height="30" Name="BlackNWhiteButton" Width="112"
- Foreground="White" Background="Crimson" Click="BlackNWhiteButton_Click" FontWeight="Bold">
- Black and White
- </Button>
- </Canvas>
- </Window>
Listing 1
We also write code listed in Listing 2 for the left mouse button click event handler and call DragMove method of the Window that is responsible for moving a Window position when a Window is dragged. The Close button click event handler simply closes the Window.
On the Black and White button click event handler, we change the background of the Window to a black and white color gradient.
- private void Window_MouseLeftButtonDown(object sender, MouseButtonEventArgs e) {
- this.DragMove();
- }
- private void CloseButton_Click(object sender, RoutedEventArgs e) {
- this.Close();
- }
- private void BlackNWhiteButton_Click(object sender, RoutedEventArgs e) {
- // Create a linear gradient brush with five stops
- LinearGradientBrush blacknwhiteBrush = new LinearGradientBrush();
- blacknwhiteBrush.StartPoint = new Point(0, 0);
- blacknwhiteBrush.EndPoint = new Point(1, 1);
- // Create and add Gradient stops
- GradientStop blackGS = new GradientStop();
- blackGS.Color = Colors.Black;
- blackGS.Offset = 0.0;
- blacknwhiteBrush.GradientStops.Add(blackGS);
- GradientStop whiteGS = new GradientStop();
- whiteGS.Color = Colors.White;
- whiteGS.Offset = 1.0;
- blacknwhiteBrush.GradientStops.Add(whiteGS);
- UIPath.Fill = blacknwhiteBrush;
- }
Listing 2
Clicking the Black and White button changes the Window that looks like Figure 2,
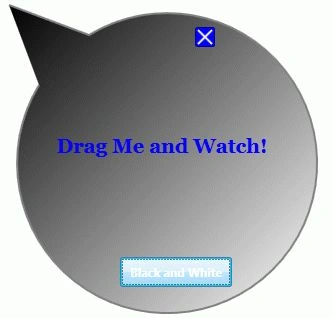
Figure 2
Join the conversation! Your thoughts help the community grow.