

Introduction
Please note, I am using a 2G Modem that means it works only with 2G compatible SIM card. That said, it will not work with 3G or 4G LTE SIM cards. If you have questions regarding the SIM card with which I have tested is the T-Mobile Standard Prepaid SIM card.
Note: The front end .NET WinForm Application was originally coded by Syeda Anila Nusrat. We will be reusing the most and do some small enhancements and code refactoring.
Send and Read SMS through a GSM Modem using AT Commands
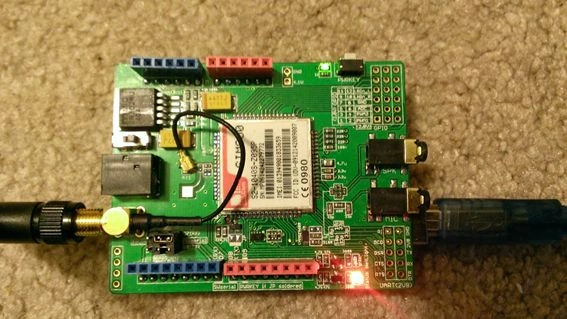
The following is the snapshot of the GSM SIM 900 Shield with Arduino Uno,
 Prerequisites
Figure 1: GSM SIM 900 Shield with Arduino Uno
- Arduino, the most commonly used ones are Arduino Uno.
- GSM SIM 900 – It’s cheap and easy to use the shield. You can buy one from eBay. Please note, the GSM Shield for Arduino comes with a 2G, 3G, etc. The one which I'm using is a Quad-band that means it only works with 2G compatible GSM Sim cards.
- SIM 900 Library for Arduino – You can download it.
Download BETA_GSM_GPRS_GPS_IDE100_v307_1.zip or the latest one.
Background
If you are a beginner to Arduino, take a look at the official Arduino website.
Coding the sample application
We will be programming the Arduino in a very generic way for receiving the AT Commands, which is being sent by the program running on PC.
You can make use of the following tool, which basically connects the Arduino using Serial communication. Once connected, you should be able to send “AT Commands” and receive the response from Arduino.
Sscom32E Serial tool.
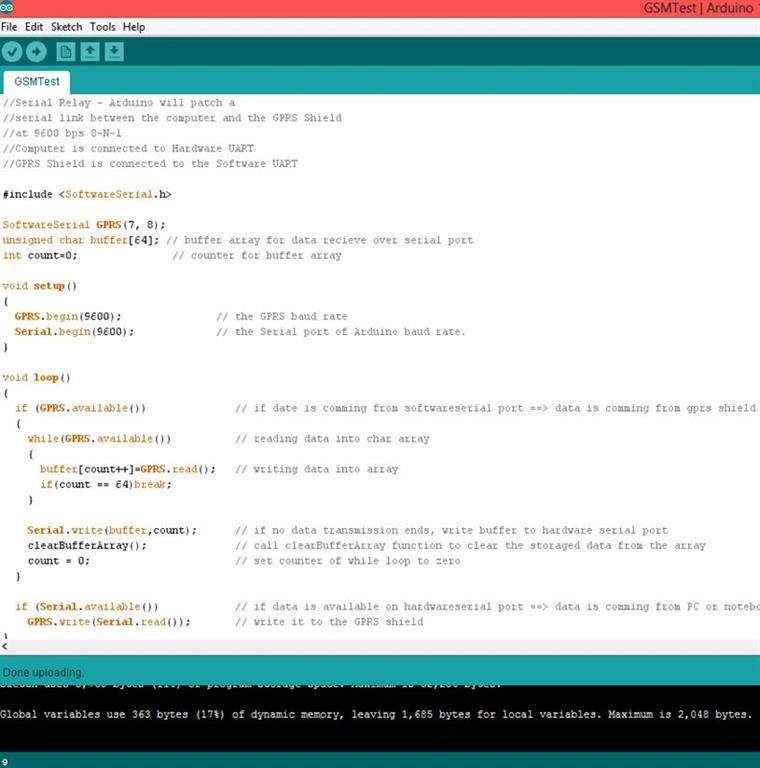
The following is the code snippet that we are making use of for receiving the AT commands and sending back the response through serial communication with the baud rate of 9600.
The snippet for Arduino GSM/GPRS Shield Code.
Here’s what we do
- The first thing, we should be doing is to include the SoftwareSerial library.
- Let us open the serial port and set the serial baud rate to 9600. We will begin with 9600 bits per second over the serial communication. More information about the same can be found at begin().
- Within the loop method, we have to code to receive the AT commands sent from the application running on our PC. Also, we do code for sending the GSM Shield response back to PC. Notice below, when we are sending the response back to PC, we read one character at a time and hold the same in buffer with the size as 64 and then write the same over the serial port. Finally, we will clear the buffer and reset the count back to zero.
- //Serial Relay - Arduino will patch a
- //serial link between the computer and the GPRS Shields
- //at 9600 bps 8-N-1
- //Computer is connected to Hardware UART
- //GPRS Shield is connected to the Software UART
- #
- include < SoftwareSerial.h > SoftwareSerial GPRS(7, 8);
- unsigned char buffer[64]; // buffer array for data received over the serial port
- int count = 0; // counter for buffer array
- void setup()
- {
- GPRS.begin(9600); // the GPRS baud rate
- Serial.begin(9600); // the Serial port of Arduino baud rate.
- }
- void loop()
- {
- if (GPRS.available()) // if date is comming from softwareserial port ==> data is comming from gprs shield
- {
- while (GPRS.available()) // reading data into char array
- {
- buffer[count++] = GPRS.read(); // writing data into array
- if (count == 64) break;
- }
- Serial.write(buffer, count); // if no data transmission ends, write buffer to hardware serial port
- clearBufferArray(); // call clearBufferArray function to clear the storaged data from the array
- count = 0; // set counter of while loop to zero
- }
- if (Serial.available()) // if data is available on hardwareserial port ==> data is comming from PC or notebook
- GPRS.write(Serial.read()); // write it to the GPRS shield
- }
- void clearBufferArray() // function to clear buffer array
- {
- for (int i = 0; i < count; i++)
- {
- buffer[i] = NULL;
- } // clear all index of an array with command NULL
- }
Using the above code in Arduino IDE, let us compile and upload the same to Arduino connected with the GSM Shield, should be all fine for receiving the AT Commands and responding back with the response to / from Shield.
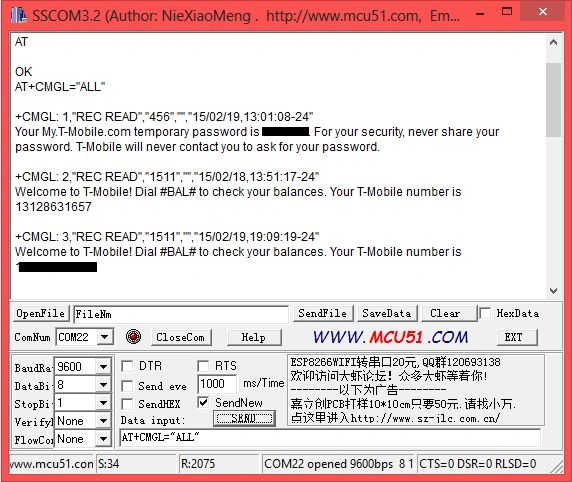
 Let us make use of “Sscom32E” tool and get our hands wet in using AT commands. First you need to select the appropriate serial com port, leave the default data, stop bit, etc. and hit “OpenCom” button so that should open the serial communication with Arduino.
The following is the code snippet, where we are trying to read all SMS by using an AT command, AT+CMGL=”ALL”.
Let us make use of “Sscom32E” tool and get our hands wet in using AT commands. First you need to select the appropriate serial com port, leave the default data, stop bit, etc. and hit “OpenCom” button so that should open the serial communication with Arduino.
The following is the code snippet, where we are trying to read all SMS by using an AT command, AT+CMGL=”ALL”.
 Some more AT Commands
Figure 2: AT Commands and responding
Figure 3: AT command
- Check whether SIM Ready,
AT+CPIN?OK+CPIN: READY
- Get network Info
AT+COPS?
+COPS: 0,0,”T-Mobile”
OK - Voice Call ATD1224XXX31XX;
Hang Up
ATH - Test Signal StrengthAT+CSQ
+CSQ: 11,0
OK - Read Unread messages
AT+CMGL="REC UNREAD"
- Read All messagesAT+CMGL="ALL"
SMS Application (.NET WinForm)
Let us dig into the .NET WinForm application and try to understand how the AT Commands are sent over to Arduino using serial communication.
The following is the code snippet which gets all the “COM” ports and adds them to combo box so that you can select the specific port for communicating with your Arduino.
Note: When you are connecting the Arduino to your PC, you should be able to see the COM port it’s using. That is the port you have to select for sending AT Commands.
- string[] ports = SerialPort.GetPortNames();
- // Add all port names to the combo box:
- foreach (string port in ports)
- {
- this.cboPortName.Items.Add(port);
- }
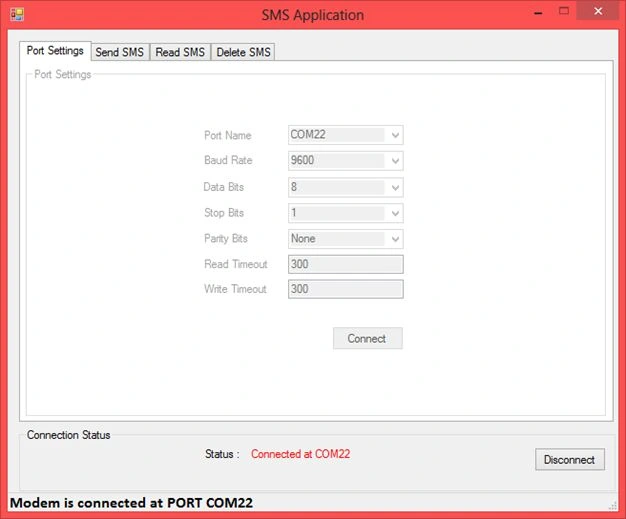
Figure 4: Port Setting
- private void btnOK_Click(object sender, EventArgs e)
- {
- try
- {
- //Open communication port
- this.port = smsHelper.OpenPort(this.cboPortName.Text, Convert.ToInt32(this.cboBaudRate.Text), Convert.ToInt32(this.cboDataBits.Text), Convert.ToInt32(this.txtReadTimeOut.Text), Convert.ToInt32(this.txtWriteTimeOut.Text));
- if (this.port != null)
- {
- this.gboPortSettings.Enabled = false;
- this.statusBar1.Text = "Modem is connected at PORT " + this.cboPortName.Text;
- // Add tab pages
- // Code for adding tabs goes here
- }
- else
- {
- //MessageBox.Show("Invalid port settings");
- this.statusBar1.Text = "Invalid port settings";
- }
- }
- catch (Exception ex)
- {
- ErrorLog(ex.Message);
- }
- }
- public SerialPort OpenPort(string portName, int baudRate, int dataBits, int readTimeout, int writeTimeout)
- {
- receiveNow = new AutoResetEvent(false);
- SerialPort port = new SerialPort();
- try
- {
- port.PortName = portName; //COM1
- port.BaudRate = baudRate; //9600
- port.DataBits = dataBits; //8
- port.StopBits = StopBits.One; //1
- port.Parity = Parity.None; //None
- port.ReadTimeout = readTimeout; //300
- port.WriteTimeout = writeTimeout; //300
- port.Encoding = Encoding.GetEncoding("iso-8859-1");
- port.DataReceived += new SerialDataReceivedEventHandler(port_DataReceived);
- port.Open();
- port.DtrEnable = true;
- port.RtsEnable = true;
- }
- catch (Exception ex)
- {
- throw ex;
- }
- return port;
- }
- public void port_DataReceived(object sender, SerialDataReceivedEventArgs e)
- {
- try
- {
- if (e.EventType == SerialData.Chars)
- {
- receiveNow.Set();
- }
- }
- catch (Exception ex)
- {
- throw ex;
- }
- }
- //Close Port
- public void ClosePort(SerialPort port)
- {
- try
- {
- port.Close();
- port.DataReceived -= new SerialDataReceivedEventHandler(port_DataReceived);
- port = null;
- }
- catch (Exception ex)
- {
- throw ex;
- }
- }
- public string SendATCommand(SerialPort port, string command, int responseTimeout, string errorMessage)
- {
- try
- {
- port.DiscardOutBuffer();
- port.DiscardInBuffer();
- receiveNow.Reset();
- port.Write(command + "\r");
- string input = ReadResponse(port, responseTimeout);
- if ((input.Length == 0) || ((!input.EndsWith("\r\n> ")) && (!input.EndsWith("\r\nOK\r\n")))) throw new ApplicationException("No success message was received.");
- return input;
- }
- catch (Exception ex)
- {
- throw ex;
- }
- }
- public string ReadResponse(SerialPort port, int timeout)
- {
- string serialPortData = string.Empty;
- try
- {
- do {
- if (receiveNow.WaitOne(timeout, false))
- {
- string data = port.ReadExisting();
- serialPortData += data;
- }
- else
- {
- if (serialPortData.Length > 0) throw new ApplicationException("Response received is incomplete.");
- else throw new ApplicationException("No data received from phone.");
- }
- }
- while (!serialPortData.EndsWith("\r\nOK\r\n") && !serialPortData.EndsWith("\r\n> ") && !serialPortData.EndsWith("\r\nERROR\r\n"));
- }
- catch (Exception ex)
- {
- throw ex;
- }
- return serialPortData;
- }
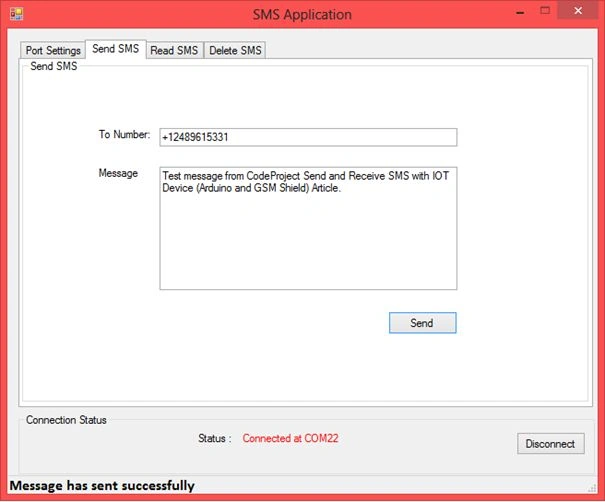
Figure 5: SMS Application
- AT+CMGF=1 <ENTER>
Indicates we are interesting in sending text messages. Please note, using this one you cannot send a Unicode message.
- AT+CMGS="+1224XXXXXX" <ENTER>
Test message from CodeProject Send and Receive SMS with IOT Device (Arduino and GSM Shield) <CTRL-Z>
Here’s what we do for sending SMS,
- Send an “AT” command to check whether the phone is connected.
- Send a command with AT+CMGF=1, indicating that we will be sending a text message.
- Send a command with AT+CMGS="+1224XXXXXX" <ENTER>
Now send a command with the text message that you wish to send with a <CTRL-Z> in the end.
- public bool SendMessage(SerialPort port, string phoneNo, string message)
- {
- bool isSend = false;
- try
- {
- string recievedData = SendATCommand(port, "AT", 300, "No phone connected");
- string command = "AT+CMGF=1" + char.ConvertFromUtf32(13);
- recievedData = SendATCommand(port, command, 300, "Failed to set message format.");
- // AT Command Syntax - http://www.smssolutions.net/tutorials/gsm/sendsmsat/
- command = "AT+CMGS=\"" + phoneNo + "\"" + char.ConvertFromUtf32(13);
- recievedData = SendATCommand(port, command, 300, "Failed to accept phoneNo");
- command = message + char.ConvertFromUtf32(26);
- recievedData = SendATCommand(port, command, 3000, "Failed to send message"); //3 seconds
- if (recievedData.EndsWith("\r\nOK\r\n")) isSend = true;
- else if (recievedData.Contains("ERROR")) isSend = false;
- return isSend;
- }
- catch (Exception ex)
- {
- throw ex;
- }
- }
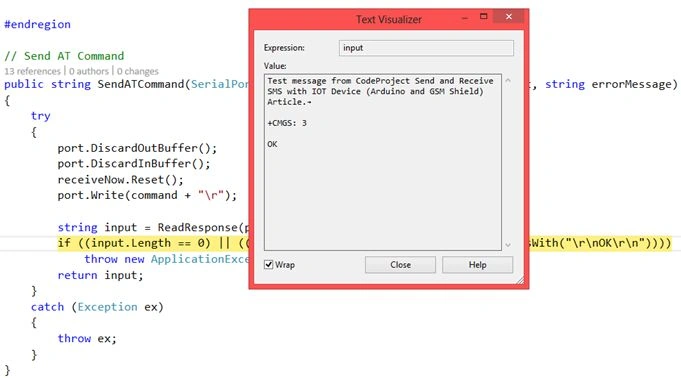
Figure 6: Text visualize
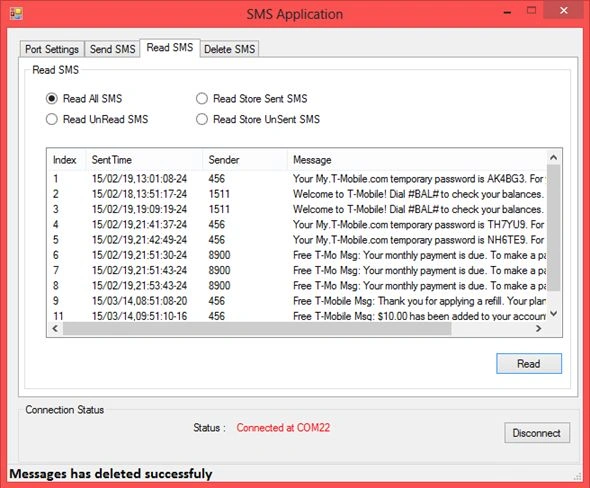
Figure 7: Read SMS
- Read all messages - "AT+CMGL=\"ALL\""
- Read unread messages - “AT+CMGL=\"REC UNREAD\""
- Read store sent messages - "AT+CMGL=\"STO SENT\""
- Read store unsent messages - AT+CMGL=\"STO UNSENT\""
We will be sending the above mentioned AT commands to GSM Modem using serial communication. Once we receive the response, we will be parsing the same returning back to the caller.
- public ShortMessageCollection ReadSMS(SerialPort port, string atCommand)
- {
- // Set up the phone and read the messages
- ShortMessageCollection messages = null;
- try
- {#
- region Execute Command
- // Check connection
- SendATCommand(port, "AT", 300, "No phone connected");
- // Use message format "Text mode"
- SendATCommand(port, "AT+CMGF=1", 300, "Failed to set message format.");
- // Read the messages
- string input = SendATCommand(port, atCommand, 5000, "Failed to read the messages.");#
- endregion# region Parse messages
- messages = ParseMessages(input);#
- endregion
- }
- catch (Exception ex)
- {
- throw ex;
- }
- if (messages != null) return messages;
- else return null;
- }
- public ShortMessageCollection ParseMessages(string input)
- {
- ShortMessageCollection messages = new ShortMessageCollection();
- try
- {
- Regex r = new Regex(@"\+CMGL: (\d+),"
- "(.+)"
- ","
- "(.+)"
- ",(.*),"
- "(.+)"
- "\r\n(.+)\r\n");
- Match m = r.Match(input);
- while (m.Success)
- {
- ShortMessage msg = new ShortMessage();
- msg.Index = m.Groups[1].Value;
- msg.Status = m.Groups[2].Value;
- msg.Sender = m.Groups[3].Value;
- msg.Alphabet = m.Groups[4].Value;
- msg.Sent = m.Groups[5].Value;
- msg.Message = m.Groups[6].Value;
- messages.Add(msg);
- m = m.NextMatch();
- }
- }
- catch (Exception ex)
- {
- throw ex;
- }
- return messages;
- }
- public bool DeleteMessage(SerialPort port, string atCommand)
- {
- bool isDeleted = false;
- try
- {#
- region Execute Command
- string recievedData = SendATCommand(port, "AT", 300, "No phone connected");
- recievedData = SendATCommand(port, "AT+CMGF=1", 300, "Failed to set message format.");
- String command = atCommand;
- recievedData = SendATCommand(port, command, 300, "Failed to delete message");#
- endregion
- if (recievedData.EndsWith("\r\nOK\r\n"))
- {
- isDeleted = true;
- }
- if (recievedData.Contains("ERROR"))
- {
- isDeleted = false;
- }
- return isDeleted;
- }
- catch (Exception ex)
- {
- throw ex;
- }
- }
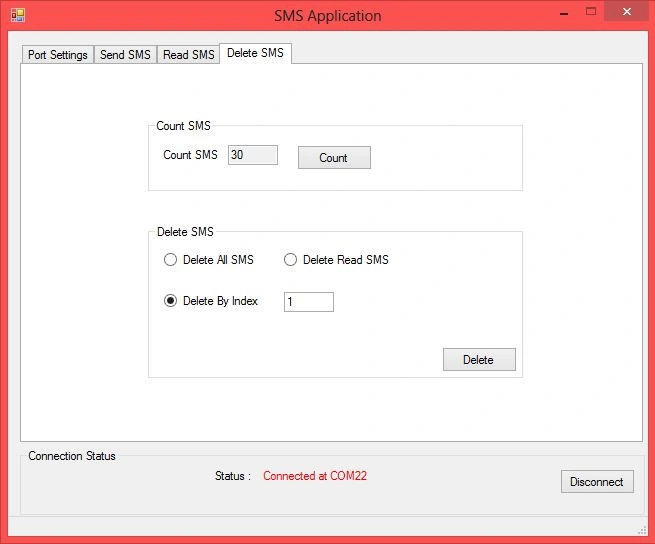
Figure 8: Delete SMS
Sr KarthigaPosted Jan 23, 2016, 5:35 AM
Nice share
Nilesh JadavPosted Oct 27, 2015, 2:59 AM
Good Work
Humayun Kabir MamunPosted Oct 27, 2015, 12:22 AM
Nice...
Gowtham KPosted Oct 26, 2015, 11:07 AM
Good One
Priyaranjan K SPosted Oct 26, 2015, 8:24 AM
Thanks for the share .