

Introduction
This article describes an easy approach to building a simple image mapping utility that may be used to mark and store points as pixel based coordinates from an image file or directly from a web page. The application is capable of capturing a collection of points and it allows the user to name and save a point collection established using the tool into a text file.
The application could be used to do things such as to digitize an image by collecting points from key features in the image. For example, if one were to want to collect sizing and spacing information on an analog display for the purposes of defining a method for creating a digital version of that device, the application could be used in conjunction with a 1:1 scale image of the device to determine where to draw lines, add text and size text, etc. For web development, the application could be used as an aid to defining sizes and shapes of areas used in an image map.
Upon initialization of the application, the user may operate in either of two modes:
- By loading an image file directly into the application, or,
- Setting the application's opacity to allow the user to view objects beneath the application.
In either case, once an image is loaded or made visible through the application, the user may mouse around the edges of an object to view the coordinates at any given point. If the user wants to capture the points and save them into a file, they may right click on the application to expose a context menu. The menu contains options to start and stop recording. Once start recording is selected, the application will store the coordinates for each selected point and will continue to so until the user selects stop recording. Once stop recording is selected, the application will expose a save file dialog and will capture the user defined file name and path from that dialog, this information will be used to store the entire point collection saved up until that point.

Figure 1: Image Mapping Utility in Use
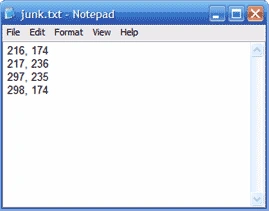
Figure 2: Text File Output of Application Stored Points
Getting Started:
In order to get started, unzip the attachment and load the solution into Visual Studio 2005. Examine the solution explorer and note the files contained in the project:
The contents of the solution show that it contains a single project entitled, "ImageMapper". This project contains a single form class called "frmMain". The frmMain.vb class contains is the only class contained in the project.
A quick check of the references will reveal that only the default class libraries are contained in the project.
The Code: The frmMain Class.
The frmMain class contains all of the code used within the application. This class imports System.Text and System.IO which are used for storing the point data into a text file.
The form itself contains a menu with these options:
- File
- Load Image File option
- Exit Application option
- Crosshairs
- Color option
- Visibility Option
- Opacity
- 100% to 10% options
The form also contains a context menu which is associated with a picture box control; its contents are:
- Start Recording
- Stop Recording
- Cancel
The window contains a picture box which has its dock property set to full. The class also has an open file dialog, save file dialog, a color dialog, and a tooltip.
Following the imports and class declaration, the first section of code in the application is a declarations region which includes the following variable declarations:
#Region "Declarations"
Private mCrosshairs As Boolean
Private mLineColor As System.Drawing.Color
Private mRecord As Boolean
Private mPoints As SortedList
Private mPointCount As Integer
#End Region
The crosshairs variable is used to determine whether or not to display the crosshairs at the current mouse position. If the variable is set to false, the crosshairs will not be shown and the user will see only a standard cross shaped cursor. With the variable set to true, the user will be shown full screen crosshairs centered on the present position of the mouse pointer. The crosshairs were intended to provide an aid to setting points along edges.
The line color variable is used to store a color used to draw the crosshairs.
The record variable is used to determine whether or not the application will store the user's left mouse clicks at points.
The points variable is a sorted list that is used to temporarily store the point collection as the user adds points to be saved.
The point count variable is used to keep track of the number of points saved in the sorted list.
Following the declarations, the next bit of code in the application is the form constructor; this block is used to set some of the variables upon initialization of the application. That code is as follows:
Public Sub New()
' This call is required by the Windows Form Designer.
InitializeComponent()
mLineColor = Color.Crimson
mPointCount = 0
Me.DoubleBuffered = True
mCrosshairs = True
End Sub
The next bit of code is the load image file menu option's click event handler; that code is as follows:
Private Sub LoadImageFileToolStripMenuItem_Click(ByVal sender As System.Object,
ByVal e As System.EventArgs) Handles LoadImageFileToolStripMenuItem.Click
Dim openFile As New System.Windows.Forms.OpenFileDialog
openFile.DefaultExt = "bmp"
openFile.Filter = "Bitmap File (*.bmp)|*.bmp|Jpeg File (*.jpg)|*.jpg|Gif File
(*.gif)|*.gif"
openFile.ShowDialog()
If openFile.FileNames.Length > 0 Then
Dim img As New Bitmap(openFile.FileName.ToString())
PictureBox1.Image = img
PictureBox1.Refresh()
End If
End Sub
This code is used to load an image into the application's picture box control. The code opens an open file dialog box that permits the user to select a common image file from the file system; once the file's name and path are defined based upon the user's selection, the application creates a new bitmap from the file and sets the picture box's image property to contain that image.
The next item in the file is the file menu's exit option; that code is simple enough:
Private Sub ExitToolStripMenuItem_Click(ByVal sender As System.Object, ByVal e As
System.EventArgs) Handles ExitToolStripMenuItem.Click
Application.Exit()
End Sub
The next code block is the crosshair menu's color menu option click event handler, which code is as follows:
Private Sub ColorToolStripMenuItem_Click(ByVal sender As System.Object, ByVal e
As System.EventArgs) Handles ColorToolStripMenuItem.Click
ColorDialog1.AllowFullOpen = True
ColorDialog1.AnyColor = True
ColorDialog1.FullOpen = True
If (ColorDialog1.ShowDialog() = Windows.Forms.DialogResult.OK) Then
mLineColor = ColorDialog1.Color
End If
End Sub
This code block exposes a color dialog and allows the user to select a color; that color is subsequently used to set the color variable's value to contain the selected color. The application uses that stored color value to set the color of the crosshairs as they are drawn.
Next up is subroutine used to set all of the opacity menu's subordinate options check marks to unchecked; this subroutine is called whenever the user selects a new opacity option:
Private Sub ClearOpacityChecks()
mnu100percent.Checked = False
mnu90percent.Checked = False
mnu80percent.Checked = False
mnu70percent.Checked = False
mnu60percent.Checked = False
mnu50percent.Checked = False
mnu40percent.Checked = False
mnu30percent.Checked = False
mnu20percent.Checked = False
mnu10percent.Checked = False
End Sub
Next up are the menu options used to set the application's opacity; there are similar options for each of the opacity settings exposed in the menu:
Private Sub mnu100percent_Click(ByVal sender As System.Object, ByVal e As
System.EventArgs) Handles mnu100percent.Click
ClearOpacityChecks()
mnu100percent.Checked = True
Me.Opacity = 1
End Sub
Join the conversation! Your thoughts help the community grow.