

Every control has a tooltip property but sometimes we need some special CSS or some kind of functionality for whenever we hover the mouse the tooltip tracks. For this kind of feature we have a jQuery tootip. The jQuery tooltip is part of the jQuery UI. In this article I will show you how to implement a jQuery tooltip in your ASP.Net application.
So let’s start the implementation of the tooltip in our website.
- Open Visual Studio
- "File" -> "New" -> "Project..."
- Choose "Visual C#" -> "Web" then select "ASP.NET MVC4 Web Application"
- Add a new Internet Application then click "OK"
Step 1: Create a new ActionResult Method in the Controller
HomeController.cs
public ActionResult ToolTipDemo()
{
return View();
}
Step 2: Right-click in this method area and click on "Add View" then click "Add".
TooTipDemo.cshtml
<link rel="stylesheet" href="http://code.jquery.com/ui/1.10.3/themes/smoothness/jquery-ui.css">
<script src="http://code.jquery.com/jquery-1.9.1.js"></script>
<script src="http://code.jquery.com/ui/1.10.3/jquery-ui.js"></script>
<style type="text/css">
.ui-tooltip {
font-size: small;
font-family: Arial;
}
</style>
ViewBag.Title = "ToolTipDemo";
}
<h2>ToolTipDemo</h2>
<style>
label {
display: inline-block;
width: 5em;
}
</style>
<script>
$(document).ready(function () {
$(document).tooltip({
track: true
});
});
</script>
<table>
<tr>
<td>
Name
</td>
<td>
<input type="text" id="txtName" title="Your Full Name Please."
</td>
</tr>
<tr>
<td>
Phone
</td>
<td>
<input type="text" id="txtPhone" title="Your phone no. (+CountryCode)-(Std Code)-(Phone no.)."
</td>
</tr>
<tr>
<td>
Age
</td>
<td>
<input type="text" id="txtAge" title="Fill your age."
</td>
</tr>
<tr>
<td>
Date of Birth
</td>
<td>
<input type="text" id="txtDob" title="Fill DOB in MM/dd/yyyy Format"
</td>
</tr>
</table>
That’s it, Press F5 , run your code.
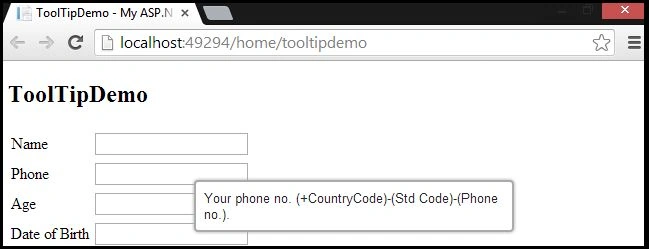
Understanding the code
As I said before the jQuery tooltip is part of the jQuery UI, so we add here these file links.
<link rel="stylesheet" href="http://code.jquery.com/ui/1.10.3/themes/smoothness/jquery-ui.css">
<script src="http://code.jquery.com/jquery-1.9.1.js"></script><script src="http://code.jquery.com/ui/1.10.3/jquery-ui.js"></script>
For the jQuery UI, we need these files.
Now look at the following code.
<script>
$(document).ready(function () {
$(document).tooltip({
track: true
});
});
</script>
We use here:
$(document).tooltip({
When we write like this, the jQuery tooltip will start automatically in all of the controls where we use the title property(<input type=”text” id=”txtName” title=”Fill your Name”) . Here I use another property under the tooltip section, it is track: true. I hope you say, what is this. When you run this programme and hover your mouse in the area of your textboxes your tooltip tracks with your mouse pointer.
track: true is for that kind of stuff, if you don’t want to use this kind of functionality then you can remove the following lines:
$(document).tooltip({
});
Sometimes we do not need this kind of features for all controls, for example you just want this kind of feature only in your txtDob TextBox control. So just write:
<script>
$(document).ready(function () {
$(‘#txtDob’).tooltip({
track: true
});
});
</script>
Now when you run the program, you can only see the jQuery ToolTip in your txtDob TextBox.
Cipher CoderPosted Jan 14, 2017, 3:01 PM
Thumbs up ! for "Understanding the code" .Very nice, and Overall Beautifull !!!
Vithal WadjePosted Sep 24, 2014, 11:28 AM
super
vasanthasilvaryPosted Feb 13, 2014, 5:14 AM
can I get project as a downloadable file?
sanjay pawarPosted Jan 31, 2014, 12:46 AM
help full article thanks Siurabh !!
AntarikshPosted Jan 17, 2014, 7:58 AM
Thanks Sourabh !!
Sourabh MishraPosted Jan 14, 2014, 4:36 AM
Hi Antariksh, your welcome. Here is the code @Html.TextBoxFor(m => m.Name, new { @id = "txtName", @title="Please fill your name" })
AntarikshPosted Jan 14, 2014, 3:07 AM
Hi Thanks for the tip. But when we use @html.textboxfor () in MVC then how can i give the title to text box ?