

Introduction
These days, people expect apps to updates in real-time like live chats, notifications, or game scores, without refreshing the page again and again. SignalR in .NET Core helps you do just that by making real-time communication easy. In this blog, we’ll quickly show you how to get started with it in your own .NET Core project.
What is SignalR?
SignalR is a real-time messaging library developed by Microsoft that allows two-way communication between clients, like web browsers, mobile apps, or desktop applications, and the server. It offers an easy and scalable way to add real-time features to your web applications, so users can get updates and messages instantly without needing to refresh the page or make manual requests.
Usages of SignalR
Here are some common use cases where SignalR can be a great fit for adding real-time functionality to your applications.
- Chat Applications: SignalR is perfect for building mid-level chat applications where users can exchange messages instantly. It supports sending messages to all users, specific groups, or individual users in real-time. For a higher-level chatting application, XMPP or WebSocket is the best option.
- Notifications: You can use SignalR to push real-time notifications to users for events such as new messages, system alerts, or order updates without making them refresh the page.
- Live Dashboards: For use cases like monitoring systems or admin panels, SignalR enables real-time dashboards that automatically refresh as data changes, helping users make quick decisions.
- Online Exams or Quizzes: SignalR can be used in online test platforms to push time updates or instant results to participants during live sessions.
- Live Polls and Q&A: Apps that conduct live polls or Q&A during webinars or events can benefit from SignalR by showing real-time responses and updates to all viewers instantly.
- Collaboration Tools: SignalR is again helpful in mid-level collaborative apps where multiple users need to work together in real-time—like document editing, whiteboards, or project tracking tools.
How to use in an ASP.NET Core project?
To use in a .NET Core project, you have to install the SignalR NuGet package. Run the below command from NuGet Package Manager or PowerShell
# .NET CLI
dotnet add package Microsoft.AspNet.SignalR

# Nuget Package Manager
NuGet\Install-Package Microsoft.AspNet.SignalR
Now you have to create a Hub. Let's say we are building a chatbot using SignalR; hence, we are creating a chat hub. This hub will handle the server-side logic for sending messages.
// ChatHub.cs
using Microsoft.AspNetCore.SignalR;
using System.Threading.Tasks;
public class ChatHub : Hub
{
    public async Task SendMessage(string user, string message)
    {
        await Clients.All.SendAsync("ReceiveMessage", user, message);
    }
}
Next, we have to register ChatHub in the program.cs file so that it can initialize at the time of starting.
// program.cs

var builder = WebApplication.CreateBuilder(args);

// Register services
builder.Services.AddRazorPages();
builder.Services.AddSignalR(); // Register SignalR

var app = builder.Build();

// Configure middleware
app.UseStaticFiles();
app.UseRouting();

// Map endpoints
app.MapRazorPages();
app.MapHub<ChatHub>("/chathub"); // Map Chathub with an endpoint

app.Run();
How to use in Front-end projects?
As our backend code is reday. Now let's use this in the frontend. Either you can use CDN script of SignalR or npm package of SignalR in case of Angular, React, or Next JS like below.
Using CDN
<!-- CDN for SignalR -->
<script src="https://cdnjs.cloudflare.com/ajax/libs/microsoft-signalr/7.0.5/signalr.min.js"></script>

<script>
    // Setting up the endpoint
    const connection = new signalR.HubConnectionBuilder()
        .withUrl("/chathub")
        .build();

    connection.on("ReceiveMessage", (user, message) => {
        const msg = `${user} - ${message}`;
        const li = document.createElement("li");
        li.textContent = msg;
        document.getElementById("messagesList").appendChild(li);
    });

    connection.start()
        .catch(err => console.error(err.toString()));

    document.getElementById("sendButton").addEventListener("click", () => {
        const user = document.getElementById("userInput").value;
        const message = document.getElementById("messageInput").value;

        connection.invoke("SendMessage", user, message)
            .catch(err => console.error(err.toString()));
    });
</script>
Using an NPM package in Angular
To use in Angular, you have to install the SignalR npm package
npm install @microsoft/signalr
Then have to create a service for the communication.
/* signalr.service.ts */

import { Injectable } from '@angular/core';
import * as signalR from '@microsoft/signalr';

@Injectable({
  providedIn: 'root'
})
export class SignalrService {
  private hubConnection: signalR.HubConnection;
  public messages: string[] = [];

  public startConnection(): void {
    this.hubConnection = new signalR.HubConnectionBuilder()
      .withUrl('http://localhost:5000/chathub') // URL to be fetched from environment config
      .build();

    this.hubConnection
      .start()
      .then(() => console.log('Connection started'))
      .catch(err => console.log('Error while starting connection: ' + err));

    this.hubConnection.on('ReceiveMessage', (user: string, message: string) => {
      this.messages.push(`${user}: ${message}`);
    });
  }

  public sendMessage(user: string, message: string): void {
    this.hubConnection.invoke('SendMessage', user, message)
      .catch(err => console.error(err));
  }
}
And now it's time to consume this service from a component.
/* app.component.ts */
/* In the blog app.component has been used. In actual project, please create a new component and register */

import { Component, OnInit } from '@angular/core';
import { SignalrService } from './signalr.service';

@Component({
  selector: 'app-root',
  templateUrl: './app.component.html',
})
export class AppComponent implements OnInit {
  user = '';
  message = '';

  constructor(public signalRService: SignalrService) {}

  ngOnInit(): void {
    this.signalRService.startConnection();
  }

  sendMessage(): void {
    this.signalRService.sendMessage(this.user, this.message);
    this.message = '';
  }
}
In the HTML, place the text box & div to view the messages.
<!-- app.component.html -->

<div>
  <input [(ngModel)]="user" placeholder="Your name" />
  <input [(ngModel)]="message" placeholder="Message" />
  <button (click)="sendMessage()">Send</button>

  <ul>
    <li *ngFor="let msg of signalRService.messages">
      {{ msg }}
    </li>
  </ul>
</div>
Architectural components of SignalR
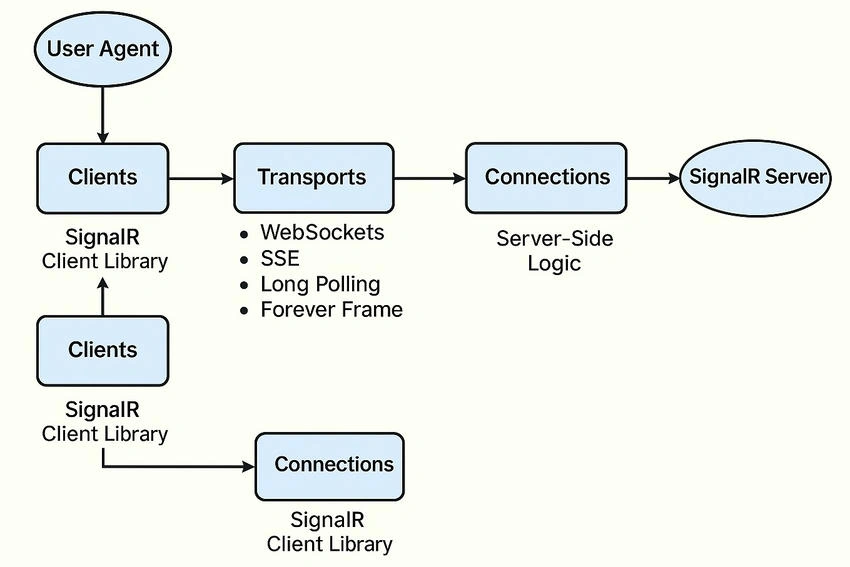
Now, as you know how to use SignalR, let's also deep dive into the architectural components of SignalR. Here are the main parts that make up the SignalR setup.
- Hubs: A Hub is a central part of SignalR that manages communication between the server and connected clients. It takes care of handling connections, sending messages, and converting data formats. With Hubs, clients can call server-side methods, and the server can also call methods on the clients.
- Clients: Clients are applications or devices, such as browsers or mobile apps, that connect to the SignalR server to exchange real-time messages. Using the SignalR client library, these clients can easily send messages to the server and receive updates without delay.
- Transports: SignalR uses different methods, called transports, to create and maintain the connection between the client and the server. These include WebSockets, Server-Sent Events (SSE), Long Polling, and Forever Frame, depending on what the client and server support.
- Connections: A connection refers to the link between a single client and the SignalR server. Each connection has a unique ID that keeps track of the client and sends messages to the right one.
- SignalR Server: The SignalR server handles all the communication between clients. It manages connections, routes messages to the right clients, and controls the flow of data through the pipeline.
Hope this helps you to build your first SignalR application and have a fair understanding of how SignalR works.
Join the conversation! Your thoughts help the community grow.