

Introduction
This is the simple
application for beginners that help to how to add more then one view in a
ASP.NET MVC application. We have know that MVC is the integrated module that
inbuilt on a three separated words Models,Views,Controllers. Now in this
application we have create the multiple view. We know that the in ASP.NET MVC
application Model fields is provide the business logic. View fields is provide
the graphical user interface and last controller field handle the all request
provide by model and view. ASP.NET MVC is the advance version of ASP.NET that
used to developed the flexible web application. In this article we have create
the more then one view in single ASP.NET MVC application that name is
create,index,details,delete and edit.
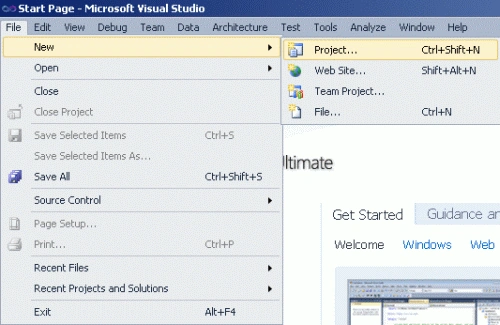
Step 1 : Open Visual Studio 2010.
- Go to file -> New->Projects
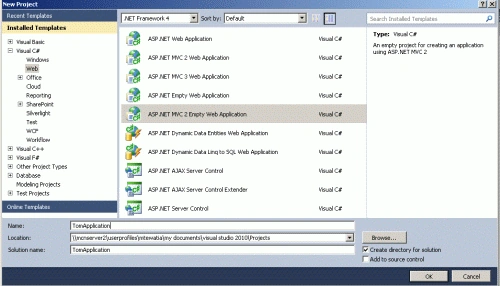
- Create an ASP.NET MVC 2 Empty Web Application
- Name it as "Tomapplication"
Step 2 : Add a class in the model folder
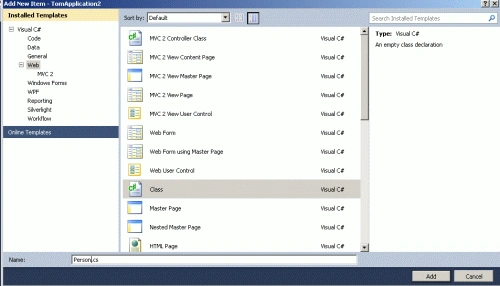
- Right click on the Models folder ->add new items->add class
- Name of Class is "Person"
- In a class define the properties

Step 3 : Define the properties of the class.
Code

Step 4 : Add a controller.
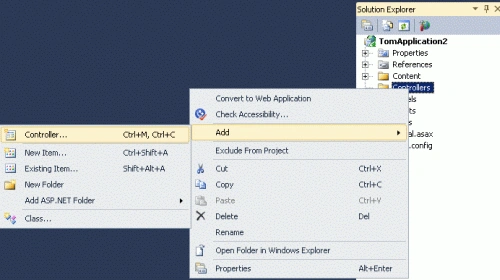
- Right click on the Controllers folder ->add->Controllers
- Name of Controllers is "Home"
- In a controller, define the request
- Add the namespace "using Tomapplication1.Models"
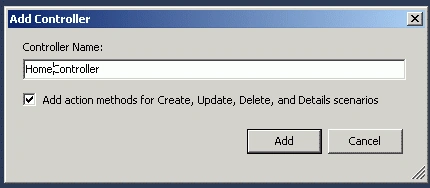
Step 5 : Write a code on controller.
Code
using
System;
using
System.Collections.Generic;
using
System.Linq;
using
System.Web;
using
System.Web.Mvc;
using
Tomapplication1.Models;
namespace
Tomapplication1.Controllers
{
public class
HomeController :
Controller
{
//
// GET: /Home/
static
List<Person>
people = new List<Person>();
public
ActionResult Index()
{
return View(people);
}
//
// GET: /Home/Details/5
public
ActionResult Details(Person
people)}
{
return View(people);
}
//
// GET: /Home/Create
public
ActionResult Create()
{
return View();
}
//
// POST: /Home/Create
[HttpPost]
public
ActionResult Create(Person p)
{
if (!ModelState.IsValid)
{
return View("Create",
p);
}
people.Add(p);
}
return RedirectToAction("Index");
}
//
// GET: /Home/Edit/5
public
ActionResult Edit(int
id)
{
Person p =
new Person();
foreach (Person
pn in people)
{
if (pn.Id == id)
{
p.Name = pn.Name;
p.Age = pn.Age;
p.Id = pn.Id;
p.Phone = pn.Phone;
p.Email = pn.Email;
}
}
return View(p);
}
//
// POST: /Home/Edit/5
[HttpPost]
public
ActionResult Edit(int id,
FormCollection collection)
{
try
{
// TODO: Add update logic here
return RedirectToAction("Index");
}
catch
{
return View();
}
}
//
// GET: /Home/Delete/5
public
ActionResult Delete(int
id)
{
Person p =
new Person();
foreach (Person
pn in people)
{
if (pn.Id == id)
{
p.Name = pn.Name;
p.Age = pn.Age;
p.Id = pn.Id;
p.Phone = pn.Phone;
p.Email = pn.Email;
}
}
return View(p);
}
//
// POST: /Home/Delete/5|
[HttpPost]
public
ActionResult Delete(int id,
FormCollection collection)
{
try
{
// TODO: Add delete logic here
return RedirectToAction("Index");
}
catch
{
return View();
}
}
}
}
Step 6 :
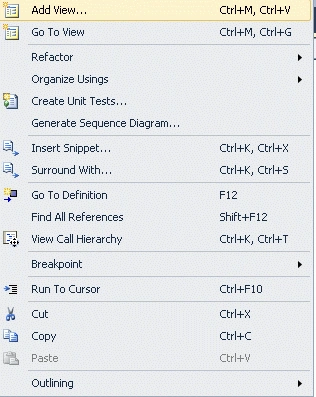
After that we create the views.
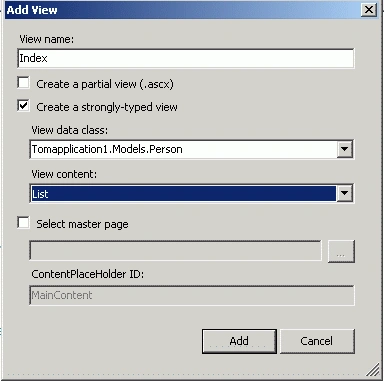
- Right click on the Index Method -> Add View
- View name same as "Index"
- Create a Strong type View
- When you create the Strong type view automatically take the namespace and class name
Code
<%@
Page Language="C#"
Inherits="System.Web.Mvc.ViewPage<IEnumerable<Tomapplication1.Models.Person>>"
%>
<!DOCTYPE
html PUBLIC
"-//W3C//DTD XHTML 1.0 Transitional//EN"
"http://www.w3.org/TR/xhtml1/DTD/xhtml1-transitional.dtd">
<html
xmlns="http://www.w3.org/1999/xhtml"
>
<head
runat="server">
<title>Index</title>
</head>
<body
bgcolor="#6699ff">
<h2>This
is Tom application</h2>
<table>
<tr>
<th></th>
<th>
Id
</th>
<th>
Name
</th>
<th>
Age
</th>
<th>
Phone
</th>
<th>
Email
</th>
</tr>
<%
foreach (var item
in Model) { %>
<tr>
<td>
<%:
Html.ActionLink("Edit",
"Edit", new
{ /*id=item.PrimaryKey*/ })
%> |
<%:
Html.ActionLink("Details",
"Details", new { /* id=item.PrimaryKey */ })%>
|
<%:
Html.ActionLink("Delete",
"Delete", new
{ /* id=item.PrimaryKey */ })%>
</td>
<td>
<%:
item.Id %>
</td>
<td>
<%:
item.Name %>
</td>
<td>
<%:
item.Age %>
</td>
<td>
<%:
item.Phone %>
</td>
<td>
<%:
item.Email %>
</td>
</tr>
<% }
%>
</table>
<p>
<%:
Html.ActionLink("Create New",
"Create") %>
</p>
</body>
</html>
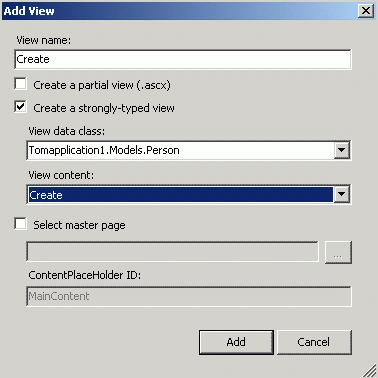
Step 6 : Add the second view that name is create view.
- Right click on the create Method -> Add View
- View name same as "create"
- Create a Strong type View
- When you create the Strong type view automatically take the namespace and class name
Code
<%@
Page Language="C#"
Inherits="System.Web.Mvc.ViewPage<Tomapplication1.Models.Person>"
%>
<!DOCTYPE
html PUBLIC
"-//W3C//DTD XHTML 1.0 Transitional//EN"
"http://www.w3.org/TR/xhtml1/DTD/xhtml1-transitional.dtd">
<html
xmlns="http://www.w3.org/1999/xhtml"
>
<head
runat="server">
<title>Create</title>
</head>
<body
bgcolor="#ff9999">
<%
using (Html.BeginForm()) {%>
<%:
Html.ValidationSummary(true)
%>
<fieldset>
<legend>Fields</legend>
<div
class="editor-label">
<%:
Html.LabelFor(model => model.Id) %>
</div>
<div
class="editor-field">
<%:
Html.TextBoxFor(model => model.Id) %>
<%:
Html.ValidationMessageFor(model => model.Id) %>
</div>
<div
class="editor-label">
<%:
Html.LabelFor(model => model.Name) %>
</div>
<div
class="editor-field">
<%:
Html.TextBoxFor(model => model.Name) %>
<%:
Html.ValidationMessageFor(model => model.Name)
%>
</div>
<div
class="editor-label">
<%:
Html.LabelFor(model => model.Age) %>
</div>
<div
class="editor-field">
<%:
Html.TextBoxFor(model => model.Age) %>
<%:
Html.ValidationMessageFor(model => model.Age)
%>
</div>
<div
class="editor-label">
<%:
Html.LabelFor(model => model.Phone) %>
</div>
<div
class="editor-field">
<%:
Html.TextBoxFor(model => model.Phone) %>
<%:
Html.ValidationMessageFor(model => model.Phone)
%>
</div>
<div
class="editor-label">
<%:
Html.LabelFor(model => model.Email) %>
</div>
<div
class="editor-field">
<%:
Html.TextBoxFor(model => model.Email) %>
<%:
Html.ValidationMessageFor(model => model.Email)
%>
</div>
<p>
<input
type="submit"
value="Create"
/>
</p>
</fieldset>
<% }
%>
<div>
<%:
Html.ActionLink("Back to List",
"Index") %>
</div>
</body>
</html>
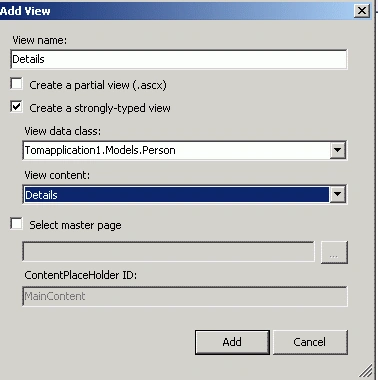
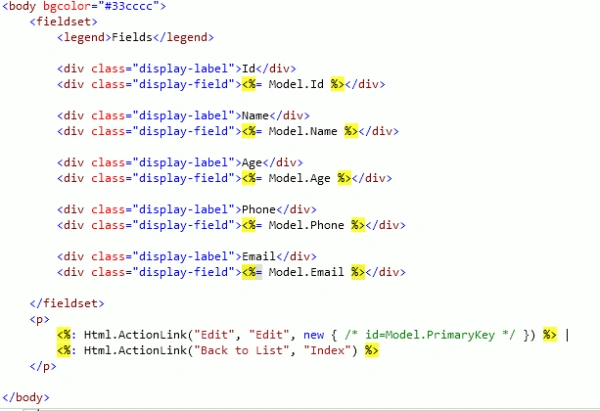
Step 7 : Add the third view that name is detail view.
- Right click on the detail Method -> Add View
- View name same as "detail"
- Create a Strong type View
- When you create the Strong type view automatically take the namespace and class name
Code
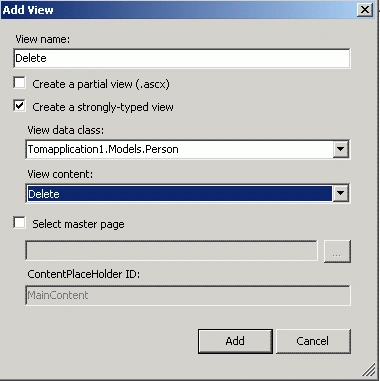
Step 8 : Add the four view that name is delete view.
- Right click on the delete Method -> Add View
- View name same as "delete"
- Create a Strong type View
- When you create the Strong type view automatically take the namespace and class name
Code

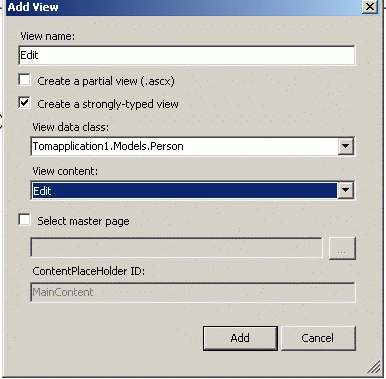
Step 9 : Add the four view that name is edit view.
- Right click on the edit Method -> Add View
- View name same as "edit"
- Create a Strong type View
- When you create the Strong type view automatically take the namespace and class name
Code
<%@
Page Language="C#"
Inherits="System.Web.Mvc.ViewPage<Tomapplication1.Models.Person>"
%>
<!DOCTYPE
html PUBLIC
"-//W3C//DTD XHTML 1.0 Transitional//EN"
"http://www.w3.org/TR/xhtml1/DTD/xhtml1-transitional.dtd">
<html
xmlns="http://www.w3.org/1999/xhtml"
>
<head
runat="server">
<title>Edit</title>
</head>
<body>
<% using (Html.BeginForm()) {%>
<%:
Html.ValidationSummary(true)
%>
<fieldset>
<legend>Fields</legend>
<div
class="editor-label">
<%:
Html.LabelFor(model => model.Id) %>
</div>
<div
class="editor-field">
<%:
Html.TextBoxFor(model => model.Id) %>
<%:
Html.ValidationMessageFor(model => model.Id) %>
</div>
<div
class="editor-label">
<%:
Html.LabelFor(model => model.Name) %>
</div>
<div
class="editor-field">
<%:
Html.TextBoxFor(model => model.Name) %>
<%:
Html.ValidationMessageFor(model => model.Name)
%>
</div>
<div
class="editor-label">
<%:
Html.LabelFor(model => model.Age) %>
</div>
<div
class="editor-field">
<%:
Html.TextBoxFor(model => model.Age) %>
<%:
Html.ValidationMessageFor(model => model.Age)
%>
</div>
<div
class="editor-label">
<%:
Html.LabelFor(model => model.Phone) %>
</div>
<div
class="editor-field">
<%:
Html.TextBoxFor(model => model.Phone) %>
<%:
Html.ValidationMessageFor(model => model.Phone)
%>
</div>
<div
class="editor-label">
<%:
Html.LabelFor(model => model.Email) %>
</div>
<div
class="editor-field">
<%:
Html.TextBoxFor(model => model.Email) %>
<%:
Html.ValidationMessageFor(model => model.Email)
%>
</div>
<p>
<input
type="submit"
value="Save"
/>
</p>
</fieldset>
<% }
%>
<div>
<%:
Html.ActionLink("Back to List",
"Index") %>
</div>
</body>
</html>
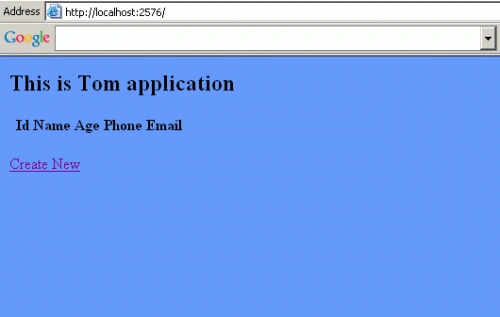
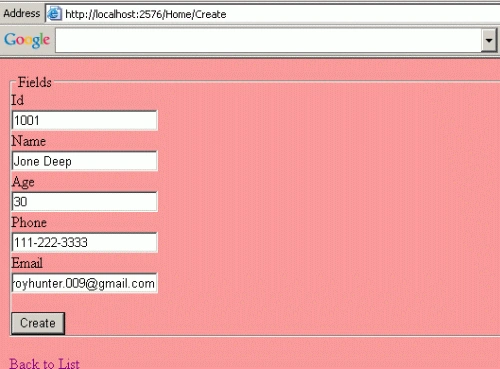
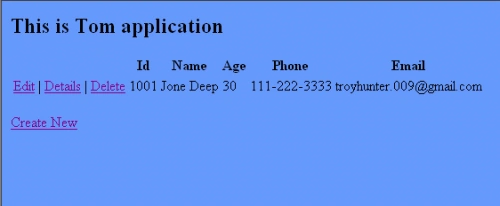
Step10: Press ctrl+F5 run application.
Output
Join the conversation! Your thoughts help the community grow.