

Introduction
Today, Artificial Intelligence is a very common aspect of our daily life. You can notice that most of the companies are using it to create very powerful and smart apps. On Facebook, while you're uploading a photo, it can automatically recognize your face. Also, the bots are available through Facebook Messenger, Cortana, Telegram, and many more. Using Artificial Intelligence makes your app more secure and robust and provides an interesting User Experience.
For example, if you want to create a home renting website, using Artificial Intelligence will make your project more powerful because you can add an Image Content recognizer to it. So, the home ads publishers won’t be able to upload any type of images except Home's; and your website will be more trusted. Also, using bots to make your users able to chat to your app will be amazing and the users will like your project more.
In this article, I’m going to talk about what Microsoft Cognitive Services is and how to use these APIs within your C# apps.
Microsoft Cognitive Services
Microsoft Cognitive Services is a set of APIs and SDKs that Microsoft created for the developers to make it easy for them to add intelligence to their apps, such as emotion and video detection; facial, speech, and vision recognition; and speech and language understanding – into their apps.
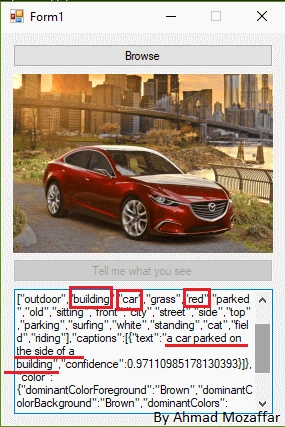
In this article, I will create a simple Windows Forms application and use the Vision API to recognize the content of an image and get the result in a JSON format so that you can manipulate it in a way you prefer.
Note - In this tutorial, I used the Vision API but you can use any of the available APIs with the same steps. Also, you can use any type of applications not only Windows Forms.
Let’s start step by step
Sign up for Microsoft Cognitive Services for free from this link, https://azure.microsoft.com/en-us/try/cognitive-services/. Follow the steps and set your region.
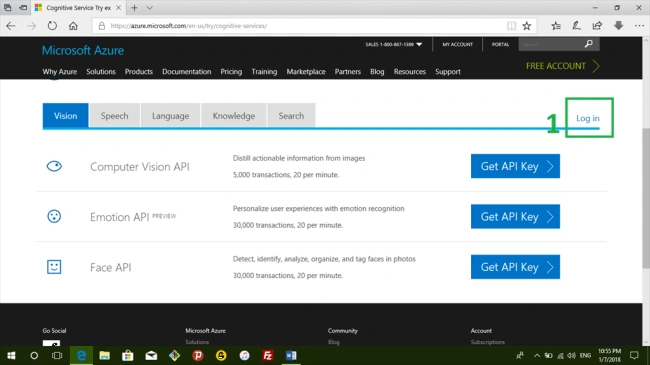
After you log in, choose "Add Vision API" and you will get your endpoint URL and the API key that you will use in your app.
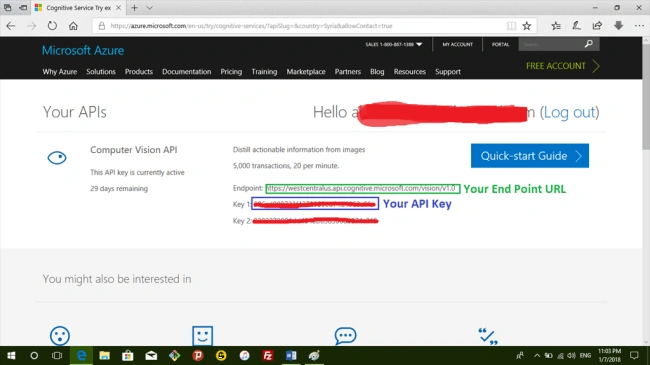
This is all you need to start creating your intelligent app.
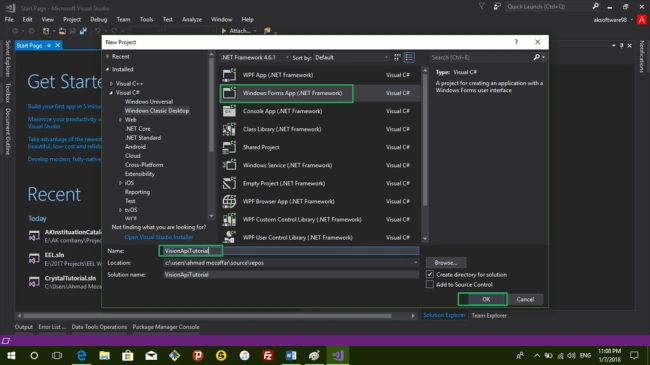
Open Visual Studio and create a new Windows Forms Project.
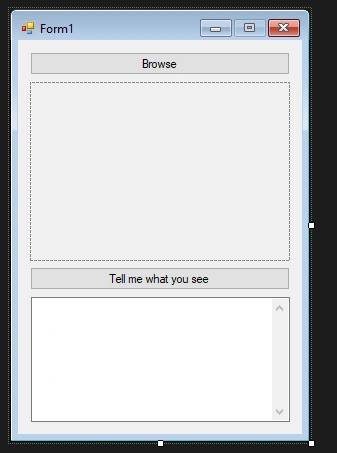
Add two buttons, a picturebox and a textbox as following.
In the code behind file, add the following namespaces:
- using System.Net.Http;
- using System.IO;
Double click on the Browse button to create a click event handler for this button and write the following code to select an image from your local drive.
- string imageFilePath = "";
- private void btnBrowse_Click(object sender, EventArgs e)
- {
- // Create an OpenFileDialogObject
- OpenFileDialog ofd = new OpenFileDialog();
- // Set the filters of the OpenFileDialog to the images formats JPEG and PNG
- ofd.Filter = "JPEG *.jpg|*.jpg|PNG *.png|*.png";
- if(ofd.ShowDialog() == DialogResult.OK)
- {
- // Store the selected file in a general variable
- imageFilePath = ofd.FileName;
- // Preview the selected picture in a pictureBox control
- pictureBox1.Image = Image.FromFile(imageFilePath);
- }
- }
- const string subscriptionKey = "Paste your API key here";
- const string uriBase = "Paste your Endpoint URL here";
- // Method to make the restful request
- async Task<string> MakeAnalaysisRequest(string imageFilePath)
- {
- // Create an HttpClient object to make a post request to the Azure Services
- HttpClient client = new HttpClient();
- // set the following paramters to your request header
- client.DefaultRequestHeaders.Add("Ocp-Apim-Subscription-Key", subscriptionKey);
- // specify the requested resutls
- string requestParamters = "visualFeatures=Categories,Description,Color&language=en";
- // create the uri from your endpoint url and the requestedParamters
- string uri = uriBase + "?" + requestParamters;
- // create a respone message object to get the response of the sent request
- HttpResponseMessage responseMessage;
- // get the bytes of the selected image
- byte[] dataByte = GetImageAsBytesArray(imageFilePath);
- // create a content for the post request _ the content will be the bytes of the picture to send it to the Azure servers
- using (ByteArrayContent content = new ByteArrayContent(dataByte))
- {
- // Define the content type of the request
- content.Headers.ContentType = new System.Net.Http.Headers.MediaTypeHeaderValue("application/octet-stream");
- // send the post request
- responseMessage = await client.PostAsync(uri, content);
- // read the string response from the sent request
- string contentString = await responseMessage.Content.ReadAsStringAsync();
- // return the string result
- return contentString;
- }
- }
- // Method to get the bytes of a specific image file
- private byte[] GetImageAsBytesArray(string imageFilePath)
- {
- // Create a file stream to access to the bytes of the selected file
- FileStream fileStream = new FileStream(imageFilePath, FileMode.Open, FileAccess.Read);
- // Create a BinaryReader object to read the bytes from a specific stream
- BinaryReader reader = new BinaryReader(fileStream);
- // Return the read bytes of a specific file
- return reader.ReadBytes((int)fileStream.Length);
- }
- // Tell me what you see button click event handler
- private async void btnRecoginze_Click(object sender, EventArgs e)
- {
- // get the result
- string result = await MakeAnalaysisRequest(imageFilePath);
- // show the result in the textbox
- txtResult.Text = result;
- }
- using System;
- using System.Drawing;
- using System.Threading.Tasks;
- using System.Windows.Forms;
- using System.Net.Http;
- using System.IO;
- namespace VisionApi
- {
- public partial class Form1 : Form
- {
- public Form1()
- {
- InitializeComponent();
- }
- const string subscriptionKey = "Paste your API key here";
- const string uriBase = "Paste your Endpoint URL here";
- string imageFilePath = "";
- private void btnBrowse_Click(object sender, EventArgs e)
- {
- OpenFileDialog ofd = new OpenFileDialog();
- ofd.Filter = "JPEG *.jpg|*.jpg|PNG *.png|*.png";
- if(ofd.ShowDialog() == DialogResult.OK)
- {
- imageFilePath = ofd.FileName;
- pictureBox1.Image = Image.FromFile(imageFilePath);
- btnRecoginze.Enabled = true;
- }
- }
- // Method to make the restful request
- async Task<string> MakeAnalaysisRequest(string imageFilePath)
- {
- // Create an HttpClient object to make a post request to the Azure Services
- HttpClient client = new HttpClient();
- // set the following paramters to your request header
- client.DefaultRequestHeaders.Add("Ocp-Apim-Subscription-Key", subscriptionKey);
- // specify the requested resutls
- string requestParamters = "visualFeatures=Categories,Description,Color&language=en";
- // create the uri from your endpoint url and the requestedParamters
- string uri = uriBase + "?" + requestParamters;
- // create a respone message object to get the response of the sent request
- HttpResponseMessage responseMessage;
- // get the bytes of the selected image
- byte[] dataByte = GetImageAsBytesArray(imageFilePath);
- // create a content for the post request _ the content will be the bytes of the picture to send it to the Azure servers
- using (ByteArrayContent content = new ByteArrayContent(dataByte))
- {
- // Define the content type of the request
- content.Headers.ContentType = new System.Net.Http.Headers.MediaTypeHeaderValue("application/octet-stream");
- // send the post request
- responseMessage = await client.PostAsync(uri, content);
- // read the string response from the sent request
- string contentString = await responseMessage.Content.ReadAsStringAsync();
- // return the string result
- return contentString;
- }
- }
- // Method to get the bytes of a specific image file
- private byte[] GetImageAsBytesArray(string imageFilePath)
- {
- // Create a file stream to access to the bytes of the selected file
- FileStream fileStream = new FileStream(imageFilePath, FileMode.Open, FileAccess.Read);
- // Create a BinaryReader object to read the bytes from a specific stream
- BinaryReader reader = new BinaryReader(fileStream);
- // Return the read bytes of a specific file
- return reader.ReadBytes((int)fileStream.Length);
- }
- // Tell me what you see button click event handler
- private async void btnRecoginze_Click(object sender, EventArgs e)
- {
- // get the result
- string result = await MakeAnalaysisRequest(imageFilePath);
- // show the result in the textbox
- txtResult.Text = result;
- }
- }
- }
https://docs.microsoft.com/en-us/azure/cognitive-services/computer-vision/quickstarts/csharp
Sachin KhairnarPosted Jan 16, 2018, 11:54 PM
Very Interesting article Ahmad Mozaffar , Thanks for Sharing !!
Vishal PrajapatiPosted Jan 10, 2018, 12:50 AM
Awesome......Good explanation..
Sagar Pandurang KapPosted Jan 9, 2018, 11:33 PM
Superb article yaar.Really fantastic.Adding Cognitive Services really makes very User Friendly..