

Introduction
Microsoft uses ASP.NET Identity to store and retrieve user information in ASP.NET Web Applications. If you're not aware of this then refer to Getting Started with ASP.NET Identity.
In that context, here I am developing a MVC application and using ASP.NET Identity. We can add more data when the user registers on the MVC web application. It is very easy to use using the ASP.NET Identity. In the existing ASP.NET Membership system, the user and profile were separate tables and profile information about the user was retrieved using the Profile Provider. ASP.NET Identity makes it easy to add more profile data for the user.
Now, we'll proceed with the following sections:
- Create MVC Application
- Enable Migration
- Modify the Model
- Modify the View
- Modify the Controller
- Running Application
Create MVC Application
Here, I am using Visual Studio 2013 and MVC 5 to generate the application architecture. Proceed with the following procedure:
Step 1: Open Visual Studio and click on "New Project".
Step 2: Select ASP.NET Web Application and enter the name "MvcUsers".
Step 3: Select the MVC Project Template or you can select "WebForms" to create the application.
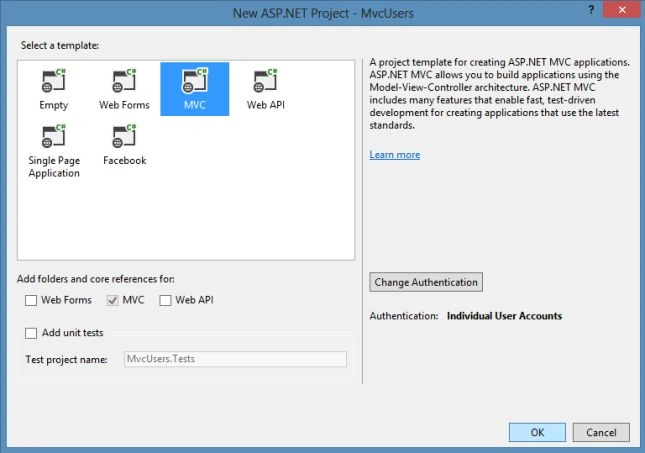
Visual Studio automatically creates the MVC application and you can see that there are various files and folders added. Now it's time to register in the application.
Step 4: Run the application and click on the "Register".
Step 5: Enter the details about the user profile in the Register page.
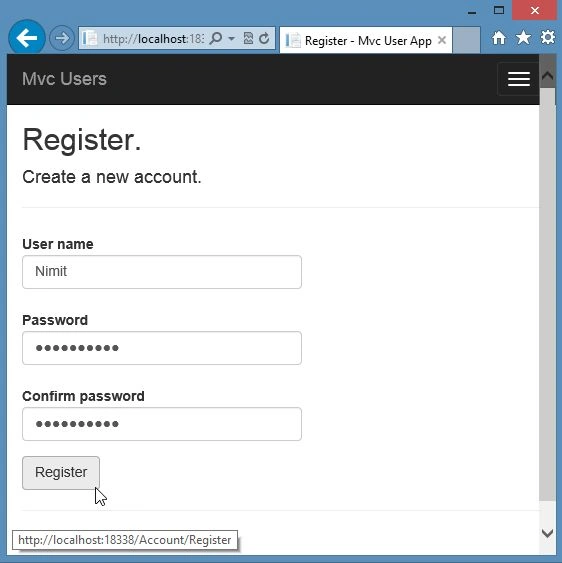
In the preceding screenshot, you can see that there are three options to be filled in by the user. We will later add one more option named "Contact" to this page.
For now register in the application or you can leave it. Proceed to the next section.
Enable Migrations
In this section, we work with migration. We cannot add properties directly in the application, it'll generate the exception. If we want to add some more data, we need to do it through the migrations. Therefore, follow the procedure below.
Step 1: Open the Package Manager Console
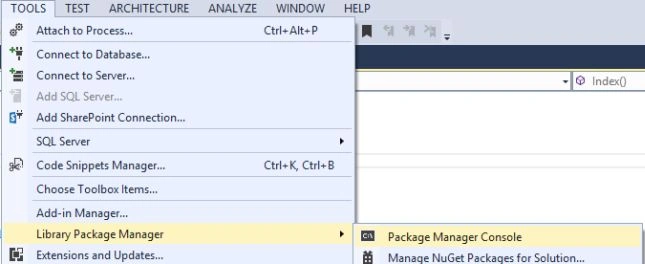
Step 2: Enter the following command and enter:
Enable Migrations
Step 3: Now open the Models\IdentityModel.cs and modify the code with the highlighted code below:
- using System;
- using Microsoft.AspNet.Identity.EntityFramework;
- namespace MvcUsers.Models
- {
- public class ApplicationUser : IdentityUser
- {
- public Int64 Contact { get; set; }
- }
- public class ApplicationDbContext : IdentityDbContext<ApplicationUser>
- {
- public ApplicationDbContext(): base("DefaultConnection")
- {
- }
- }
- }
In the code above, we've added a new property named Contact and to do this we need to add the Using System at the top of the class. Since we've added the new property therefore we need to update the database for this change. This is where the Entity Framework is very useful. Using migration we can update the database for the new changes.
Step 4: Now, enter the following command in the Package Manager Console:
Add-Migration "Contact"

Step 5: Now update the database with the following command:
Update-Database

Modify the Model
Now in the Model section we add the new property using the following procedure:
Step 1: Open the Models\AccountViewModel.cs
Step 2: Modify the RegisterViewModel class code with the highlighted code below:
- public class RegisterViewModel
- {
- [Required]
- [Display(Name = "User name")]
- public string UserName { get; set; }
- [Required]
- [StringLength(100, ErrorMessage = "The {0} must be at least {2} characters long.", MinimumLength = 6)]
- [DataType(DataType.Password)]
- [Display(Name = "Password")]
- public string Password { get; set; }
- [DataType(DataType.Password)]
- [Display(Name = "Confirm password")]
- [Compare("Password", ErrorMessage = "The password and confirmation password do not match.")]
- public string ConfirmPassword { get; set; }
- public Int64 Contact { get; set; }
- }
Modify the View
Now in the View section we add the new property using the following procedure:
Step 1: Open the Views\Account\Register.cshtml
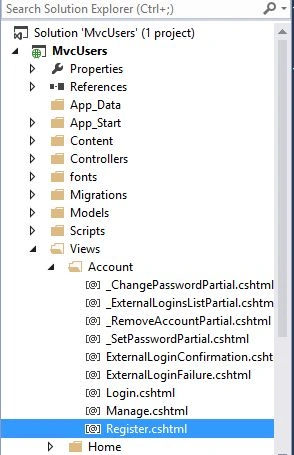
Step 2: Modify the code with the highlighted code below:
- <div class="form-group">
- @Html.LabelFor(m => m.ConfirmPassword, new { @class = "col-md-2 control-label" })
- <div class="col-md-10">
- @Html.PasswordFor(m => m.ConfirmPassword, new { @class = "form-control" })
- </div>
- </div>
- <div class="form-group">
- @Html.LabelFor(m=>m.Contact, new { @class= "col-md-2 control-label"})
- <div class="col-md-10">
- @Html.TextBoxFor(m=>m.Contact, new { @class= "form-control"})
- </div>
- </div>
Modify the Controller
So far we've modified the Model and View, it's time to modify the controller using the following procedure:
Step 1: Open Controller\AccountController.cs
Step 2: Now modify the Register method as shown in the highlighted code below:
- public async Task<ActionResult> Register(RegisterViewModel model)
- {
- if (ModelState.IsValid)
- {
- var user = new ApplicationUser() { UserName = model.UserName, Contact=model.Contact };
- var result = await UserManager.CreateAsync(user, model.Password);
- if (result.Succeeded)
- {
- await SignInAsync(user, isPersistent: false);
- return RedirectToAction("Index", "Home");
- }
- else
- {
- AddErrors(result);
- }
- }
- // If we got this far, something failed, redisplay form
- return View(model);
- }
Running the Application
Now we've successfully modified the application, therefore we run the application in this section using the following procedure:
Step 1: Press Ctrl+F5 to run the application
Step 2: Open the Register page
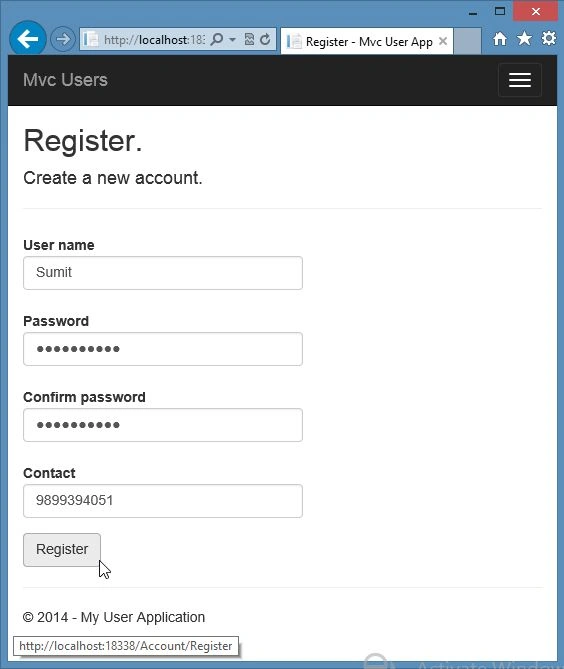
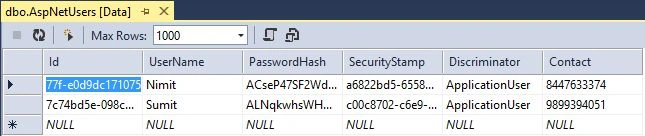
We can also check the details in the database in the Server Explorer
Summary
This article will help you to learn to apply the migration in the Entity Framework based MVC application and you can also add more profile data to the application. Thanks for reading and stay updated.
Boyee SrirachaPosted Mar 4, 2020, 1:27 AM
Thanks Nimit , and how to perform the reverse process I meant to retrieve the data from database by using ASP.NET Identity (in your example is "contact" field.
Bob MathisPosted Dec 20, 2017, 9:56 AM
You say in Step 3: "Select the MVC Project Template or you can select "WebForms" to create the application.", so I selected "WebForms" and could not do anything else in the tutorial, because it is all MVC from there on.Not very helpful - At least for what I need.