

Hi guys, One of the best feature available in Expression Blend is allowing the binding of any property of one control to relative property of other control. In this article you will learn how to add a text file from the strorage device and resize it and also save it back to the storage device. Apart from this you can also learn how to resize the image manually.
Follow the steps below :
Step 1 : Open Expression Blend.
- Open new Project as WPF application
- Name it as "resizing"
Step 2 : The page opens up with the design view. In this artboard add two buttons.
- Name One button as resizetext and change the content to "Resize Text"
- Name other button as resizeimg and change the content to "Resize image"
Step 3 : You can change the background image or color of the artboard also can change the color, Font etc property of the button to give better look and feel of the page. Now select the "Resize Text".
- Go to property and click on the event property of the button
- Now in I'll redirect this start page to the text resizing page
- In front of the Click event type the name of the Click method. Here I have named it as "textopen"
- Press Enter and type the following lines of code
public
partial
class
Start_page : Window
{
public
Start_page()
{
this.InitializeComponent();
}
private
void
textopen(object
sender, System.Windows.RoutedEventArgs e)
{
MainWindow mw =
new
MainWindow();
// here MainWindow is the name of the page used for resizing the text. Go to
step 5 to know about this.
mw.Show();
this.Close();
}
}
Step 4 : Similarly select the "Resize image" button.
-
In the CLick event property type the name of the method
-
Now in I'll redirect this start page to the image resizing page
-
Here I have named as "imgopen" and type the following lines of code
private
void
imgopen(object
sender, System.Windows.RoutedEventArgs e)
{
image_resizing ir =
new
image_resizing();
// here image_resizing is
the name of the page used for resizing the image. Go to step 5 to know about
this.
ir.Show();
this.Close();
}
Step 5 : Now add a page for text resizing and name this page as MainWindow.
-
Go to File -->New Item-->Window
-
Name this page as MainWindow
Step 6 : This opens up a page with the artboard and design view. In this page add the following controls.
-
A Text box and expand it to approximate half the screen size and name it as "tb1"
-
A button named "addbtn" and change its content to "Add ". This button is to insert a text file in to the textbox for resizing
- Add andother button named "savebtn" and change its content to "Save ". This button is to save a text file
Step 7 : Now select the "Add" button.
- Go to property
- Click on the event button
- Type the name of the method in front of the click event. Here I have named it as add()
- Now write the following lines to add the text file into the textbox
using
System.Windows.Media.Imaging;
using
System.Windows.Shapes;
using
System.IO;
//Dont
forget to include this line
namespace
_d
{
public
partial
class
MainWindow : Window
{
public
MainWindow()
{
this.InitializeComponent();
}
private
void
add(object
sender, System.Windows.RoutedEventArgs e)
{
Microsoft.Win32.OpenFileDialog fd =
new
Microsoft.Win32.OpenFileDialog();
fd.InitialDirectory =
"D:\\";
fd.Filter ="Text
files (*.txt)|*.txt";
fd.RestoreDirectory =
true
;
bool?
result = fd.ShowDialog();
if(result==true)
{
String mypath = fd.FileName.ToString();
if(File.Exists(mypath))
tb1.Text = System.IO.File.ReadAllText(mypath);
}
}
}
}
Step 8 : Now I'll add the line of code for the "Save" button to save the text file to the storage drive again.
- Select the "Save" button
- Go to property
- Type the name of the method in front of the Click event and press Enter
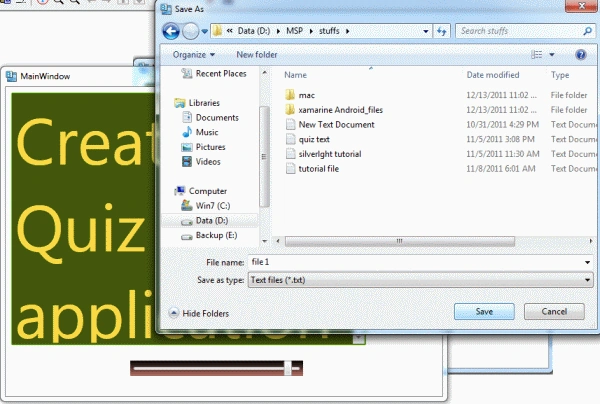
- Here I have named this method as save()
private
void
save(object
sender, System.Windows.RoutedEventArgs e)
{
Microsoft.Win32.SaveFileDialog svfd =
new
Microsoft.Win32.SaveFileDialog();
svfd.InitialDirectory =
"D:\\";
svfd.Filter ="Text
files (*.txt)|*.txt";
svfd.RestoreDirectory =
true
;
bool?
result = svfd.ShowDialog();
if(result==true) {
String mypath3 = svfd.FileName.ToString();
if(File.Exists(mypath3))
{
System.IO.File.Delete(mypath3);
}
using(
FileStream fs = File.Create(mypath3))
{
//here the
text content is read byte by byte and saved to the file
Byte[] txtcontent =
new
UTF8Encoding(true).GetBytes(tb1.Text);
fs.Write(txtcontent,0,txtcontent.Length);
}
}
}
Step 9 : Now the main task of resizing is to be accomplished. For this :
- Add a Slider control to the artboard
- Resize this slider control by using selection tool
- You may change the display color or gradient of this control
- Select this slider control
- Go to Property window--> Common property--> In the Maximum field type the value = 100;
Step 10 : Now select the Textbox and do the following changes to the properties.
- You can change the foreground/ background color/gradient
- In the artboard add a row separating the textbox and the slider control. For this run the mouse along the boundary of the artboard and mark a line border between thetextbox and the slider control
- Now go to property window --> layout property --> set the VerticalScrolbarVisibility property--> Auto
Step 11 : Next task is to bind the sliding value of the slider control and the text size. For this:
- Select the textbox
- Go to property --> Text property
- In this select the small square shaped advanced option button alongside of the font size property

- This opens a window--> In this select the Databinding option
- Again a window opens up--> select the Elementary data binding property--> Select Slider control--> In the list of binding properties select--> "value" property of the slider control. Press OK and exit
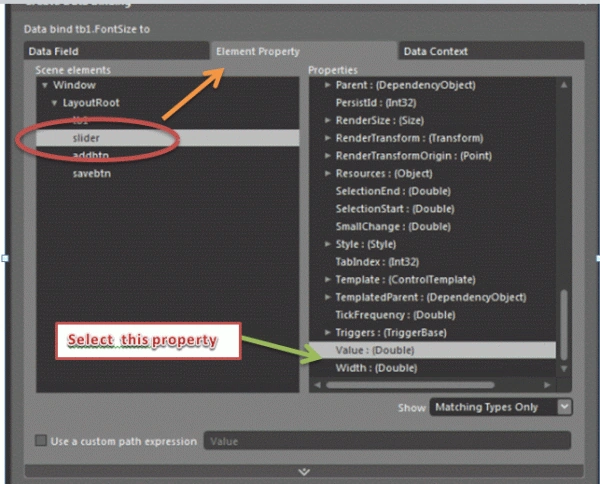
- Now the sliding value of the slider is bind with the font size of the Text in the Textbox
Step 12 : To see the effect just press F5 and check the application. You'll find that the application runs well showing the text font increasing with the slider movement. Also you can add and save the text file.
Step 13 :Now next job is to resize the image. Follow the steps below:
- Now add a page for resizing the image and name this page as image_resizing
-
Go to File -->New Item-->Window
-
Name this page as image_resizing
Step 14 : This opens up a page with the artboard and design view. In this page add the following controls
-
A image box and insert and image into this by dragging and dropping an image from the storage drive
-
Add 4 buttons named "hplus", "hminus", " wplus" and wminus" respectively for increasing and decreasing the height and width of the image
-
Now change the contents to "+ " and "-" respectively.See the fig to get it more clear:
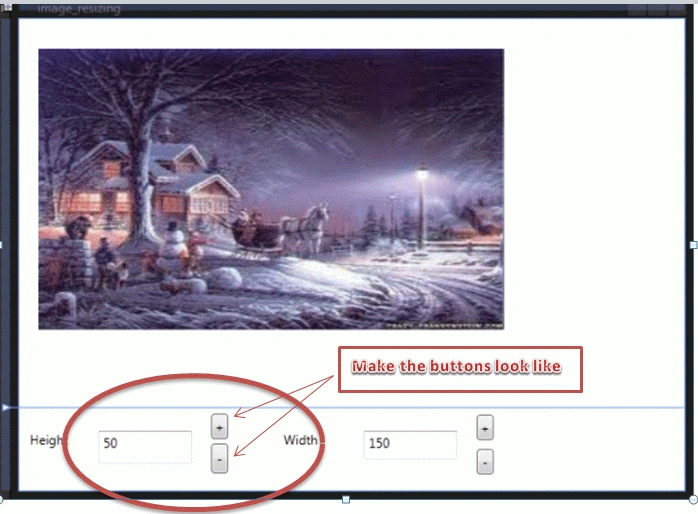
- Add 2 text blocks and change their contents to "Height" and "Width" respectively
- Add 2 Textbox name them as "htext" and "wtext" respectively for the height and width value respectively. Change the content to any height or width value
- In the artboard add a row separating the imagebox and the height/width control. For this run the mouse along the boundary of the artboard and mark a line border between thetextbox and the slider control
Step 15 : Now select the "+" button in representing the height.
- Go to property
- Click on the event button
- Type the name of the method in front of the click event. Here I have named it as plus()
- Now write the following lines to increase the height of the image through button click
using
System;
using
System.Collections.Generic;
using
System.Text;
using
System.Windows;
using
System.Windows.Controls;
using
System.Windows.Data;
using
System.Windows.Documents;
using
System.Windows.Input;
using
System.Windows.Media;
using
System.Windows.Media.Imaging;
using
System.Windows.Shapes;
namespace
_d
{
///
<summary>
///
Interaction logic for image_resizing.xaml
///
</summary>\
public
partial
class
image_resizing : Window
{
public
image_resizing()
{
this.InitializeComponent();
// Insert
code required on object creation below this point.
}
private
void
plus(object
sender, System.Windows.RoutedEventArgs e)
{
// TODO:
Add event handler implementation
img.Height = System.Convert.ToInt32(htext.Text) +
1;
htext.Text =System.Convert.ToString
(System.Convert.ToInt32(htext.Text) +
1);
}
Step 16 : Now select the "-" button in representing the height.
- Go to property
- Click on the event button
- Type the name of the method in front of the click event. Here I have named it as hmin()
- Now write the following lines to decrease the height of the image through button click
private
void
hmin(object
sender, System.Windows.RoutedEventArgs e)
{
img.Height = System.Convert.ToInt32(htext.Text) -
1;
htext.Text = System.Convert.ToString
(System.Convert.ToInt32(htext.Text) -
1);
}
Step 17 : Now select the "+" button in representing the width.
- Go to property
- Click on the event button
- Type the name of the method in front of the click event. Here I have named it as wp()
- Now write the following lines to increase the width of the image through button click
private
void
wm(object
sender, System.Windows.RoutedEventArgs e)
{
// TODO:
Add event handler implementation here.
img.Width = System.Convert.ToInt32(wtext.Text) -
1
;
wtext.Text = System.Convert.ToString
(System.Convert.ToInt32(wtext.Text) -
1);
}
Step 18 : Now select the "-" button in representing the width.
- Go to property
- Click on the event button
- Type the name of the method in front of the click event. Here I have named it as wm()
- Now write the following lines to decrease the width of the image through button click
private
void
wm(object
sender, System.Windows.RoutedEventArgs e)
{
// TODO:
Add event handler implementation here.
img.Width = System.Convert.ToInt32(wtext.Text) -
1
;
wtext.Text = System.Convert.ToString
(System.Convert.ToInt32(wtext.Text) -
1);
}
Step 19 : Now select the textbox in representing the height.
- Go to property
- Click on the event button
- Type the name of the method in front of the TextChanged event. Here I have named it as hg()
- Now write the following lines to change the height of the image through manually typing the height of the image
private
void
hg(object
sender, System.Windows.Controls.TextChangedEventArgs e)
{
// TODO:
Add event handler implementation here.
img.Height = System.Convert.ToInt32(htext.Text) ;
}
Step 20 : Now select the textbox in representing the height.
- Go to property
- Click on the event button
- Type the name of the method in front of the TextChanged event. Here I have named it as wd()
- Now write the following lines to change the width of the image through manually typing the width of the image
private
void
wd(object
sender, System.Windows.Controls.TextChangedEventArgs e)
{
// TODO:
Add event handler implementation here.
img.Width = System.Convert.ToInt32(wtext.Text) ;
}
Step 21 : The XAML coding
of the MainWindow page is :
<Window
xmlns="http://schemas.microsoft.com/winfx/2006/xaml/presentation"
xmlns:x="http://schemas.microsoft.com/winfx/2006/xaml"
xmlns:d="http://schemas.microsoft.com/expression/blend/2008"
xmlns:mc="http://schemas.openxmlformats.org/markup-compatibility/2006"
mc:Ignorable="d"
x:Class="_d.MainWindow"
x:Name="Window"
Title="MainWindow"
Width="640"
Height="480">
<Grid
x:Name="LayoutRoot">
<Grid.RowDefinitions>
<RowDefinition/>
</Grid.RowDefinitions>
<TextBox
x:Name="tb1"
Margin="8,8,108.947,73.416"
TextWrapping="Wrap"
Text="HI
this is sample Text"
FontSize="{Binding
Value,
ElementName=slider}"
VerticalScrollBarVisibility="Auto"
HorizontalScrollBarVisibility="Visible"
Grid.IsSharedSizeScope="True"
Background="#FF41560A"
BorderBrush="#FF69C61F"
Foreground="#FFF9DA46"
ScrollViewer.CanContentScroll="True"/>
<Slider
x:Name="slider"
Margin="177.5,0,198.947,28.916"
Maximum="100"
VerticalAlignment="Bottom">
<Slider.Background>
<LinearGradientBrush
EndPoint="0.5,1"
MappingMode="RelativeToBoundingBox"
StartPoint="0.5,0">
<GradientStop
Color="Black"
Offset="0"/>
<GradientStop
Color="#FFB66F63"
Offset="1"/>
</LinearGradientBrush>
</Slider.Background>
</Slider>
<Button
x:Name="addbtn"
Content="Add"
HorizontalAlignment="Right"
Height="30"
Margin="0,54,14,0"
VerticalAlignment="Top"
Width="72"
Click="add"
Background="#FF848085"
BorderBrush="White"
OpacityMask="#FF812C5F"
Foreground="#FFF7FBF8"/>
<Button
x:Name="savebtn"
Content="Save"
HorizontalAlignment="Right"
Height="27"
Margin="0,106.5,14,0"
VerticalAlignment="Top"
Width="72"
Click="save"
Background="#FF8F8F8F"
Foreground="#FFF5E9E9"/>
</Grid>
</Window>
Step 22 : The XAML coding
of the image resizing page is :
<Window
xmlns="http://schemas.microsoft.com/winfx/2006/xaml/presentation"
xmlns:x="http://schemas.microsoft.com/winfx/2006/xaml"
x:Class="_d.image_resizing"
x:Name="Window"
Title="image_resizing"
Width="640"
Height="480">
<Grid
x:Name="LayoutRoot">
<Grid.RowDefinitions>
<RowDefinition
Height="0.824*"/>
<RowDefinition
Height="0.176*"/>
</Grid.RowDefinitions>
<Image
x:Name="imgbox"
Margin="34,18,0,0"
HorizontalAlignment="Left"
VerticalAlignment="Top"
RenderTransformOrigin="0.5,0.5"
Panel.ZIndex="2"
ScrollViewer.HorizontalScrollBarVisibility="Auto"
ScrollViewer.VerticalScrollBarVisibility="Auto">
<Image.RenderTransform>
<TransformGroup>
<ScaleTransform/>
<SkewTransform/>
<RotateTransform/>
<TranslateTransform
X="5"
Y="500"/>
</TransformGroup>
</Image.RenderTransform>
</Image>
<Image
x:Name="img"
Margin="18,28,0,0"
Source="christmas3.jpg"
Stretch="Fill"
RenderTransformOrigin="0.5,0.5"
Panel.ZIndex="100"
HorizontalAlignment="Left"
Width="115"
Height="88.306"
VerticalAlignment="Top"/>
<TextBlock
x:Name="hght"
HorizontalAlignment="Left"
Margin="10,21.679,0,24.722"
TextWrapping="Wrap"
Text="Height"
Width="59"
Grid.Row="1"/>
<TextBlock
x:Name="wdth"
Margin="248,22.2,0,28.542"
TextWrapping="Wrap"
Text="Width"
HorizontalAlignment="Left"
Width="59"
Grid.Row="1"/>
<Button
x:Name="wminus"
Content="-"
Margin="0,0,179,14.722"
Click="wm"
HorizontalAlignment="Right"
Width="16"
Height="24.116"
VerticalAlignment="Bottom"
Grid.Row="1"/>
<Button
x:Name="wplus"
Content="+"
Margin="0,6.84,179,0"
Click="wp"
HorizontalAlignment="Right"
Width="16"
Height="24.26"
VerticalAlignment="Top"
Grid.Row="1"/>
<Button
x:Name="hplus"
Content="+"
HorizontalAlignment="Left"
Margin="180,5.339,0,0"
Width="16"
Click="plus"
Height="24"
VerticalAlignment="Top"
Grid.Row="1"/>
<Button
x:Name="hminus"
Content="-"
HorizontalAlignment="Left"
Margin="180,33.339,0,16.062"
Width="16"
Click="hmin"
Grid.Row="1"/>
<TextBox
x:Name="htext"
HorizontalAlignment="Left"
Margin="74,21.859,0,24.542"
TextWrapping="Wrap"
Text="50"
Width="88"
TextChanged="hg"
Grid.Row="1"/>
<TextBox
x:Name="wtext"
Margin="0,22.02,213,28.722"
TextWrapping="Wrap"
Text="150"
TextChanged="wd"
HorizontalAlignment="Right"
Width="88"
Grid.Row="1"/>
</Grid>
</Window>
Step 23 : The XAML coding
of the Start page is :
<Window
xmlns="http://schemas.microsoft.com/winfx/2006/xaml/presentation"
xmlns:x="http://schemas.microsoft.com/winfx/2006/xaml"
x:Class="_d.Start_page"
x:Name="Window"
Title="Start_page"
Width="640"
Height="480">
<Grid
x:Name="LayoutRoot">
<Image
Source="bckgrnd.jpg"
Stretch="Fill"
Margin="-3,0,3,0">
<Image.OpacityMask>
<LinearGradientBrush
EndPoint="0.5,1"
StartPoint="0.5,0">
<GradientStop
Color="Black"
Offset="0"/>
<GradientStop
Color="#FF7C1717"
Offset="1"/>
</LinearGradientBrush>
</Image.OpacityMask>
</Image>
<Button
x:Name="resizetxt"
Content="Resize
Text" Height="38.753"
Margin="177,129,184,0"
VerticalAlignment="Top"
Foreground="#FFEDDE3B"
BorderBrush="#FF5FDC28"
Padding="5"
FontSize="24"
FontFamily="Monotype
Corsiva"
OpacityMask="Black"
Click="textopen">
<Button.Background>
<LinearGradientBrush
EndPoint="0.5,1"
StartPoint="0.5,0">
<GradientStop
Color="#FF188028"
Offset="0"/>
<GradientStop
Color="#FF811F1F"
Offset="1"/>
</LinearGradientBrush>
</Button.Background>
</Button>
<Button
x:Name="resizeimg"
Content="Resize
image" Margin="177,196.247,184,207"
Foreground="#FFEDDE3B"
BorderBrush="#FF5FDC28"
Padding="5"
FontSize="24"
FontFamily="Monotype
Corsiva"
OpacityMask="Black"
Click="imgopen"
ClickMode="Press">
<Button.Background>
<LinearGradientBrush
EndPoint="0.5,1"
StartPoint="0.5,0">
<GradientStop
Color="#FF188028"
Offset="0"/>
<GradientStop
Color="#FF892727"
Offset="1"/>
</LinearGradientBrush>
</Button.Background>
</Button>
</Grid>
</Window>
Output :
When the first page or Start page is launched

When Resize Text button is selected.
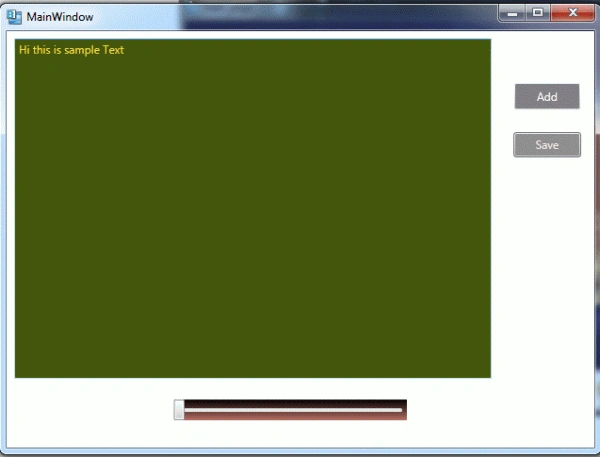
When Text file is added to the Textbox.
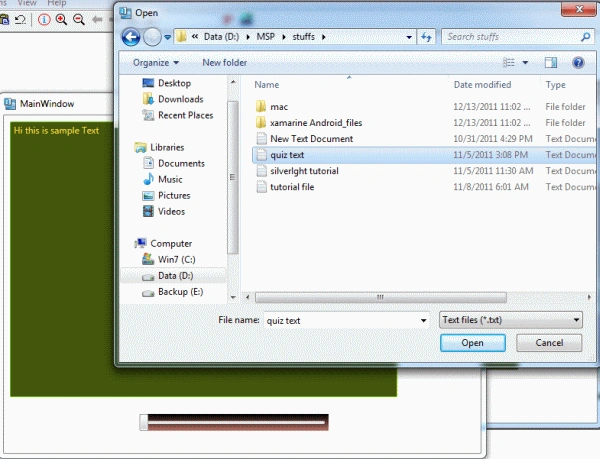
When text file original.

When text file is resized.
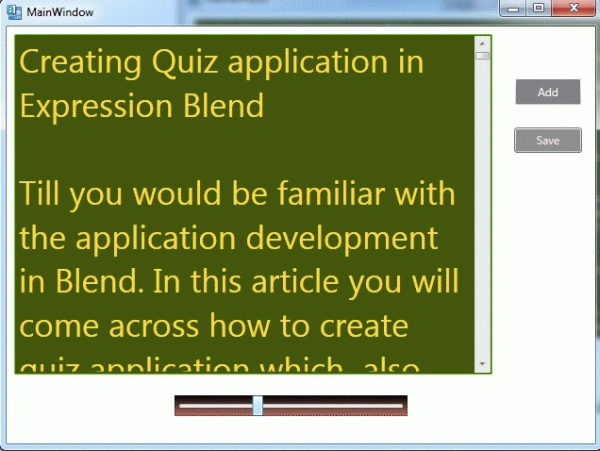
Text resized again.
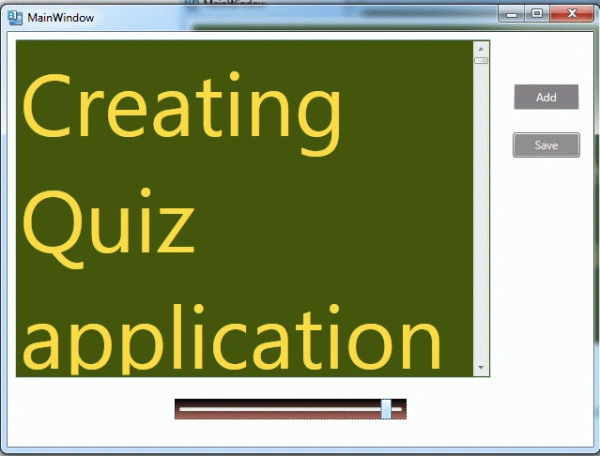
When Text file is saved on clicking the save button.
When Resize image is selected.

When image height size is changed.

When image width size is changed.

That's all in this article. Hope you would have enjoyed working with WPF in Expression Blend. Feel free to post your remarks. Thanking you.
Andrew FinlanderPosted Dec 26, 2011, 1:52 AM
Gud work manoj thaNKS FOR SHARING