

In my previous articles, we discussed,
Now, let's discuss the next feature of angular: setting up angular routing in our real-time application and visualize the application in developer tools extension called "Augury". As we know, in Angular we can create SPA (single page application) so for this Routing is the one and only tool or module to navigate from one page to another page.
There are mainly two types of routing as below,
- Component level routing
- Module-level routing
In some scenarios, we need to pass data from one component to another component by routing then we can use query param and sometimes we need redirect using href, so in this case, we can use <routerLink> directive.
Let's discuss component level routing,
Step 1
Go and create a first angular application using angular-CLI(for more details - click here)
Step 2
Go and create a component using the CLI command. i.e (ng g c home),
- Home component
- About component
- Contact component
Step 3
After creating a project using Angular CLI command, the root routing file created automatically as app-routing.module.ts in app/src/app-routing.modules.ts. Now next go and edit that file and configure routing inside the same file below,
- Go to app-routing.module.ts and import Routes and RouterModule.
- Declare constant type as Routes as mentioned below,
- const routes: Routes = [{
- path: "",
- component: HomeComponent
- }, {
- path: "Contact",
- component: ContactComponent
- }, {
- path: "about",
- component: HomeComponent
- }, {
- path: "**",
- component: PageNotFoundComponent
- }];
There are two main properties,
- Path
In Path, we need to pass a string as route whatever you want. Suppose I am creating the path as 'home' then we can see our path i.e., localhost:4200/home
- Component
In Component, we need to pass the name of the component. Suppose you want to render home component i.e. component: HomeComponenImport HomeComponent in the same file.
Example
Syntax to set routing only for component
path - 'home',
component - HomeComponent
Step 4
Next, we need to pass the above routes in the forRoot() method which is defined in the RouteModule. Below is the way we can use routes:-
- @NgModule({
- imports: [RouterModule.forRoot(routes)],
- exports: [RouterModule]
- })
Let's discuss Module level routing / Lazy Loading Routes in Angular,
Firstly, we need to understand what is lazy loading and when we should use it?
Lazy loading is a design pattern and it help us to download the web pages in chunks instead of downloading everything in a big bundle. It's very helpful when we have a very complex and large application then we should use lazy loading to avoid load on the browser and it always increases the application performance.
Just look into the snapshot below,
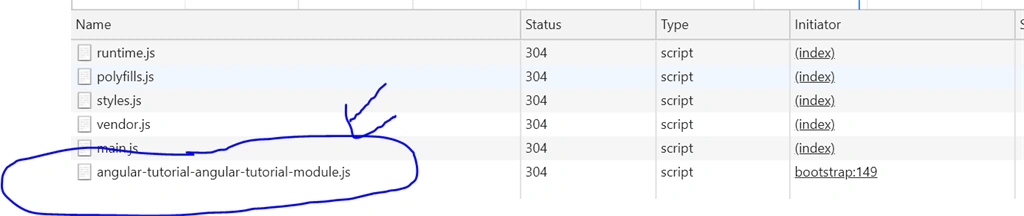
As you can see in the above image, everything is not loaded here.
How to achieve lazy loading in Angular
Step 1
Create one module inside the app folder using CLI command: ng g m <module-name> --routing
Example
ng g m angular-tutorial --routing
Step 2
Go to your module routing which has created using above command.
Example
I have created routing module name angular-tutorial-routing.module.ts and paste below code for achieving module-level routing:-
- import { NgModule } from '@angular/core';
- import { Routes, RouterModule } from '@angular/router';
- import { PrimengDetailsComponent } from './primeng-details/primeng-details.component';
- import { NebularDetailsComponent } from './nebular-details/nebular-details.component';
- import { AuguryDetailsComponent } from './augury-details/augury-details.component';
- import { AngularLibraryComponent } from './angular-library/angular-library.component';
- import { ThirdPartyLibraryComponent } from './third-party-library/third-party-library.component';
- const routes: Routes = [{
- path: '',
- component: AngularLibraryComponent
- },
- {
- path: 'primeng-details',
- component: PrimengDetailsComponent
- },
- {
- path: 'nebular-details',
- component: NebularDetailsComponent
- },
- {
- path: 'augury-details',
- component: AuguryDetailsComponent
- },
- {
- path: "third-party-library",
- component: ThirdPartyLibraryComponent
- }];
- @NgModule({
- imports: [RouterModule.forChild(routes)],
- exports: [RouterModule]
- })
- export class AngularTutorialRoutingModule { }
Step 3
Go to "app-routing.module.ts" and write the below code,
- import { NgModule } from '@angular/core';
- import { Routes, RouterModule } from '@angular/router';
- const routes: Routes = [{
- path: '',
- loadChildren: () => import('./angular-tutorial/angular-tutorial.module').then(m => m.AngularTutorialModule)
- }];
- @NgModule({
- imports: [RouterModule.forRoot(routes)],
- exports: [RouterModule]
- })
- export class AppRoutingModule { }
NOTE
As you can see in the above code, we need to use path and load children properties to achieve lazy loading and
import('.........') -import feature introduced in angular 8, before we need to pass relative path of that module.
Let's discuss what is "Augury" and how it will help to visualize and debug our application,
An augury is an inspection tool for angular that is available as an extension in chrome.
There are few steps to setup augury in your browser,
- Go to chrome browser and click on options -> more tools -> Extensions -> open chrome web store -> search "Augury" and add it.
- Now open your application and go to DevTools -> Augury
How "Augury" will work in Angular
- In Augury, you can see the two essential tab - Component Tree, Router Tree.
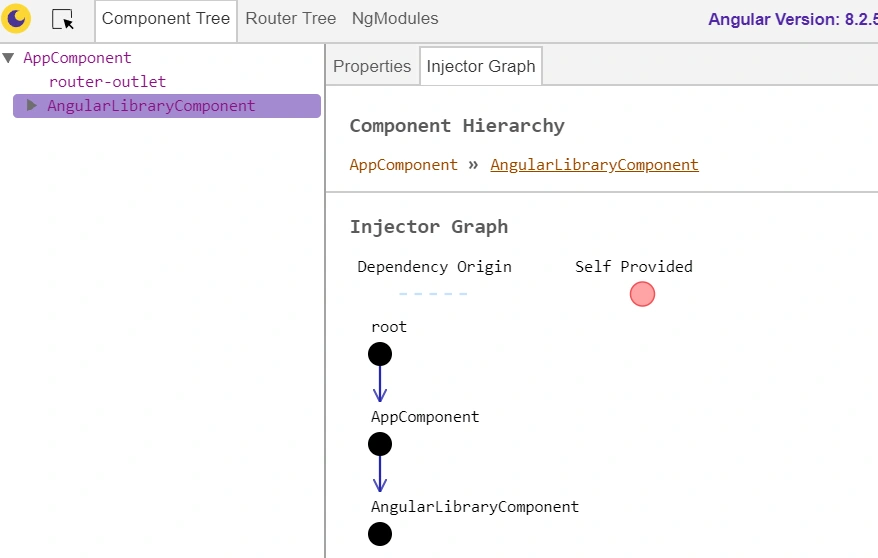
- Component Tree
All components will display here. Go and select a particular component, you will get the state of component and as well as see the dependency of the component using the injector graph. See snapshot below
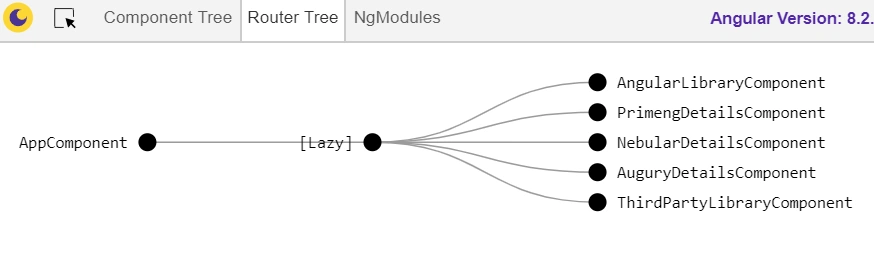
- Router Tree
Visualize which type of routing we are using in our application as see a snapshot,
If you want to explore more about Augury then visit here.
The source code for this template is on Github, please feel free to come up with proposals to improve it.
I hope this article is helpful to you. Thanks for reading!
Happy learning. :)
Akshay DeshmukhPosted Sep 13, 2019, 4:14 AM
It will definitely help devs while implementing routing. Cool!
Shwetank SrivastavaPosted Sep 12, 2019, 8:47 AM
Its very informative articles. thanks for sharing
Amit MohantyPosted Sep 10, 2019, 11:15 PM
Nice article