

Introduction
In this article, we are going to discuss a few basics of auto-scaling in Kubernetes, as well as the step-by-step implementation of weather forecast application using the .NET Core 6 Web API and the containerization of weather forecast service with the help of Docker and Kubernetes.
Agenda
- What is Docker?
- Why Docker?
- Benefits of Docker
- What is Kubernetes?
- Why Kubernetes?
- Benefits of Kubernetes
- Auto-scaling in Kubernetes
- Step-by-step implementation of the Weather Forecast Application
- Containerization of Applications using Docker and Kubernetes
- Auto-Scaling Implementation with Kubernetes
- Monitor Applications with High Traffic
Prerequisites
- Visual Studio 2022
- Docker and Kubernetes
- .NET Core 6 SDK
What is Docker?
- Docker is an open-source containerization platform that enables developers to build, run, and deploy applications quickly. Docker package application, including all its libraries, configurations, and dependencies.
- Its primary focus is to automate the deployment of applications inside containers that boot up in seconds.
Why Docker?
- In the tech world, I think you've heard the phrase “It works on my machine,” and mostly, this happens because of the different libraries, configurations, and dependencies required for the application to run under the operating system.
- Managing application dependencies and configuration is a crucial task for the DevOps team, and Docker has all the capabilities to handle this kind of problem in the software development lifecycle.
- Docker helps us build and deploy distributed microservice applications with the help of continuous integration and a continuous deployment pipeline, which saves a lot of time.
- Docker uses the container as a unit of software that packages application code with all its dependencies so the application can run quickly in isolated environments.
Benefits of Docker
- Application portability: Docker is the container platform and allows running containers on a physical machine, virtual machine, or any other cloud provider in less time without modification
- Faster delivery and deployment: Docker enables us to build and deploy application images across every step of the deployment phase efficiently.
- Scalability: Docker is scalable because it can increase and decrease the number of application instances easily in different environments.
- Isolation: Docker containerizes and runs the application in an isolated environment with all dependencies and configurations.
- Security: Docker ensures the applications running inside the different containers are isolated from each other, and it has different security layers and tools to manage that.
- High performance: Docker is generally faster and takes fewer resources than VMs.
- Version control management: Docker provides versioning-related things that can track container versions and roll back the same if required.
If you want to learn more about Docker and its basic components, then check out the following article:
https://www.c-sharpcorner.com/article/docker
What is Kubernetes?
- Kubernetes is a portable, extensible, open-source container orchestration platform for managing containerized workloads and services.
- Kubernetes, also called K8s, is a numeronym standard that has been used since the 1980s. For example, in Kubernetes, there are 8 words in between K and S like that.
- Google developed an internal system called Borg and later Omega, which they used to orchestrate the data center.
- In 2014, Google introduced Kubernetes as an open-source project, and it is written in the Go language. Later on, she donated to the Cloud Native Computing Foundation (CNCF).
- Kubernetes has all the capabilities to automate container deployment, load balancing, and auto-scaling.
Why Kubernetes?
- Containers are a good way to bundle and run applications in an isolated environment, but with that, we need to manage containers efficiently without any downtime. For example, if the application is running in a production environment and the running container goes down, you will need to create a new container using different commands or some other things. But, at a large level, it’s really hard to manage several containers.
- As a solution, Kubernetes comes into the picture because it is a container orchestration platform and has all kinds of capabilities like auto-scaling, load-balancing, version control, health monitoring, auto-scheduling, and many more.
- Kubernetes monitors everything; if multiple users log in at the same time and traffic suddenly increases, it will auto-scale and provide other resources to different containers that are running inside the node.
Benefits of Kubernetes
- Auto scaling: Kubernetes automatically increases and decreases the number of pods based on network traffic and allocates different resources.
- Automate deployment: Kubernetes automates the deployment of applications with the help of different cloud providers.
- Fault tolerance: Kubernetes manages all things related to the container. If he finds one of the pods and the container goes down due to high network traffic, it will automatically start a new instance and provide different resources for it.
- Load balancing: Kubernetes load balances and manages all incoming requests from outside the cluster, and it continuously looks at the running pods under different nodes and sends a request to a particular service using the load balancing technique.
- Rollout and Rollback: Kubernetes rollout and rollback if anything wrong happens with the application after certain changes and managing to version
- Health monitoring: Kubernetes continuously checks the health of the running node to see if the containers and pods are working fine or not.
- Platform independent: Kubernetes is an open-source tool, which is why it can move workloads and applications anywhere on public cloud, on-premises, hybrid, and public cloud infrastructure.
If you want to learn more about Kubernetes and its basic components, then check out the following article:
https://www.c-sharpcorner.com/article/kubernetes
Auto-scaling in Kubernetes
Auto Scaling in Kubernetes means that Kubernetes can automatically change the number of duplicate copies of your application running (called "replica pods") depending on how much your application is being used. It does this by keeping an eye on how much the central processing unit (CPU) of your computer is being used, or by looking at other specific measurements you've set up. This way, your application always has enough resources to handle different levels of demand without needing someone to adjust it manually.
Two main types of auto-scaling in Kubernetes
There are two main types of auto-scaling in Kubernetes
1. Horizontal pod auto scaler (HPA)
- It keeps an eye on how much of your computer's CPU is being used.
- You tell it what percentage of CPU usage you want to aim for, and how many copies of your application should be running at a minimum and maximum.
- If your CPU usage goes above or below the target you set, HPA will automatically add or remove copies of your application to make sure the CPU usage stays where you want it.
2. Vertical pod auto scaler (VPA)
- It looks at how much CPU and memory your application is using.
- Instead of adding or removing copies of your application, as HPA does, VPA changes how much CPU and memory each copy of your application asks for.
- This helps make sure that each copy of your application gets just the right amount of CPU and memory it needs, which can make your whole system run more efficiently.
Step-by-step implementation of Weather Forecast API
Step 1. Create a new .NET Core Web API Project.
Step 2. Weather Forecast class with required properties.
namespace AutoScaleK8SDemo
{
    public class WeatherForecast
    {
        public DateTime Date { get; set; }
        public int TemperatureC { get; set; }
        public int TemperatureF => 32 + (int)(TemperatureC / 0.5556);
        public string? Summary { get; set; }
    }
}
Step 3. Weather forecast controller with action method.
using Microsoft.AspNetCore.Mvc;
namespace AutoScaleK8SDemo.Controllers
{
    [ApiController]
    [Route("[controller]")]
    public class WeatherForecastController : ControllerBase
    {
        private static readonly string[] Summaries = new[]
        {
        "Freezing", "Bracing", "Chilly", "Cool", "Mild", "Warm", "Balmy", "Hot", "Sweltering", "Scorching"
    };
        private readonly ILogger<WeatherForecastController> _logger;
        public WeatherForecastController(ILogger<WeatherForecastController> logger)
        {
            _logger = logger;
        }
        [HttpGet(Name = "GetWeatherForecast")]
        public IEnumerable<WeatherForecast> Get()
        {
            return Enumerable.Range(1, 5).Select(index => new WeatherForecast
            {
                Date = DateTime.Now.AddDays(index),
                TemperatureC = Random.Shared.Next(-20, 55),
                Summary = Summaries[Random.Shared.Next(Summaries.Length)]
            })
            .ToArray();
        }
    }
}
Step 4. Register for the required services.
var builder = WebApplication.CreateBuilder(args);
// Add services to the container.
builder.Services.AddControllers();
// Learn more about configuring Swagger/OpenAPI at https://aka.ms/aspnetcore/swashbuckle
builder.Services.AddEndpointsApiExplorer();
builder.Services.AddSwaggerGen();
var app = builder.Build();
// Configure the HTTP request pipeline.
app.UseSwagger();
app.UseSwaggerUI();
app.UseAuthorization();
app.MapControllers();
app.Run();
Containerization of applications using Docker and Kubernetes
Note. Please make sure Docker and Kubernetes are running on your system.
Step 1. Create a Docker image for our newly created application.
# Use the official .NET Core SDK as a parent image
FROM mcr.microsoft.com/dotnet/sdk:6.0 AS build
WORKDIR /app
# Copy the project file and restore any dependencies (use .csproj for the project name)
COPY *.csproj ./
RUN dotnet restore
# Copy the rest of the application code
COPY . .
# Publish the application
RUN dotnet publish -c Release -o out
# Build the runtime image
FROM mcr.microsoft.com/dotnet/aspnet:6.0 AS runtime
WORKDIR /app
COPY --from=build /app/out ./
# Expose the port your application will run on
EXPOSE 80
# Start the application
ENTRYPOINT ["dotnet", "AutoScaleK8SDemo.dll"]
Step 2. Build the Docker image.
docker build -t web-api.
The docker build command is used to build a Docker image from a Docker file. It includes a variety of options, including the -t option to specify a tag for an image.
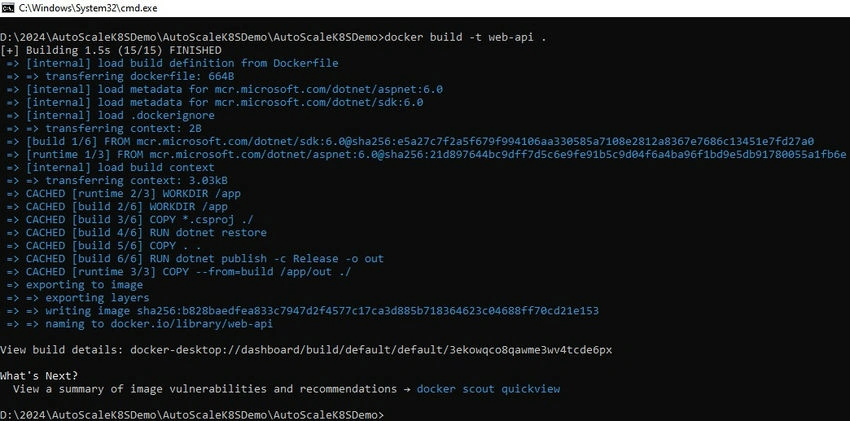
This command creates a Docker image that uses the Dockerfile in the current directory (.) and marks it as web-API.
Step 3. Run the docker image inside a docker container.
docker run -d -p 5001:80 — name web-api-container web-api
- -d: Detached mode (run in the background).
- -p 5001:80: Map port 5001 on your local machine to port 80 inside the container.
- -name web-apiContainer: Assign a name to the container.
- web-api: Use the image you built earlier.
Step 4. Open the browser and hit the API URL to execute the endpoint.
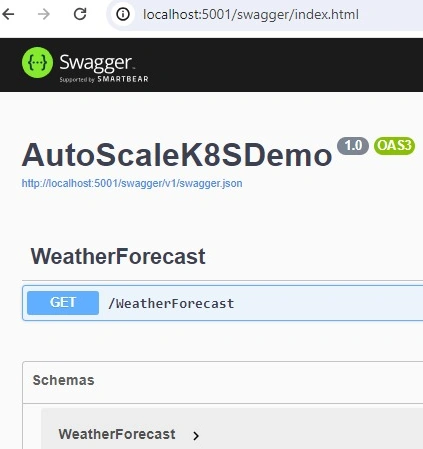
Step 5. Create a deployment and service YAML file for Kubernetes to create deployments, pods, and services for our weather forecast service.
Deployment.YAML
apiVersion: apps/v1
kind: Deployment
metadata:
  name: weatherforecast-app-deployment  # Name of the deployment
spec:
  selector:
    matchLabels:
      app: weatherforecast-app  # Label selector to match pods controlled by this deployment
  template:
    metadata:
      labels:
        app: weatherforecast-app  # Labels applied to pods created by this deployment
    spec:
      containers:
        - name: weatherforecast-app  # Name of the container
          image: web-api:latest  # Docker image to use
          imagePullPolicy: Never
          ports:
          - containerPort: 80  # Port to expose within the pod
          resources:
            requests:
              memory: 20Mi
              cpu: "0.25"
            limits:
              memory: 400Mi
              cpu: "1"
Service.YAML
apiVersion: v1
kind: Service
metadata:
  name: weatherforecast-app-service  # Name of the service
spec:
  selector:
    app: weatherforecast-app  # Label selector to target pods with this label
  ports:
    - protocol: TCP
      port: 80
      targetPort: 80
  type: NodePort  # Type of service (other options include ClusterIP, LoadBalancer, etc.)
Step 6. Apply deployment and service YAML files with kubectl commands.
kubectl apply -f deployment.yml
kubectl apply -f service.yml
Step 7. Check and verify deployment, instances, services, pods, logs, etc.
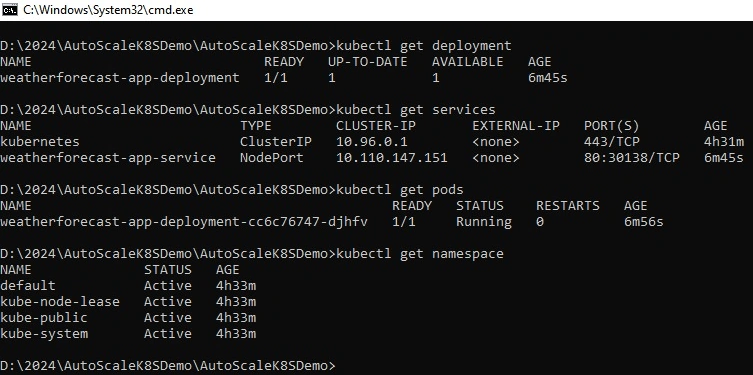
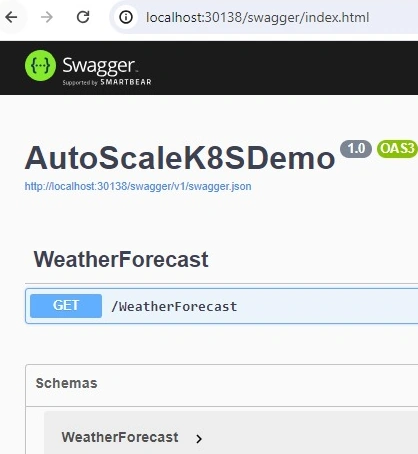
Step 8. Open the browser and hit the localhost URL with the Kubernetes service port, as shown in the above image.
Auto-Scaling Implementation with Kubernetes
First, we need a metric server for this functionality.
The Metric Server is like a traffic cop in a city full of roads (nodes) and cars (pods). It keeps an eye on how busy each road (node) is and how much space each car (pod) is taking up.
Following are a few points that help us understand why the metric server is important.
- Managing traffic: Just like a traffic cop helps manage traffic flow by monitoring how many cars are on the road, the Metric Server helps Kubernetes manage the workload by keeping track of how busy each part of the system is.
- Making decisions: When roads get too crowded, the traffic cop might direct some cars to take a different route. Similarly, Kubernetes uses the information from the Metric Server to decide if it needs to add more resources (like more roads) or move some workloads around to keep everything running smoothly.
- Keeping things running smoothly: By knowing how much space each car (pod) is taking up on the road (node), Kubernetes can ensure that resources are used efficiently. It prevents situations where some parts of the system have too much traffic while others are empty.
- Planning ahead: Just like city planners use traffic data to decide where to build new roads, Kubernetes administrators can use data from the Metric Server to plan for future needs. They can see how much traffic the system is handling and make decisions about adding more resources if needed.
Let’s start the configuration
Step 1. Download the metric server file from the below path.
https://github.com/kubernetes-sigs/metrics-server/releases/latest/download/components.yaml
Step 2. Modify the server argument to add - --kubelet-insecure-tls
- The Metrics Server talks to the Kubelets to get information about how your cluster is doing.
- Usually, this communication is kept safe using TLS, a kind of security measure.
- But in a setup like Docker Desktop for local development, the Kubelets might use certificates that aren't automatically trusted. This can cause security issues.
- To work around this in development, you can use a flag called --kubelet-insecure-tls. It tells the Metrics Server to not worry about checking the certificates when it talks to the Kubelets.
- But remember, while this is handy for development, it's not safe for production because it opens up security risks.
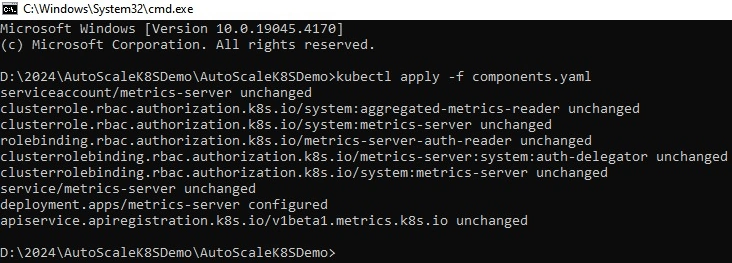
Step 3. Apply the components.yaml file with the help of Kubectl to configure the metric server on the cluster.
kubectl apply -f components.yaml
Step 4. Create a new hpa.yaml file for horizontal pod scaling.
apiVersion: autoscaling/v2
kind: HorizontalPodAutoscaler
metadata:
  name: weatherforecast-hpa
spec:
  minReplicas: 1
  maxReplicas: 5
  metrics:
    - resource:
        name: cpu
        target:
          averageUtilization: 40
          type: Utilization
      type: Resource
  scaleTargetRef:
    apiVersion: apps/v1
    kind: Deployment
    name: weatherforecast-app-deployment
Explanation
- API version: Specifies the Kubernetes API version being used. In this case, it's autoscaling/v2, indicating that it's using the v2 version of the Autoscaling API.
- Kind: specifies the kind of Kubernetes resource being defined. Here, it's HorizontalPodAutoscaler, indicating that it's an HPA resource.
- Metadata: Contains metadata about the HPA resource, including its name.
- Spec: defines the specification of the HPA, including its behavior.
- Min replicas: Specifies the minimum number of replicas that should be running at any given time. In this case, it's set to 1, meaning there should always be at least one replica running.
- Max replicas: Specifies the maximum number of replicas that can be scaled up to. In this case, it's set to 5, meaning the auto scaler can create up to 5 replicas if necessary.
- Metrics: Specifies the metrics used for autoscaling.
- Resource: Indicates that the auto scale should scale based on resource metrics such as CPU or memory usage.
- Name: Specifies the name of the resource metric being used. Here, it's CPU, indicating that the autoscaler will scale based on CPU usage.
- Target: Specifies the target value for the metric.
- Average utilization: specifies the target average utilization of the resource metric. In this case, it's set to 40, meaning the auto scaler will try to maintain an average CPU utilization of 40%.
- Type: Specifies the type of target value. Here, it's Utilization.
- Type: Specifies the type of metric being used for autoscaling. Here, it's Resource.
- Scale target ref: Specifies the reference to the resource that should be scaled by this HPA.
- API version: Specifies the API version of the resource being scaled. Here, it's apps/v1, indicating an API version of Kubernetes apps.
- Kind: Specifies the kind of resource being scaled. Here, it's Deployment.
- Name: Specifies the name of the deployment being scaled. In this case, it's weather forecast-app-deployment.
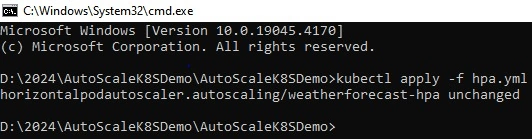
Step 5. Apply hpa YAML file with the kubectl command.
kubectl apply -f hpa.yaml

Step 6. By default, vertical pod auto-scaling is not available in Kubernetes; for that, we need to install the same.
https://github.com/kubernetes/autoscaler/tree/master/vertical-pod-autoscaler
Step 7. Go to the autoscaler\vertical-pod-autoscaler\hack path and execute the vpa-up file, then it will install vpa.
Step 8. Create a new vpa.yml file for vertical pod scaling
apiVersion: autoscaling.k8s.io/v1
kind: VerticalPodAutoscaler
metadata:
  name: weatherforecast-app-vpa
spec:
  targetRef:
    apiVersion: apps/v1
    kind: Deployment
    name: weatherforecast-app-deployment
  updatePolicy:
    updateMode: "Off"
Explanation
- API version: This indicates the version of the Kubernetes API being used, specifically the Autoscaling API version 1 (autoscaling.k8s.io/v1).
- Kind: Specifies the kind of Kubernetes resource being defined, which in this case is a VerticalPodAutoscaler.
- Metadata: Contains information about the VPA, including its name.
- Spec: defines the specifications of the VPA, including its behavior.
- Target ref: Specifies the reference to the resource that should be adjusted by this VPA. In this case, it's a deployment named "weather forecast-app-deployment".
- Update policy: Specifies the policy for updating the pods managed by the VPA.
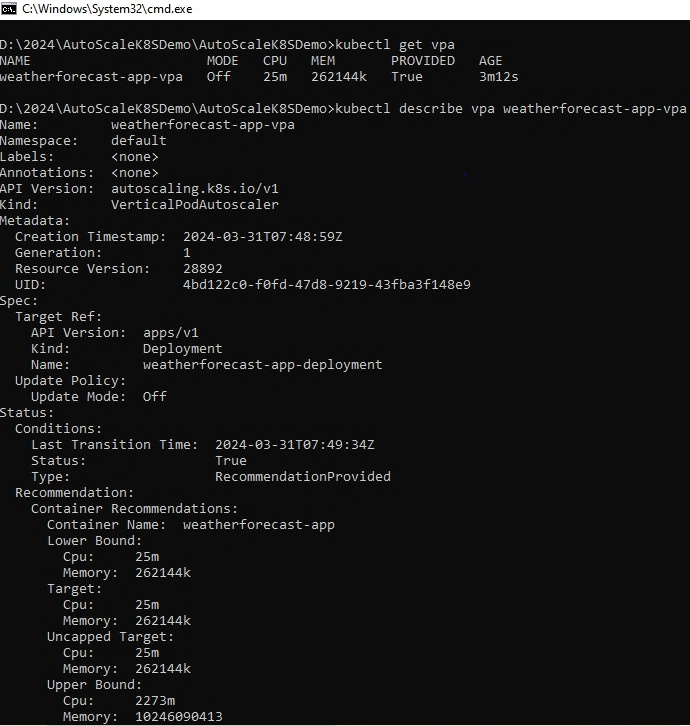
- Update mode: Indicates the update mode for the VPA. Here, it's set to "Off", which means the VPA is not actively updating the resource. This likely implies that the VPA is being used in an advisory mode, providing recommendations for resource requests and limits rather than directly adjusting them.
There are the following types of update modes in vertical pod scaling
Auto Mode
In Auto mode, the VPA automatically adjusts the resource requests and limits for your application's pods based on their actual usage. If a pod needs more resources to handle its workload, the VPA will increase its resource allocations. Similarly, if a pod is using fewer resources, the VPA will decrease its allocations. It's like having a smart system that dynamically adjusts the resources your application pods need to run efficiently.
Recreate Mode
In Recreate mode, the VPA recalculates the resource requirements for your pods based on their usage patterns, but it requires the pods to be recreated with the updated configurations. This means that when the VPA determines that a pod needs more or fewer resources, it will delete the existing pod and create a new one with the updated resource allocations. During this process, there may be a brief period of downtime as the new pod is created.
Initial Mode
In Initial mode, the VPA uses historical usage data to compute resource recommendations for your pods, but it doesn't apply these recommendations immediately. Instead, the recommendations serve as starting points when the pods are initially created or scaled up. This mode helps ensure that new pods are provisioned with appropriate resource allocations from the beginning, based on past usage patterns.
Off Mode
In off mode, the VPA doesn't actively adjust the resource requests and limits for your pods. It simply observes and collects data on their resource usage without making any changes. This mode is useful when you want to monitor your application's resource usage trends without allowing the VPA to modify the pod configurations. It's like having a monitoring tool that watches your pods but doesn't interfere with their resource allocations.
Step 9. Apply vpa YAML file to the cluster with the help of kubectl.
kubectl apply -f vpa.yaml
Monitor Applications with High Traffic
Let’s generate a load on the service that we hosted before
Step 1. Execute the below command to create a load.
kubectl run -i --tty load-generator --rm --image=busybox:1.28 --restart=Never -- /bin/sh -c "while sleep 0.01; do wget -q -O- http://weatherforecast-app-service/WeatherForecast; done"
Note. If you want more traffic, then run multiple instances of the load generator at different prompts.
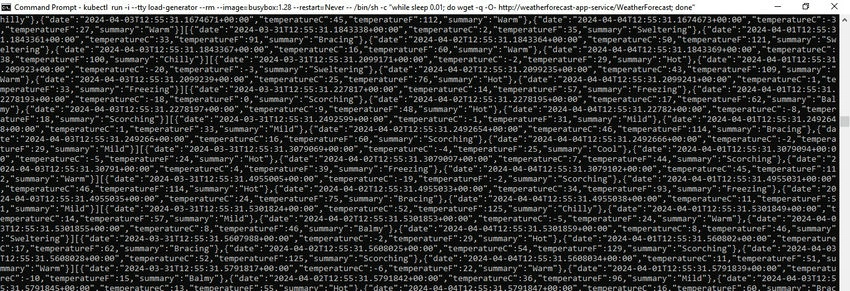
As we can see, the load is starting to generate in the above image.
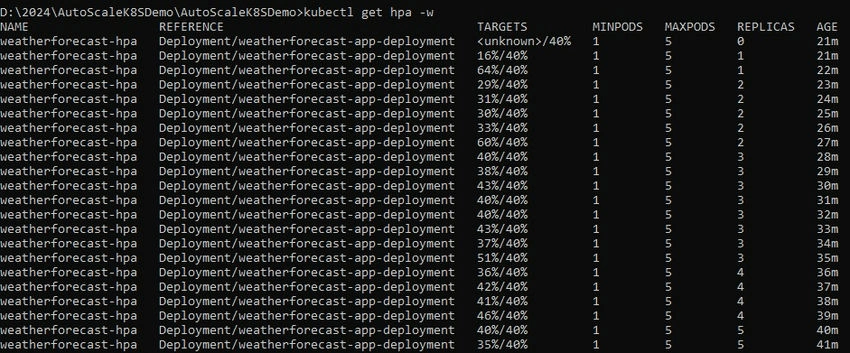
As you can see in the above image the initial target is low and the number of replicas is also minimal, But our load generator starts creating loads, and due to that, our replicas start increasing, which means Kubernetes creates new pods to handle traffic with the help of auto-scaling.
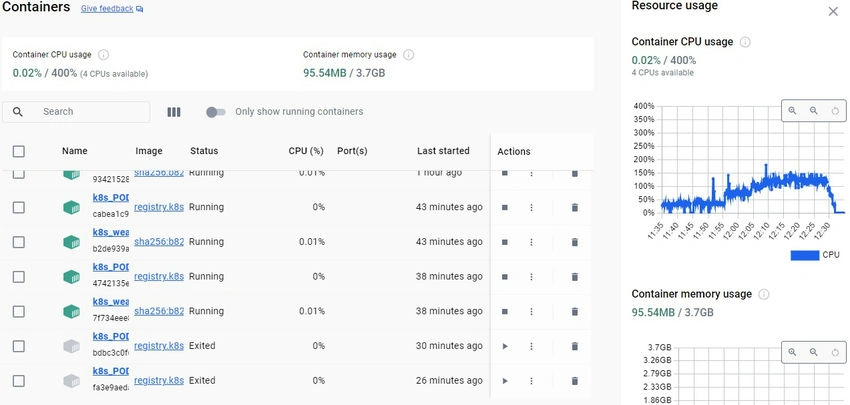
Also, once we stopped the load generator, our number of replicas decreased, as shown in the below images

GitHub
https://github.com/Jaydeep-007/AutoScaleK8SDemo/tree/master
Conclusion
In this article, we discussed the basics of Docker and Kubernetes with auto-scaling. Also, step-by-step implementation of the Weather Forecast API. Later on, we containerize the service, apply the auto-scale configuration, and monitor the application with high traffic.
Rijwan AnsariPosted Aug 4, 2024, 3:53 AM
Nice article. Thanks for sharing