

Introduction
In this article, we will integrate the Azure Active Directory into an Angular application and get data from a secured web API using a JWT bearer token. There will be 3 steps to integrate the Azure Active Directory into our application.
- Configure Azure active directory for our application:
- Please log into the Azure portal using your credentials.
- Select the Azure Active Directory icon/blade.
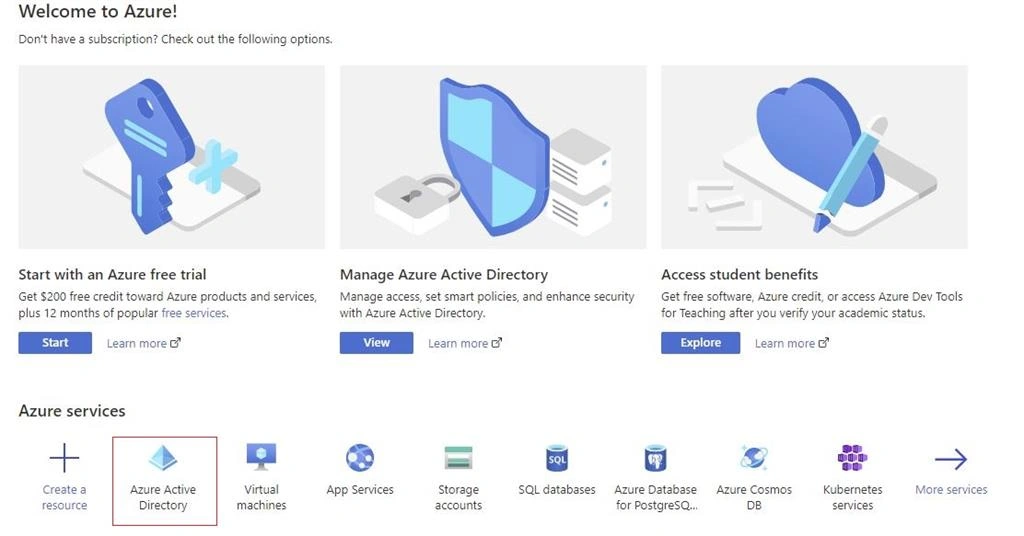
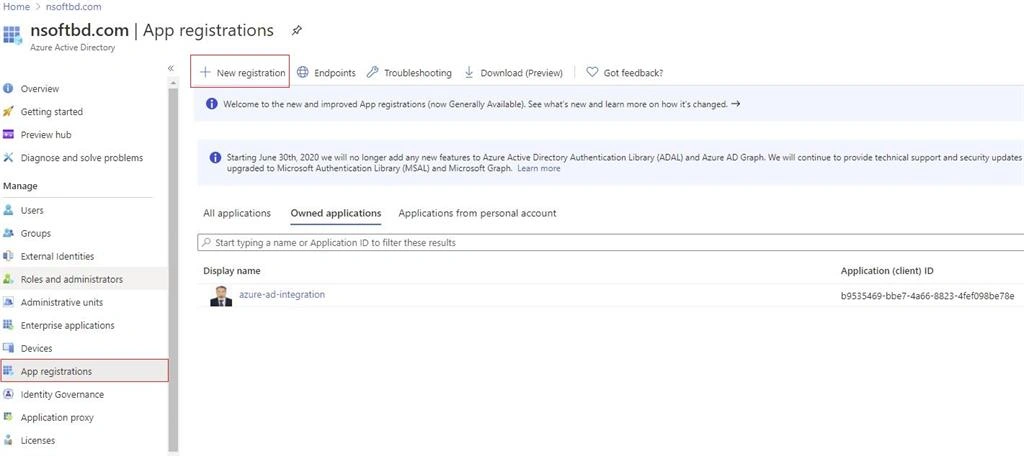
- Select the App registration blade and then click new registration. Enter your application name.
- In my case, the name was “azure-ad-integration”. Select the support account types. I selected “Accounts in this directory only”.
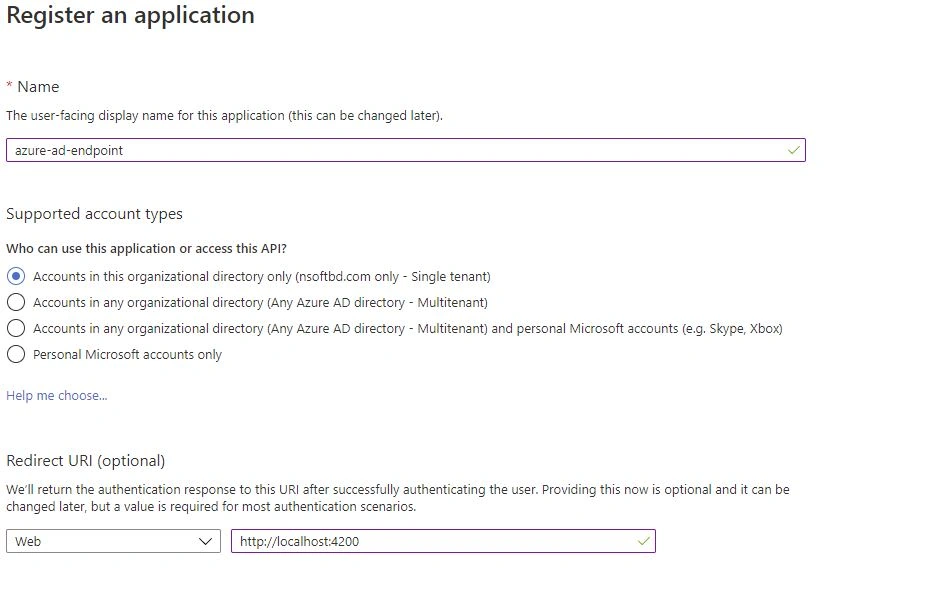
- Then you can set “Redirect URI”, although it is an optional field. For my case, I selected “Web” and set its value to http://localhost:4200
- Then click the “Register” button. You'll see the application's Overview or the main registration page.
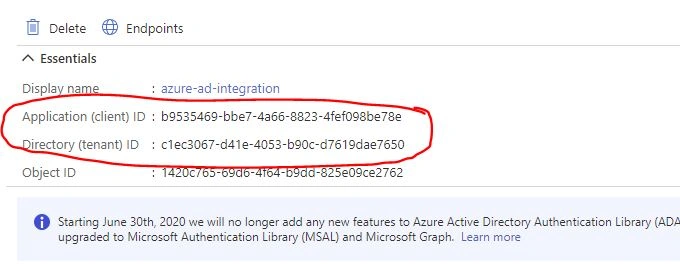
- The important details here are the client and tenant ids. Note these down in Notepad or similar, you'll need them later.
- Then go to the "Authentication" blade and select "Access Tokens" and "ID tokens" from the implicit grant.
- Then go to "Expose an API" then select "Add a scope" from Scopes defined by this API. Put all the necessary information and save it.
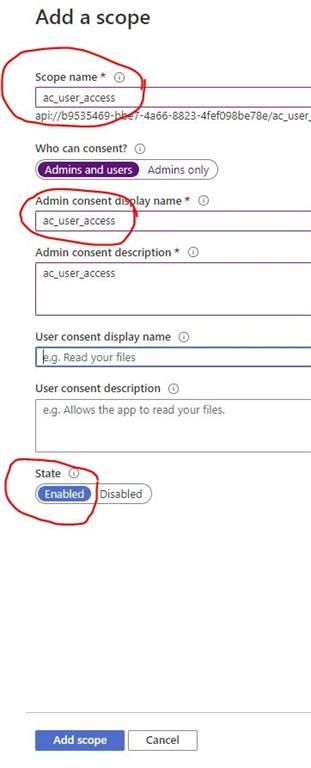
- Your Azure application is ready for production.
- Create an Angular 9 application
- Create an angular application using the following command
ng new azure-ad-client
- Add a package using the following command:
npm install --s @azure/msal-angular
- const isIE = window.navigator.userAgent.indexOf('MSIE ') > -1 || window.navigator.userAgent.indexOf('Trident/') > -1;
- @NgModule({
- declarations: [
- AppComponent,
- ProfileComponent
- ],
- imports: [
- BrowserModule,
- AppRoutingModule,
- HttpClientModule,
- MsalModule.forRoot({
- auth: {
- clientId: environment.clientId,
- authority: environment.authority,
- redirectUri: environment.redirectUrl,
- postLogoutRedirectUri: environment.postLogoutRedirectUri,
- navigateToLoginRequestUrl: true
- }, cache: {
- cacheLocation: 'localStorage',
- storeAuthStateInCookie: isIE, // set to true for IE 11
- },
- }, {
- popUp: !isIE,
- consentScopes: [
- 'user.read',
- 'openid',
- 'profile',
- ],
- protectedResourceMap: [
- ['https://graph.microsoft.com/v1.0/me', ['user.read']]
- ]
- }),
- ],
- providers: [
- {
- provide: LocationStrategy,
- useClass: HashLocationStrategy
- },
- {
- provide: HTTP_INTERCEPTORS,
- useClass: MsalInterceptor,
- multi: true
- },
- MsalService,
- ApiService
- ],
- bootstrap: [AppComponent]
- })
- const routes: Routes = [
- {
- path: '',
- component: ProfileComponent,
- canActivate: [MsalGuard]
- }
- ];
- @NgModule({
- imports: [RouterModule.forRoot(routes)],
- exports: [RouterModule]
- })
Create a new component called profile.
Create a new service in the called api.service.ts into an app/shared folder and add the following code:
- @Injectable({ providedIn: 'root' })
- export class ApiService {
- private baseUrl = environment.apiEndpoint;
- constructor(private http: HttpClient) { }
- getWeathers(): Observable<IWeatherForecast[]> {
- // console.log('Token is ', localStorage.getItem('msal.idtoken'));
- const reqHeader = new HttpHeaders({
- 'Content-Type': 'application/json',
- Authorization: 'Bearer ' + localStorage.getItem('msal.idtoken')
- });
- return this.http.get<IWeatherForecast[]>(this.baseUrl + 'home', { headers: reqHeader }).pipe(
- retry(1),
- catchError(this.errorHandl)
- );
- }
- // Error handling
- errorHandl(error) {
- let errorMessage = '';
- if (error.error instanceof ErrorEvent) {
- errorMessage = error.error.message;
- } else {
- errorMessage = `Error Code: ${error.status}\nMessage: ${error.message}`;
- }
- return throwError(errorMessage);
- }
- }
- export class ProfileComponent implements OnInit {
- name: string;
- username: string;
- public weatherData: IWeatherForecast[] = [];
- constructor(private msalService: MsalService, private apiService: ApiService) { }
- ngOnInit(): void {
- const account = this.msalService.getAccount();
- this.name = account.name;
- this.username = account.userName;
- this.getWeatherinformation();
- }
- getWeatherinformation() {
- this.apiService.getWeathers().subscribe(res => {
- // console.log('data: ', res);
- this.weatherData = res as IWeatherForecast[];
- });
- }
- logout() {
- localStorage.clear();
- this.msalService.logout();
- }
- }
- Name: {{name}}<br/>
- Username: {{username}}
- <br/>
- <h3>Data From Web API</h3>
- <ul>
- <li *ngFor="let element of weatherData" [type]="element">
- {{element.date}}, {{element.summary}}, {{element.temperatureC}}, {{element.temperatureF}}
- </li>
- </ul>
- <button type='button' name='logOut' id='logout' (click)="logout()">Log Out</button>
- The client application is ready.
- Create a Web API project:
- After creating your API project, please add the following package:
- Microsoft.AspNetCore.Authentication.JwtBearer
- Microsoft.AspNetCore.Cors
- Add the following code into the Startup.cs file:
- public void ConfigureServices(IServiceCollection services)
- {
- services.AddControllers();
- // Add Cors
- services.AddCors(o => o.AddPolicy("default", builder =>
- {
- builder.AllowAnyOrigin()
- .AllowAnyMethod()
- .AllowAnyHeader();
- }));
- services.AddAuthentication(o =>
- {
- o.DefaultAuthenticateScheme = JwtBearerDefaults.AuthenticationScheme;
- o.DefaultChallengeScheme = JwtBearerDefaults.AuthenticationScheme;
- o.DefaultScheme = JwtBearerDefaults.AuthenticationScheme;
- }).AddJwtBearer(opt =>
- {
- opt.IncludeErrorDetails = true;
- opt.Authority = "https://login.microsoftonline.com/c1ec3067-d41e-4053-b90c-d7619dae7650/v2.0";
- opt.Audience = "b9535469-bbe7-4a66-8823-4fef098be78e";
- });
- }
- // This method gets called by the runtime. Use this method to configure the HTTP request pipeline.
- public void Configure(IApplicationBuilder app, IWebHostEnvironment env)
- {
- if (env.IsDevelopment()) app.UseDeveloperExceptionPage();
- // Enable Cors
- app.UseCors("default");
- app.UseRouting();
- app.UseAuthentication();
- app.UseAuthorization();
- app.UseEndpoints(endpoints => { endpoints.MapControllers(); });
- }
- Add a Controller and add the following code into that controller:
- using System;
- using System.Collections.Generic;
- using System.Linq;
- using Microsoft.AspNetCore.Authentication.JwtBearer;
- using Microsoft.AspNetCore.Authorization;
- using Microsoft.AspNetCore.Mvc;
- using Microsoft.Extensions.Logging;
- namespace azure_ad_webapi.Controllers
- {
- [Authorize(AuthenticationSchemes = JwtBearerDefaults.AuthenticationScheme)]
- [Route("api/home")]
- [Consumes("application/json")]
- [Produces("application/json")]
- [ApiController]
- public class HomeController : ControllerBase
- {
- private static readonly string[] Summaries =
- {
- "Freezing", "Bracing", "Chilly", "Cool", "Mild", "Warm", "Balmy", "Hot", "Sweltering", "Scorching"
- };
- // private readonly ILogger<HomeController> _logger;
- public HomeController()
- {
- //_logger = logger;
- }
- [HttpGet]
- public IEnumerable<WeatherForecast> Get()
- {
- var rng = new Random();
- return Enumerable.Range(1, 5).Select(index => new WeatherForecast
- {
- Date = DateTime.Now.AddDays(index),
- TemperatureC = rng.Next(-20, 55),
- Summary = Summaries[rng.Next(Summaries.Length)]
- })
- .ToArray();
- }
- }
- }
All code is hosted in GitHub. You can check it for a better understanding.
Weng NgPosted Mar 31, 2021, 8:03 PM
Salam, bro. Thanks for the article. Very helpful and easy to understand. Bless you.
Craig SimonPosted Feb 5, 2021, 3:39 PM
Thank you for this. I'll be investigating how to adapt this AD-based approach for AD B2C. The differences look challenging. If you've got a similar boilerplate for B2C, I'd be delighted to see it.
Hamid KhanPosted Sep 22, 2020, 10:12 PM
Very good concept that you explain................