

Part II - Writing text, images and simple graphics in the document.
This is the second part of this articles series about creating simple PDFs using iTextSharp. In the first part we looked at how to create the file and add meta information. We also added a simple line of text in the document. As there are several ways of placing elements in the document, I will describe two in this article; The flow layout and exact positioning.
Flow layout
Exact positioning
Here you set the exact coordinates (Y & X) to place elements in the document and this is the way we will continue to place text in this tutorial. Here you need to control the page bounds yourself, keeping track of when it's time to switch page. This gives us better control over how we create documents.
To enable exact positioning of text and other elements as described above you need to use the PdfContentByte class which enables you to place it where you want to. You get hold of a reference with this simple line of code:
- PdfContentByte cb = writer.DirectContent;
- cb.BeginText();
- cb.SetFontAndSize(f_cn, 9);
You can create fonts several ways, here shown how to by using the BaseFont class.
- BaseFont f_cb = BaseFont.CreateFont("c:\\windows\\fonts\\calibrib.ttf", BaseFont.CP1252, BaseFont.NOT_EMBEDDED);
- BaseFont f_cn = BaseFont.CreateFont("c:\\windows\\fonts\\calibri.ttf", BaseFont.CP1252, BaseFont.NOT_EMBEDDED);
Okay, now you can place text where you want to with the following code:
- cb.SetTextMatrix(100, 100); // Left, Top
- cb.ShowText("Hello World"); First
- cb.EndText();
One tricky thing to keep track of is that the y coordinate in the SetTextMatrix are a bit different from normal use of graphic coordinates, it works from the top bottom of the document, is backward. To visualize this, let's do two simple for loops to draw the positions in the document.
- int row = 1;
- for (int y = 0; y != 70; y++)
- {
- cb.SetTextMatrix(10, row);
- cb.ShowText("Y: " + row.ToString());
- row += 12; // The spacing between the rows is set to 12 "points"
- }
- int col = 35;
- for (int x = 0; x != 22; x++)
- {
- cb.SetTextMatrix(col, 829);
- cb.ShowText("X: " + col.ToString());
- col += 25; // The spacing between the columns is set to 25 "points"
- }
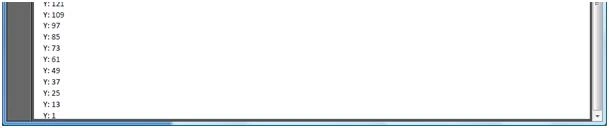
and works its way up to the top with the line spacing of 12 points. The last position is here the Y: 829.
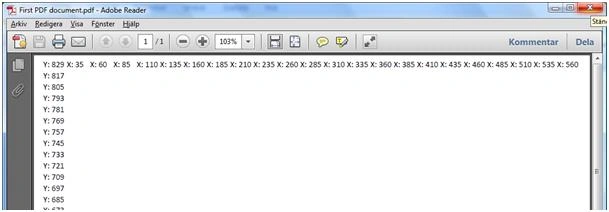
The second loop creates the left to right "column" illustration, and that one goes from right to left as normal positioning of coordinates are used. This is normally something I keep in printing on my desktop when I design PDF's using iTextSharp, it can otherwise be many test documents created before everything falls into the right place!
Text alignment
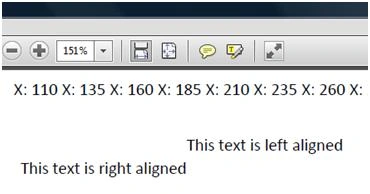
- cb.ShowTextAligned(PdfContentByte.ALIGN_LEFT, "This text is left aligned", 200, 800, 0);
- cb.ShowTextAligned(PdfContentByte.ALIGN_RIGHT, "This text is right aligned", 200, 788, 0);
Drawing lines
To draw the line in the document, use the Stroke method like this cb.Stroke().
Drawing lines
To draw a rectangle you can use the Rectangle method, like this:
cb.Rectangle(400, 700, 100, 100);
cb.Stroke();
NOTE: You need to call the end text method before you write lines or add images in the document when you use exact positioning, if you are doing it while writing text. One way to keep track of this is to start out with the graphics before you start placing text!
There are several ways of placing images, but I will just show the simplest one, using exact positioning. First, create a instance of the image class, like this:
- iTextSharp.text.Image img = iTextSharp.text.Image.GetInstance("http://www.c-sharpcorner.com/App_Themes/CSharp/Images/CSSiteLogo.gif");
- iTextSharp.text.Image img = iTextSharp.text.Image.GetInstance(Server.MapPath("img.png"));
- img.SetAbsolutePosition(50, 647);
- cb.AddImage(img);
- img.ScaleAbsolute(216, 70);
- img.ScalePercent(50);
Now you have the basic knowledge of how to place text, graphics and images in a PDF document using iTextSharp. Please, check out Part III where I go thru a simple process creating a PDF invoice from a XML file.
Ram PrakashPosted Apr 4, 2023, 7:22 AM
I have 5 pages into the pdf. I want to write text on page 3, How to select the page in itext?
Phunsuk WangduPosted Sep 6, 2022, 1:32 AM
Hi! Can you please re-create this working concept using mvc razor? thanks in advance..
Chathu PereraPosted Jun 19, 2019, 3:18 AM
Really Helpful!!
Sonu ChaudharyPosted Jun 8, 2016, 2:56 PM
good one ..
Ajit AbrahamPosted Jan 7, 2016, 4:15 AM
Very helpful, Thank You.
Santhakumar MunuswamyPosted Jul 23, 2015, 3:50 PM
Good article
Danny AbrahamPosted Jun 4, 2014, 2:46 AM
Superb article. It has detailed explanation of ItextSharp.
Online UserPosted Nov 6, 2013, 11:21 AM
Thanks for the good article! I tried it but it keeps giving me an error on the page before compiling. I guess it lack a kind of library. I have the pdfwriter as in Dim pdfwriterInstant As PdfWriter = PdfWriter.GetInstance(pdfReport, New FileStream(ServerPDFReportPathName, FileMode.Create)) and when it is used in the page like pdfwriterInstant.SetLineWidth(0.0F), i get error like this: 'SetLinewidth' is not a member of 'itextsharp.text.pdf.pdfwriter'. what could go wrong here? following is the list of my libraries imported to the page: Imports System.Data Imports MySql.Data.MySqlClient 'iTextSharp Libraries Imports iTextSharp.text 'Core PDF Text Functionalities Imports iTextSharp.text.pdf 'PDF Content Imports iTextSharp.text.html Imports iTextSharp.text.html.simpleparser Imports System.IO 'Working With 'For creating PDF file: Imports System Imports Microsoft.VisualBasic.FileIO
sadun ssssssPosted Apr 12, 2013, 10:54 PM
Thank a lot for this tutorial part.....
Tomas VarinPosted Apr 2, 2011, 4:16 PM
Hi Micke, how are you? Thanks for write this articule, I find it very usefull. I'm trying to make a fill round rectangle but I can't I'm doing: <code> PdfContentByte cb = writer.DirectContent; cb.SetColorFill(BaseColor.CYAN); cb.RoundRectangle(350, 550, 150, 150, 10); cb.Stroke(); </code> but doesn't work. Can you help me? Regards!! Tomas