

This article provides a simple way to try XAML without C#. This is for anyone unfamiliar with XAML that wants to get an idea of what it is and how it works. This article only explains XAML, not WPF or even C#. You don't even need special software for this article; you can use just Notepad and Internet Explorer if you wish. You can use most any text editor, including Visual Studio if you wish. I won't provide the concepts; you can get that elsewhere. The intent is to allow you to have a little fun playing with XAML to become familiar with it.
- <Page xmlns="http://schemas.microsoft.com/winfx/2006/xaml/presentation"
- xmlns:sys="clr-namespace:System;assembly=mscorlib"
- xmlns:x="http://schemas.microsoft.com/winfx/2006/xaml"
- >
- <Label Content="This is a Label" />
- </Page>
Then save the file with the extension "xaml". If you are unsure of what I mean then please download the attached zip file and look at the file "Skeleton.xaml". When you browse to the file in IE you will get:
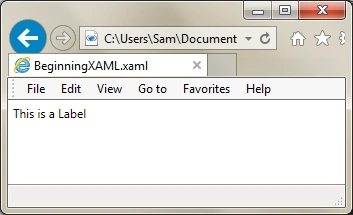
Note that the Label tag created a Label. So now for the fun part. Try adding the following tag after the Label tag:
- <Button Content="Button" Width="75" Height="23" HorizontalAlignment="Left" VerticalAlignment="Top"/>
Then refresh the page if you still have the file open in IE or browse to the file using IE. You will get:
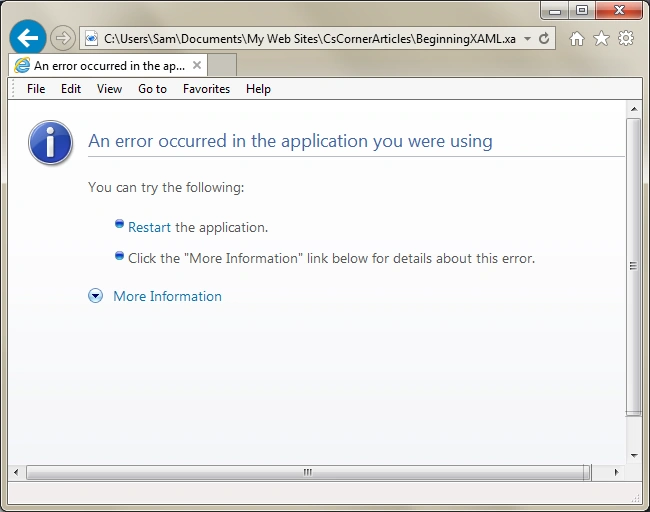
That is not fun. So we will use a Grid tag and put the other stuff in it. So put the following within the "Page" tag (I am excluding the "Page" tag from the following):
- <Grid>
- <Label Content="This is a Label" Margin="12,12,0,0" />
- <Button Content="Button" Margin="12,48,0,0" Width="75" Height="23"
- HorizontalAlignment="Left" VerticalAlignment="Top" />
- </Grid>
You can play around with that. The following shows a bunch of stuff; give this a try (there should be nothing else in the file except the Page tag):
- <DockPanel>
- <Menu Height="25" DockPanel.Dock="Top">
- <MenuItem Header="_File">
- <MenuItem Header="_Open"/>
- <MenuItem Header="_Save"/>
- <MenuItem Header="Save_As"/>
- </MenuItem>
- </Menu>
- <StatusBar Height="25" Margin="2,2,0,0" Name="statusBar1" DockPanel.Dock="Bottom">
- <StatusBarItem>This StatusBar works</StatusBarItem>
- </StatusBar>
- <Grid Height="300">
- <Label Content="Test Label" Height="30" HorizontalAlignment="Left" Margin="12,12,0,0" VerticalAlignment="Top" Width="290" FontSize="14" BorderThickness="2" HorizontalContentAlignment="Center" BorderBrush="#7F000000" FontWeight="Bold" />
- <Button Content="Button" Height="23" HorizontalAlignment="Left" Margin="12,63,0,0" VerticalAlignment="Top" Width="75" />
- <CheckBox Content="CheckBox" Height="16" HorizontalAlignment="Left" Margin="115,63,0,0" VerticalAlignment="Top" />
- <ListBox Height="100" HorizontalAlignment="Left" Margin="12,138,0,0" VerticalAlignment="Top" Width="75" DataContext="{Binding}">
- <ListBoxItem Content="One" />
- <ListBoxItem Content="Two" />
- <ListBoxItem Content="Three" />
- </ListBox>
- <Grid.ContextMenu>
- <ContextMenu>
- <MenuItem Header="Cut"/>
- <MenuItem Header="Copy"/>
- <MenuItem Header="Paste"/>
- </ContextMenu>
- </Grid.ContextMenu>
- </Grid>
- </DockPanel>
Using that we can get:
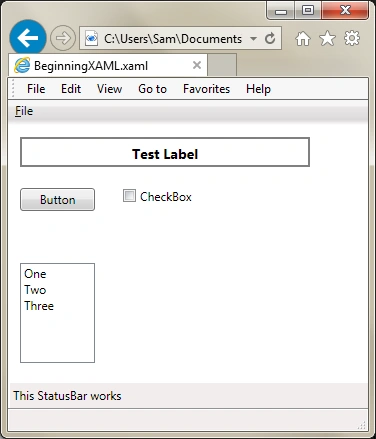
Note that if you put the following attributes in the Page tag then they will specify the size of the window within the IE window:
Height="350" Width="320"
Hashim ShafiqPosted Aug 21, 2015, 10:07 PM
Nice
Udaya kumarPosted Oct 30, 2014, 6:13 AM
Nice
hamida khanamPosted Oct 9, 2014, 10:00 AM
Good work.Thanks
Dinesh BeniwalPosted Oct 9, 2014, 3:52 AM
Good work sam.
Mahesh ChandPosted Oct 9, 2014, 12:40 AM
Cool Sam. Nice