

This article shows how to bind data in ListView controls with using ViewState variable and also shows paging on controls on linkbutton click. We will learn here how to bind controls with data with ViewState and how to handle paging on controls. This binds data according to link button text on link button click event.
Also read
- Binding Data Using ListView and GridView in ASP.NET without Database
- Binding Data in ListView on LinkButton Click
Initial Chamber
Step 1: Open your Visual Studio and create an empty website then provide a suitable name such as ListViewUsingViewState.
Step 2: In Solution Explorer you will get your empty website, then add some web forms.
ListViewUsingViewState (your empty website). Right click and select Add New Item Web Form. Name it ListViewUsingViewState.aspx.
Design Chamber
Step 3: Open the ListViewUsingViewState.aspx file and write some code for the design of the application.
When you open this page you can see the following code-
- <%@ Page Language="C#" AutoEventWireup="true" CodeFile="ListViewUsingViewState.aspx.cs" Inherits="ListViewUsingViewState" %>
- <!DOCTYPE html>
- <html xmlns="http://www.w3.org/1999/xhtml">
- <head runat="server">
- <title> </title>
- </head>
- <body>
- <form id="form1" runat="server">
- <div>
- </div>
- </form>
- </body>
- </html>
- Now add control on page then you get below code-
- <div>
- <%-- Here we add data to bind in ViewState --%>
- <div>
- <asp:Label ID="Label1" runat="server" Text="Name"></asp:Label>
- <asp:TextBox ID="TextBox1" runat="server"></asp:TextBox>
- <asp:Label ID="Label2" runat="server" Text="Designation"></asp:Label>
- <asp:TextBox ID="TextBox2" runat="server"></asp:TextBox>
- <asp:Button ID="Button1" runat="server" Text="save" OnClick="InsertData" />
- </div><br />
- <%-- end --%>
- <%-- listview check --%>
- <div>
- <asp:ListView ID="ListView1" runat="server" GroupPlaceholderID="groupPlaceHolder1" ItemPlaceholderID="itemPlaceHolder1" OnPagePropertiesChanging="OnPagePropertiesChanging">
- <LayoutTemplate>
- <table border="1">
- <tr>
- <th>Name
- </th>
- <th>Designation
- </th>
- </tr>
- <asp:PlaceHolder runat="server" ID="groupPlaceHolder1"></asp:PlaceHolder>
- <tr>
- <td colspan="3">
- <%-- This part used for paging --%>
- <asp:DataPager ID="DataPager1" runat="server" PagedControlID="ListView1" PageSize="2">
- <Fields>
- <asp:NextPreviousPagerField ButtonType="Link" ShowFirstPageButton="false" ShowPreviousPageButton="true"
- ShowNextPageButton="false" />
- <asp:NumericPagerField ButtonType="Link" />
- <asp:NextPreviousPagerField ButtonType="Link" ShowNextPageButton="true" ShowLastPageButton="false" ShowPreviousPageButton="false" />
- </Fields>
- </asp:DataPager>
- <%-- end --%>
- </td>
- </tr>
- </LayoutTemplate>
- <GroupTemplate>
- <tr>
- <asp:PlaceHolder runat="server" ID="itemPlaceHolder1"></asp:PlaceHolder>
- </tr>
- </GroupTemplate>
- <ItemTemplate>
- <td>
- <%# Eval("Name") %>
- </td>
- <td>
- <%# Eval("Designation") %>
- </td>
- </ItemTemplate>
- </asp:ListView>
- </div>
- <%-- end --%>
- </div>
Here I have designed the ListView Control and used some property as in the following:
Now design page looks like the following:
Design Page-
- <%@ Page Language="C#" AutoEventWireup="true" CodeFile="ListViewUsingViewState.aspx.cs" Inherits="ListViewUsingViewState" %>
- <!DOCTYPE html>
- <html xmlns="http://www.w3.org/1999/xhtml">
- <head runat="server">
- <title>List View With View State - Upendra Pratap Shahi</title>
- </head>
- <body>
- <form id="form1" runat="server">
- <div>
- <%-- Here we add data to bind in ViewState --%>
- <div>
- <asp:Label ID="Label1" runat="server" Text="Name"></asp:Label>
- <asp:TextBox ID="TextBox1" runat="server"></asp:TextBox>
- <asp:Label ID="Label2" runat="server" Text="Designation"></asp:Label>
- <asp:TextBox ID="TextBox2" runat="server"></asp:TextBox>
- <asp:Button ID="Button1" runat="server" Text="save" OnClick="InsertData" />
- </div><br />
- <%-- end --%>
- <%-- listview check --%>
- <div>
- <asp:ListView ID="ListView1" runat="server" GroupPlaceholderID="groupPlaceHolder1" ItemPlaceholderID="itemPlaceHolder1" OnPagePropertiesChanging="OnPagePropertiesChanging">
- <LayoutTemplate>
- <table border="1">
- <tr>
- <th>Name
- </th>
- <th>Designation
- </th>
- </tr>
- <asp:PlaceHolder runat="server" ID="groupPlaceHolder1"></asp:PlaceHolder>
- <tr>
- <td colspan="3">
- <%-- This part used for paging --%>
- <asp:DataPager ID="DataPager1" runat="server" PagedControlID="ListView1" PageSize="2">
- <Fields>
- <asp:NextPreviousPagerField ButtonType="Link" ShowFirstPageButton="false" ShowPreviousPageButton="true"
- ShowNextPageButton="false" />
- <asp:NumericPagerField ButtonType="Link" />
- <asp:NextPreviousPagerField ButtonType="Link" ShowNextPageButton="true" ShowLastPageButton="false" ShowPreviousPageButton="false" />
- </Fields>
- </asp:DataPager>
- <%-- end --%>
- </td>
- </tr>
- </LayoutTemplate>
- <GroupTemplate>
- <tr>
- <asp:PlaceHolder runat="server" ID="itemPlaceHolder1"></asp:PlaceHolder>
- </tr>
- </GroupTemplate>
- <ItemTemplate>
- <td>
- <%# Eval("Name") %>
- </td>
- <td>
- <%# Eval("Designation") %>
- </td>
- </ItemTemplate>
- </asp:ListView>
- </div>
- <%-- end --%>
- </div>
- </form>
- </body>
- </html>
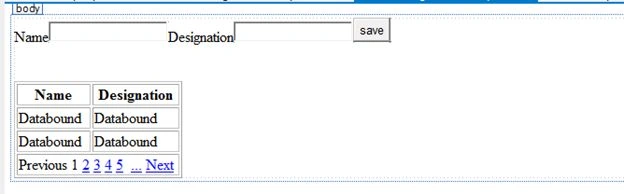
Figure 1
Code chamber
Step 4 In the code chamber we will write some code so that our application works.
Adding the following namespaces on namespace section of your code behind page-
- using System;
- using System.Collections.Generic;
- using System.Data;
- using System.Linq;
- using System.Web;
- using System.Web.UI;
- using System.Web.UI.WebControls;
Code behind Page-
- using System;
- using System.Collections.Generic;
- using System.Data;
- using System.Linq;
- using System.Web;
- using System.Web.UI;
- using System.Web.UI.WebControls;
- public partial class ListViewUsingViewState : System.Web.UI.Page
- {
- protected void Page_Load(object sender, EventArgs e)
- {
- if (!IsPostBack)
- {
- DataTable dt = new DataTable();
- dt.Columns.Add("Name", typeof(string));
- dt.Columns.Add("Designation", typeof(string));
- ViewState["DataEntry"] = dt;
- BindListView();
- }
- }
- private void BindListView()
- {
- DataTable dt = new DataTable();
- dt = (DataTable)ViewState["DataEntry"];
- if (dt.Rows.Count > 0 && dt != null)
- {
- ListView1.DataSource = dt;
- ListView1.DataBind();
- }
- else
- {
- ListView1.DataSource = null;
- ListView1.DataBind();
- }
- }
- /// <summary>
- /// This function is used to save the data in ViewState
- /// </summary>
- /// <param name="sender">sender</param>
- /// <param name="e">e</param>
- protected void InsertData(object sender, EventArgs e)
- {
- string sName = "";
- string sDesg = "";
- //here taking data from textbox
- if (TextBox1.Text.ToString() == "")
- {
- ScriptManager.RegisterClientScriptBlock(this, this.GetType(), "alertMessage", "alert('Enter the name')", true);
- return;
- }
- else
- {
- sName = TextBox1.Text.ToString();
- }
- if (TextBox2.Text.ToString() == "")
- {
- ScriptManager.RegisterClientScriptBlock(this, this.GetType(), "alertMessage", "alert('Enter the designation')", true);
- return;
- }
- else
- {
- sDesg = TextBox2.Text.ToString();
- }
- DataTable dt = new DataTable();
- DataRow dr;
- //assigning ViewState value in Data Table
- dt = (DataTable)ViewState["DataEntry"];
- //Adding value in datatable
- dr = dt.NewRow();
- dr["Name"] = sName;
- dr["Designation"] = sDesg;
- dt.Rows.Add(dr);
- if (dt != null)
- {
- ViewState["DataEntry"] = dt;
- }
- //here bind Listview after data save in ViewState
- this.BindListView();
- //empty the textbox control
- TextBox1.Text = string.Empty;
- TextBox2.Text = string.Empty;
- }
- //this is used for paging on ListView
- protected void OnPagePropertiesChanging(object sender, PagePropertiesChangingEventArgs e)
- {
- (ListView1.FindControl("DataPager1") as DataPager).SetPageProperties(e.StartRowIndex, e.MaximumRows, false);
- this.BindListView();
- }
- }
On initial load-

Figure 2
On blank data
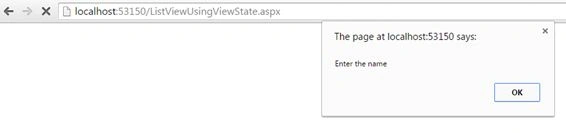
Figure 3
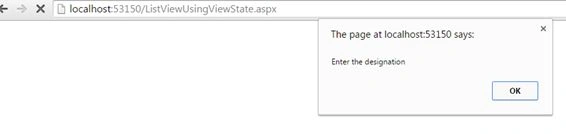
Figure 4
Enter data

Figure 5
On first entry
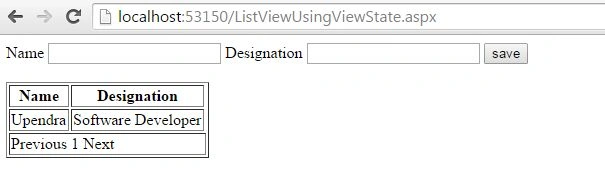
Figure 6
On Second Entry
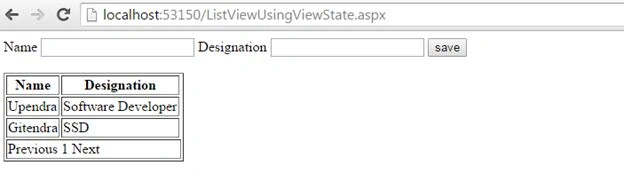
Figure 7
On third entry paging shows

Figure 8
Now click on paging and see the following output.
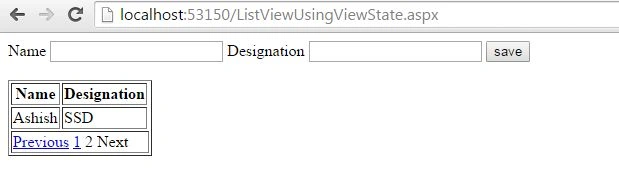
Figure 9
I hope you liked this. Have a good day. Thank you for reading this article.
Dhanik SahniPosted Nov 13, 2015, 6:24 AM
Good One.
Shakti SaxenaPosted Oct 2, 2015, 7:42 AM
good one
Karthikeyan KPosted Oct 2, 2015, 2:13 AM
Good one sir...
Harshad PansuriyaPosted Oct 2, 2015, 1:17 AM
Nice One
Nilesh JadavPosted Oct 2, 2015, 12:15 AM
Nice work sir !!
Pankaj Kumar ChoudharyPosted Oct 1, 2015, 7:25 PM
Nice Article Sir..........
Santhakumar MunuswamyPosted Oct 1, 2015, 3:56 PM
Good Article. Thanks for sharing us