
Introduction
If we like to create a visual representation of data rather than having boring table forms and charts this library will be a good option. This will help you to develop up to complex workflows in more customized way.
Supports: Blazor server app and web assembly (WASM)
Library Name: Z.Blazor.Diagrams (Free)
Library link: https://github.com/Blazor-Diagrams/Blazor.Diagrams
Demos : https://blazor-diagrams.zhaytam.com/demos/simple
Blazor.Diagrams
- It generates workflow or flowchart using back-end data.
- fully customizable and extensible.
- supports Blazor (both Server Side and WASM).
- used to make advanced diagrams with a custom design
Benefits
- Avoid javascipt
- Fully customizable (both looks & behavior)
- Be multipurpose
- Used for diagramming use cases
- Performance
- Separate data layer & UI
Features
It has a lot of features that you can refer in the above library link, here I’ve shared some cool features below,
- Touch support
- Panning, zooming
- Links between nodes
- Locking mechanism(read-only)
- Grouping nodes
- Multi selection, deletion and region selection
In this article, I’ll teach you to simply create 3 node connection with this library in blazor WASM.
Implementation
Step 1: Installation
First, you'll need to install this library from NuGet package, using Visual Studio's Package Manager or by the following commands:
- Package Manager Console - Install-Package Z.Blazor.Diagrams
- CLI - dotnet add package Z.Blazor.Diagrams
- Package Manager - tab from visual studio
Step 2: Project setup
Blazor.Diagrams needs some JavaScript and CSS to work properly, let's add them in wwwroot/index.html
<!-- in the head element -->
<link href="_content/Z.Blazor.Diagrams/style.min.css" rel="stylesheet" />
<!-- if you want the default styling -->
<link href="_content/Z.Blazor.Diagrams/default.styles.min.css" rel="stylesheet" />
<!-- in the body element -->
<script src="_content/Z.Blazor.Diagrams/script.min.js"></script>
Step 3: Import namespaces in _Imports.razor
@using Blazor.Diagrams.Core;
@using Blazor.Diagrams.Core.Models;
@using Blazor.Diagrams.Components;
@using Blazor.Diagrams.Core.Geometry;

Step 4
Copy paste below code in your razor page, my case it’s an index.razor
@page "/"

<h1>Sample - Blazor Diagrams</h1>
<hr />

<!-- Add this where you want to show the diagram -->
<CascadingValue Value="Diagram">
    <DiagramCanvas></DiagramCanvas>
</CascadingValue>

@code {
    //Creating a diagram manager
    private Diagram? Diagram { get; set; }

    protected override void OnInitialized()
    {
        base.OnInitialized();

        //Changing options
        var options = new DiagramOptions
        {
            DeleteKey = "Delete", // What key deletes the selected nodes/links
            DefaultNodeComponent = null, // Default component for nodes
            AllowMultiSelection = true, // Whether to allow multi selection using CTRL
            Links = new DiagramLinkOptions
            {
                // Options related to link
            },
            Zoom = new DiagramZoomOptions
            {
                Minimum = 0.5, // Minimum zoom value
                Inverse = false, // Whether to inverse the direction of the zoom when using the wheel
                // Other
            }
        };

        Diagram = new Diagram(options);

        Setup();
    }

    //Nodes - functions
    private void Setup()
    {
        var node1 = NewNode(50, 50);
        var node2 = NewNode(300, 300);
        var node3 = NewNode(300, 50);
        Diagram?.Nodes.Add(new[] { node1, node2, node3 });
        Diagram?.Links.Add(new LinkModel(node1.GetPort(PortAlignment.Right), node2.GetPort(PortAlignment.Left)));
    }

    private NodeModel NewNode(double x, double y)
    {
        var node = new NodeModel(new Point(x, y));
        node.AddPort(PortAlignment.Bottom);
        node.AddPort(PortAlignment.Top);
        node.AddPort(PortAlignment.Left);
        node.AddPort(PortAlignment.Right);
        return node;
    }
}
Explanation
- Diagram – It’s a component from this library that will create this flowchart diagram as a whole
- DiagramOptions – we can set options for the diagram component with lot of operations like delete, zoom, node selection and so on.
- DiagramLinkOptions – option related to links
- DiagramZoomOptions – option to set zooming values, direction
- Diagram = new Diagram(options) – pass all the option configuration to the diagram component
- Nodes - these would be created from data received from the backend
- NodeModel.Port – will add connecting ports for each node
- Setup() – will create 3 nodes with all the connecting ports and passed it into diagram component
- LinkModel - The AddLink method adds a link of type LinkModel, which is the default link type. It also returns the created link. We can link the different connecting ports of one node with other
- CascadingValue – this is a method to add the diagram canvas into your blazor component with parameter diagram
Step 5
If you run and wanted to see the output, I guess it won’t show unless or until you add the below styling in your index.html file
<style>
    .diagram-canvas {
        width: 100%;
        height: 100%;
        position: absolute;
        outline: none;
        overflow: hidden;
        cursor: -webkit-grab;
        cursor: grab;
        touch-action: none;
    }
</style>
Step 6
If you did everything correctly and used the default styles, you should see this: output
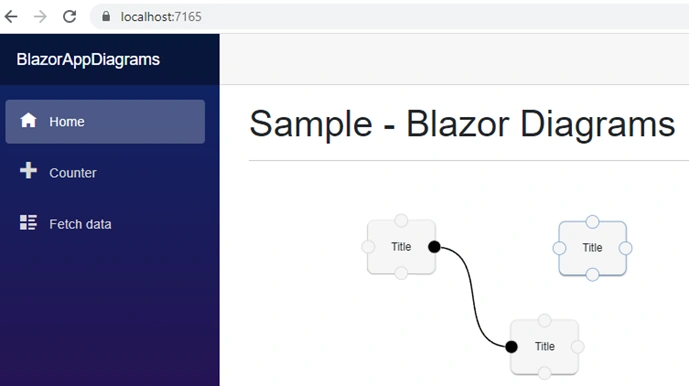
You can build complex flowchat customely using this free library.
*** !!! Happy coding !!! ***
Georgi HadzhigeorgievPosted Dec 16, 2022, 4:30 PM
That's great, thank you!