

Introduction
In an organization, employees leave and join the organization and it is a process. Company data should be secured when employees leave the organization. Ideally, when an employee leaves, the IT Team should have the right to close and block the user by sign-in to the M365 environment.
We will discuss and learn about how we can implement a feature for the manager to block sign-in by users when any employee leaves the team.
Learning Objectives
- Information of Adaptive cards
- Information of Adaptive Cards Extension (ACEs)
- Generate SPFx solution with ACEs
- Create Model and Service
- Create multiple Quick View
- Modify default Card View
- Modify Adaptive Card Extension
- Output
Let’s begin.
Information of Adaptive Cards
Adaptive Cards is a universal Card UI framework released by Microsoft in 2017 which aims to standardize the lay-outing of Cards independent of the host platform.
The goal is to define a Card once, make it portable and flexible and use it to the different platforms to apply it according to its own requirements.
Adaptive Cards are written in JSON (JavaScript object notation). They’re just a simple syntax for how a Card should be structured, where the list goes, where a button sets, and how the title and description (information) looks, etc. Each host application that displays your Card will then tweak it so its styling looks like a native part of the app.
Reference Link: https://adaptivecards.io/
Information of Adaptive Cards Extension (ACEs)
Adaptive Card Extensions is a Component type in SharePoint Framework that can enable developers to create rich and native extensions for Microsoft Viva Connections’ Dashboards and SharePoint Pages. Aces are using the Adaptive Card engine to generate rich UI by applying declarative JSON schema.
Developers need to focus on only business logic and traverse Cards and Quick Views depending on business requirements.
Generate SPFx solution with ACEs
Before generating an SPFx solution with ACEs, make sure you have installed the below prerequisites.
- Node.js v12 LTS
- Gulp v4
- Yeoman v3
- Set up SPFx Development Environment
Install the latest beta release using the below code.
npm install @microsoft/generator-sharepoint@next --global
Open node command prompt
Reach to your desire location where you want to create a solution
Run the below command
yo @microsoft/sharepoint
When prompted, enter the below values to each parameter.
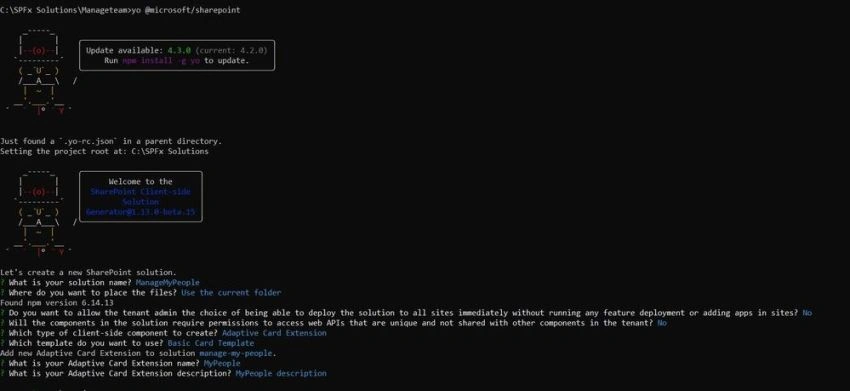
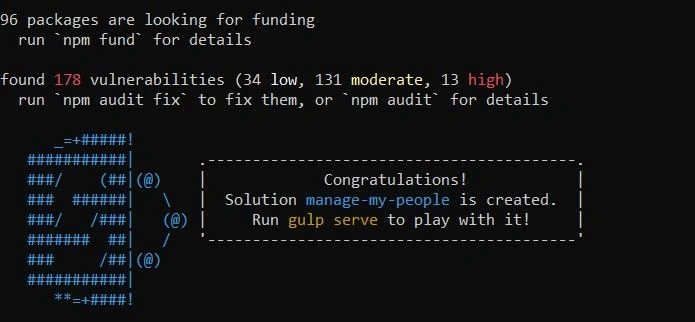
Once all required packages are downloaded then you will get a message as below.
Now open a solution in visual studio code or editor that you want to use.
The below command is used to open the solution in VS Code
code .
Create Model and Service to consume Graph
Install required packages to connect graph in solution
npm install @pnp/sp @pnp/graph @pnp/logging
Create Model
Create a folder called “Models” in “..\src\”.
Create a new file with the name “models.ts” in folder models at location “..\src\models”.
Copy the below code and paste it into the file.
export interface IMyTeam {
    userPrincipalName: string;
    displayName: string;
    givenName: string;
    id: string;
    mobilePhone: string;
    officeLocation: string;
    preferredLanguage: string;
    surname: string;
    jobTitle: string;
    mail: string;
  }

  export interface IConfig {
    members: IMyTeam[];
  }

  export class Config implements IConfig {
    constructor(
      public members: IMyTeam[] = []
    ) { }
  }
Create Service
Create a folder called “Services” in “..\src\”.
Create a new file called “Service.ts” in folder services at location “..\src\services”.
Copy the below code to it.
import { IConfig, IMyTeam, Config } from "../models/models";
import { Logger, LogLevel } from "@pnp/logging";
import "@pnp/graph/users";
import "@pnp/graph/onedrive";
import "@pnp/graph/groups";
import { MSGraphClient } from "@microsoft/sp-http";
import { graph } from "@pnp/graph";
import forEach from "lodash/forEach";

export interface IService {
    Init(client: MSGraphClient): Promise<void>;
}

export class Service implements IService {

    private LOG_SOURCE: string = "🔶Service";
    private _ready: boolean = false;
    private _currentConfig: IConfig = null;
    private _client: MSGraphClient;
    public async Init(client: MSGraphClient): Promise<void> {
        this._client = client;
        await this._getConfig();
    }

    public async BlockSignIn(userPrincipalName): Promise<boolean> {
        return await this._blockSignIn(userPrincipalName);
    }
    public get Ready(): boolean {
        return this._ready;
    }
    public get Config(): IConfig {
        return this._currentConfig;
    }

    private async _getConfig(): Promise<void> {
        try {
            this._currentConfig = await this.GenerateConfig();
            this._ready = true;
        } catch (error) {
            Logger.write(`${this.LOG_SOURCE} (_getConfig) - ${error} - `, LogLevel.Error);
        }
    }

    private async GenerateConfig(): Promise<IConfig> {
        let mmpConfig: IConfig = null;
        try {
            mmpConfig = new Config();
            mmpConfig.members = await this._directReportsToMe();
        } catch (error) {
            Logger.write(`${this.LOG_SOURCE} (GenerateConfig) - ${error} - `, LogLevel.Error);
        }
        return mmpConfig;
    }

    private async _directReportsToMe(): Promise<IMyTeam[]> {
        let returnValue: IMyTeam[] = [];
        try {
            let directReports = await graph.me.directReports();
            if (directReports.length > 0) {
                forEach(directReports, (o: any) => {
                    returnValue.push({
                        displayName: o.displayName,
                        id: o.id,
                        jobTitle: o.jobTitle,
                        givenName: o.givenName,
                        mail: o.mail,
                        mobilePhone: o.mobilePhone,
                        officeLocation: o.officeLocation,
                        preferredLanguage: o.preferredLanguage,
                        surname: o.surname,
                        userPrincipalName: o.userPrincipalName
                    });
                });
            }
        } catch (error) {
            Logger.write(`${this.LOG_SOURCE} (_directReportsToMe) - ${error} - `, LogLevel.Error);
        }
        return returnValue;
    }

    private async _blockSignIn(userPrincipalName): Promise<boolean> {
        let doesSignInBlocked: boolean = false;

        await this._client.api(`/users/${userPrincipalName}`).patch({
            "accountEnabled": false
        }).then(() => {
            doesSignInBlocked = true;
        }).catch((error) => {
            Logger.write(`${this.LOG_SOURCE} (_blockSignIn) - ${error} - `, LogLevel.Error);
        });

        return doesSignInBlocked;
    }
}
Create Multiple Quick View
Success Quick View
Success quick view calls when block sign-in process has been successfully executed.
Create new file called “SuccessView.ts” at location “..\src\adaptiveCardExtensions\myTeam\quickView \”
Copy below code in the “SuccessView.ts” file.
import { ISPFxAdaptiveCard, BaseAdaptiveCardView, IActionArguments } from '@microsoft/sp-adaptive-card-extension-base';
import { IMyTeamAdaptiveCardExtensionProps, IMyTeamAdaptiveCardExtensionState } from '../MyTeamAdaptiveCardExtension';
export interface ISuccessViewData {
    subTitle: string;
    title: string;
    description: string;
}
export class SuccessView extends BaseAdaptiveCardView<
    IMyTeamAdaptiveCardExtensionProps,
    IMyTeamAdaptiveCardExtensionState, ISuccessViewData> {
    public get data(): ISuccessViewData {
        return {
            subTitle: `Block Sign-In is successfully done!!`,
            title: `User : ${this.state.currentConfig.members[this.state.currentIndex].displayName} `,
            description: `${this.state.currentConfig.members[this.state.currentIndex].displayName} will not be able to sign in...`,
        };
    }

    public get template(): ISPFxAdaptiveCard {
        return {
            "schema": "http://adaptivecards.io/schemas/adaptive-card.json",
            "type": "AdaptiveCard",
            "version": "1.2",
            "body": [
                {
                    "type": "TextBlock",
                    "weight": "Bolder",
                    "text": "${title}"
                },
                {
                    "type": "ColumnSet",
                    "columns": [
                        {
                            "type": "Column",
                            "items": [
                                {
                                    "type": "TextBlock",
                                    "weight": "Bolder",
                                    "text": "${subTitle}",
                                    "wrap": true
                                }
                            ]
                        }
                    ]
                },
                {
                    "type": "TextBlock",
                    "text": "${description}",
                    "wrap": true
                }
            ],
            "actions": [
                {
                    "type": "Action.Submit",
                    "id": "close",
                    "title": "Close",
                },
            ]
        };
    }
    public onAction(action: IActionArguments): void {
        if (action.id == "close") {
            this.quickViewNavigator.close();
        }
    }
}
Error Quick View
Error quick view call when block sign-in process has not been successfully executed.
Create new file called “ErrorView.ts” at location “...\src\adaptiveCardExtensions\myTeam\quickView \”
Copy below code in the “ErrorView.ts” file.

Madhan ThuraiPosted Sep 23, 2021, 6:05 AM
Beyond something easy, great work ,keep it up (Y)
Sagar LadPosted Sep 22, 2021, 10:00 PM
Nice article