

Artificial Intelligence chatbots are no longer limited to paid platforms or enterprise solutions. With the availability of free AI models and open APIs, developers and learners can now build their own AI-powered chatbots using simple frontend technologies like Angular or plain HTML/JavaScript.
In this article, we’ll explore how to create a free AI chatbot using:
DeepSeek: R1 0528 (Free Model)
OpenRouter API (Free for learning purposes)
Angular-compatible frontend (HTML + JavaScript demo)
This setup is ideal for learning, prototyping, and demos without any backend complexity.
Why DeepSeek R1 and OpenRouter?
DeepSeek: R1 0528 (Free)
DeepSeek R1 is a powerful reasoning-based AI model capable of:Answering questions
Explaining concepts
Generating structured responses (Markdown, lists, etc.)
The R1 0528 free version is sufficient for learning and experimentation.
OpenRouter API
OpenRouter.ai provides:A single API to access multiple AI models
Free API keys for learning and testing
No credit card required for free-tier usage
You can easily switch models (DeepSeek, Gemini, etc.) without changing your frontend logic.
Getting a Free API Key
Follow these steps to generate your API key:
Visit 👉 https://openrouter.ai/
Sign in using Google or GitHub
Navigate to API Keys
Generate a new free API key
Copy and store it securely

You will use this key in the Authorization header.
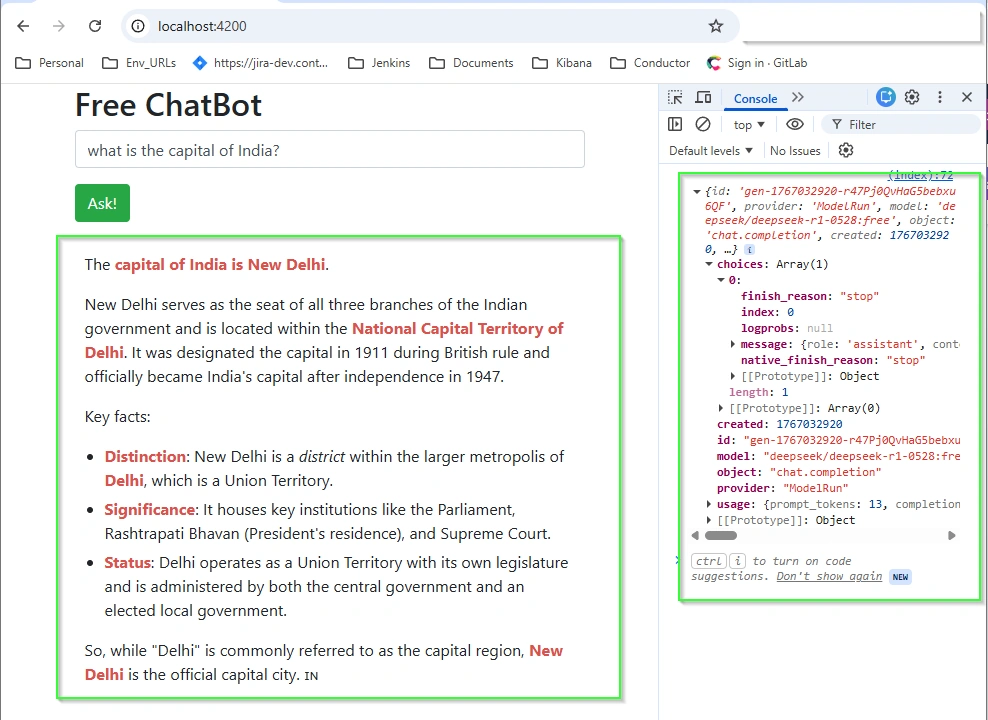
Chatbot UI Overview
The chatbot UI is simple and lightweight:
Input box for user questions
“Ask!” button to submit queries
Response rendered as formatted Markdown
Bootstrap used for quick styling
This demo can be:
Embedded inside an Angular component
Used directly as a static HTML page
Extended with chat history or streaming responses
Demo Code Snippet (Free AI Chatbot)
Below is a working demo using HTML + JavaScript, compatible with Angular integration:
<!DOCTYPE html>
<html lang="en">
  <head>
    <meta charset="UTF-8" />
    <meta name="viewport" content="width=device-width, initial-scale=1.0" />
    <title>WSP ChatBot</title>

    <!-- Bootstrap -->
    <link
      rel="stylesheet"
      href="https://cdnjs.cloudflare.com/ajax/libs/twitter-bootstrap/4.3.1/css/bootstrap.min.css"
    />

    <!-- Markdown Parser -->
    <script src="https://cdn.jsdelivr.net/npm/marked/marked.min.js"></script>

    <style>
      #response {
        margin-top: 20px;
        padding: 10px;
        min-height: 50px;
      }
      #response h3 {
        color: #333;
        font-size: 1.2em;
      }
      #response strong {
        color: #d9534f;
      }
      #response ul {
        padding-left: 20px;
      }
      #response li {
        margin-bottom: 5px;
      }
    </style>
  </head>

  <body>
    <div class="container">
      <h2>Free ChatBot</h2>

      <div class="form-group">
        <input
          type="text"
          class="form-control"
          id="userInput"
          placeholder="Enter your question"
        />
      </div>

      <button class="btn btn-success" onclick="sendMessage()">Ask!</button>
      <div id="response"></div>
    </div>

    <script>
      async function sendMessage() {
        const input = document.getElementById("userInput").value;
        const responseDiv = document.getElementById("response");

        if (!input) {
          responseDiv.innerHTML = "Please enter a message.";
          return;
        }

        responseDiv.innerHTML = "Loading...";

        try {
          const response = await fetch(
            "https://openrouter.ai/api/v1/chat/completions",
            {
              method: "POST",
              headers: {
                Authorization: "Bearer <YOUR_API_KEY>",
                "HTTP-Referer": "<YOUR_SITE_URL>",
                "X-Title": "<YOUR_SITE_NAME>",
                "Content-Type": "application/json",
              },
              body: JSON.stringify({
                model: "deepseek/deepseek-r1-0528:free",
                messages: [{ role: "user", content: input }],
              }),
            }
          );

          const data = await response.json();
          const markdownText =
            data.choices?.[0]?.message?.content || "No response received.";

          responseDiv.innerHTML = marked.parse(markdownText);
        } catch (error) {
          responseDiv.innerHTML = "Error: " + error.message;
        }
      }
    </script>
  </body>
</html>
UI Screenshot Showing Code Execution
How This Fits into Angular
You can easily adapt this demo for Angular by:
Moving HTML into a component template
Placing the sendMessage() logic inside the component .ts file
Using Angular HttpClient instead of fetch
Binding input with [(ngModel)]
The API request structure remains exactly the same.
Key Benefits of This Approach
Completely free for learning
No backend required
Easy to extend or customize
Supports Markdown responses
Works with multiple AI models via OpenRouter
Conclusion
Building an AI chatbot no longer requires expensive subscriptions or complex infrastructure. By combining DeepSeek R1 (free) with the OpenRouter API, you can quickly create a powerful AI chatbot using just frontend code.
This setup is perfect for:
Learning AI integrations
Angular demos
Proof-of-concept projects
Personal experimentation
As a next step, you can enhance this chatbot by adding:
Chat history
Streaming responses
Role-based prompts
Backend proxy for production security
Join the conversation! Your thoughts help the community grow.