

Introduction
In this article, we'll walk through creating an Azure Blob Trigger Function to compress images uploaded to Azure Storage using the sharp image processing library. The function automatically compresses the images and saves them to a specified directory.
Prerequisites
Before we begin, ensure you have the following.
- An Azure subscription (you can create a free account if you don't have one).
- Node.js is installed on your local machine.
- Azure Functions Core Tools installed to run and deploy the function locally.
- An Azure Storage account to store the blobs.
- Sharp library installed for image processing.
Step 1. Create an Azure Blob Storage.
Begin by creating an Azure Storage Account if you haven't already. Inside the Storage Account, create a container named blob-trigger. This container will be used to trigger the Azure Function whenever a new blob (file) is added.
Step 2. Set up your Azure Function App.
Create an Azure Function App in the Azure portal. Make sure to select the Node.js runtime. Once the Function App is created, navigate to the Functions section and add a new function. Choose the Blob trigger template and set the container name to blob-trigger (or whatever container you created in Step 1).
Step 3. Configure local.settings.json.
In your function app folder, create a file named local.settings.json to store local development settings. Update the file with your Azure Storage Account connection string, account name, and key. Also, specify the blob container name and Node.js as the runtime.
Here’s how the local.settings.json file should look.
{
  "IsEncrypted": false,
  "Values": {
    "AzureWebJobsStorage": "Your_Connection_String_Here",
    "FUNCTIONS_WORKER_RUNTIME": "node",
    "gunalearnings_STORAGE": "Your_Connection_String_Here"
  }
}
Step 4. Configure host.json.
In your function app folder, create a file named host.json to define global configuration settings for your function app. This includes settings for monitoring, such as enabling Application Insights and configuring function extensions.
Here's an example of what the host.json file might look like.
{
  "version": "2.0",
  "logging": {
    "applicationInsights": {
      "samplingSettings": {
        "isEnabled": true,
        "excludedTypes": "Request"
      }
    }
  },
  "extensionBundle": {
    "id": "Microsoft.Azure.Functions.ExtensionBundle",
    "version": "[4.*, 5.0.0)"
  },
  "concurrency": {
    "dynamicConcurrencyEnabled": true,
    "snapshotPersistenceEnabled": true
  }
}
- Version: Indicates the version of the Azure Functions runtime. In this case, it's version "2.0."
- logging: Configures logging settings for the Azure Functions application.
- applicationInsights: Configures Application Insights integration for logging and monitoring.
- sampling settings: Specifies settings for log sampling.
- isEnabled: Enables or disables log sampling. If true, log sampling is enabled.
- excludedTypes: Specifies log types to exclude from sampling. In this case, "Request" logs are excluded.
- extensionBundle: Configures the Azure Functions extension bundle.
- id: Specifies the ID of the extension bundle.
- version: Specifies the version range of the extension bundle to use. In this case, it's set to a range from version 3.x to version 4.0.0.
- concurrency: Configures concurrency settings for the Azure Functions application.
- dynamicConcurrencyEnabled: Enables or disables dynamic concurrency, allowing the system to adjust concurrency levels based on demand.
- snapshotPersistenceEnabled: Enables or disables snapshot persistence, which helps maintain the state between function executions.
Step 5. Write the Azure Blob Trigger Function Code.
Now, create a file named blob-trigger-poc.ts and implement the Azure Blob Trigger Function for image compression using the Sharp library.
Here's the code that triggers a new blob being uploaded, compresses the image, and saves it to a new location.
import { app, InvocationContext } from "@azure/functions";
import sharp from "sharp";
import * as fs from "fs";
import * as path from "path";

export async function blobtriggerpoc(
  blob: Buffer,
  context: InvocationContext
): Promise<void> {
  const blobName = context.triggerMetadata.name;
  context.log(`Processing blob: ${blobName}`);

  try {
    // Compress the image
    const compressedImage = await sharp(blob)
      .resize({ width: 800 })
      .jpeg({ quality: 80 })
      .toBuffer();

    // Define the output path correctly
    const outputDir = path.join("src/", "compressed-images");
    if (!fs.existsSync(outputDir)) {
      fs.mkdirSync(outputDir, { recursive: true });
    }

    const outputPath = path.join(outputDir, `${blobName}-compressed.jpg`);

    // Ensure the output directory exists
    if (!fs.existsSync(outputDir)) {
      fs.mkdirSync(outputDir, { recursive: true });
    }

    // Write the compressed image to the specified path
    fs.writeFileSync(outputPath, compressedImage);

    context.log(`Compressed image saved to: ${outputPath}`);
  } catch (error) {
    context.log(`Error processing blob: ${error.message}`);
  }
}

app.storageBlob("blobtriggerpoc", {
  path: "blob-trigger/{name}",
  connection: "Your_Connection_String_Here",
  handler: blobtriggerpoc,
});
Explanation of the Code
- Blob Trigger: The function is triggered whenever a new blob is uploaded to the Azure Blob Storage container. The blob's contents are passed to the blob parameter, and the blob name is accessed through context.bindingData.name.
- Image Compression
- The image is processed using Sharp, a popular image-processing library for Node.js.
- The image is resized to a width of 800px while maintaining the aspect ratio, and it is compressed into a JPEG format with 80% quality.
- Output Directory
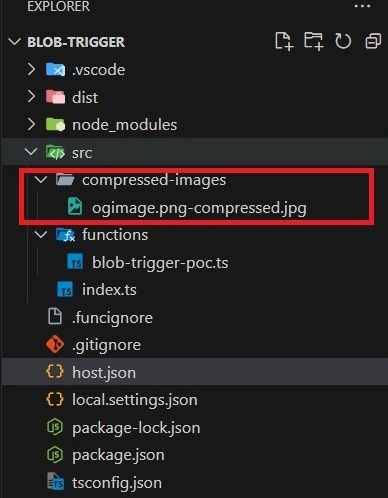
- The function saves the compressed image to a folder called compressed images on the local file system.
- If the folder doesn't exist, it is created using fs.mkdirSync().
- Saving the Image: The compressed image is written to the output path using fs.writeFileSync().
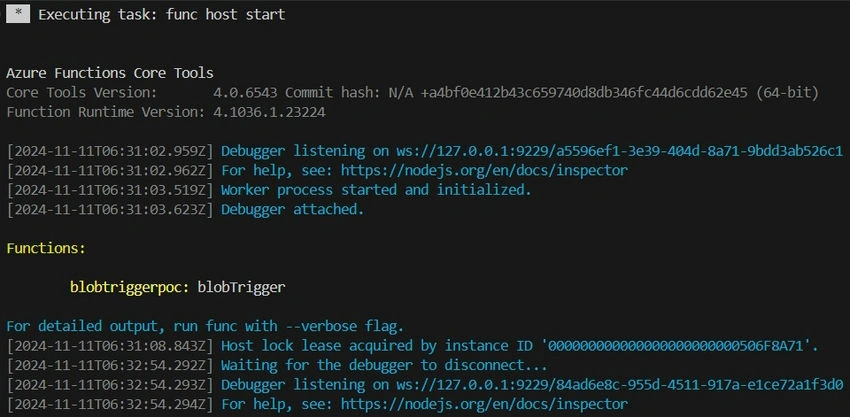
The code has been finalized. Please execute it by pressing F5.
Step 6. Open Azure Storage Explorer and Upload an Image.
- Open Azure Storage Explorer, sign in to your Azure account, and locate your Blob Container (e.g., blob-trigger).
- Right-click the container, select Upload > Upload Files, and choose the image you want to upload.
- Once uploaded, the Azure Function will trigger and process the image, saving the compressed version to the output folder or container.

Conclusion
by using Azure Blob Storage and an Azure Function with a blob trigger, you can efficiently automate image processing tasks such as compression. With the steps provided, you can upload images to your blob container, trigger the function, and easily store the processed results. This workflow enables seamless automation of image handling, ensuring scalability and efficient resource management in the cloud.
Join the conversation! Your thoughts help the community grow.