

Introduction
This article shows how to capture an image using a webcam in MVC4 and in this application we will use a jQuery webcam.js plug-in for capturing images. I have seen that most online applications currently require webcam image capturing functionality in some way or another. Most social networking sites use this kind of functionality in their application for capturing user profile pictures.
Similarly I have written this article on how to capture a picture using webcam.js in ASP.Net web forms.
Here is the URL: C-SharpCorner
Agenda
- Create basic MVC application.
- Download and Adding webcam.js related reference files to project.
- Adding Controller ( PhotoController ).
- Adding Index view.
- Adding Action Method Capture( ).
- Adding Script for capturing Image.
- Adding Action Method and Script for binding image.
- Adding [HttpPost] Index Action Method.
- Displaying the index View in New Window.
- Changephoto.cshtml Code Snippet.
- PhotoController Code Snippet.
- Index.cshtml Code Snippet.
- Finally Output.
Create basic MVC application
Create a MVC 4 application and name it WebcamMVC.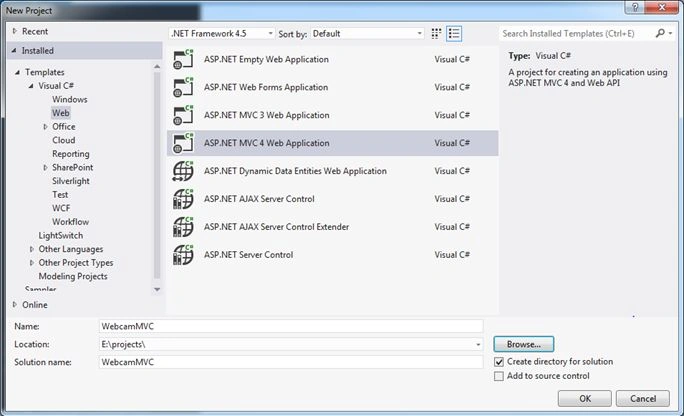
After naming it just click on the OK button. A new dialog will then popup for selecting a template. Select Basic template and click the OK button.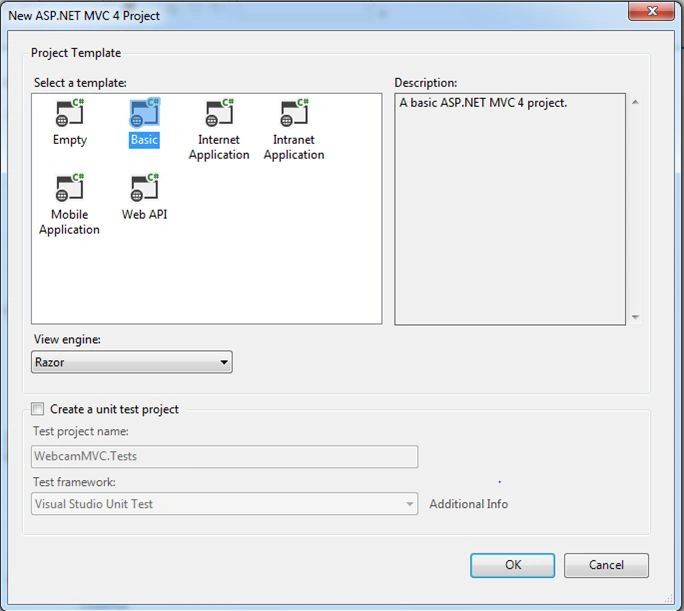
After creating the application it's time to download and add webcam.js and related files to the project.
Downloading and adding webcam.js related reference files to project
For downloading (webcam.js related) files just visit the give URL: jQuery-webcam.
Here you can download the Zip file.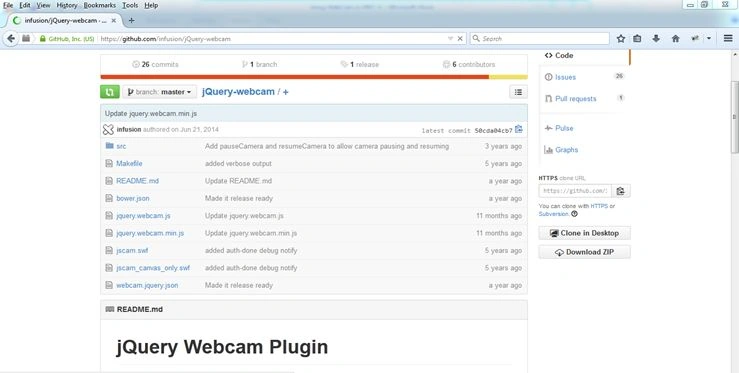
And the following is the complete view of the files that are In the Zip folder.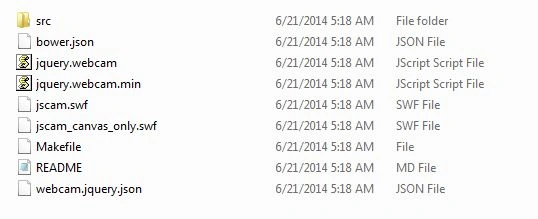
After downloading just extract the files and add all the files to the script folder of your project.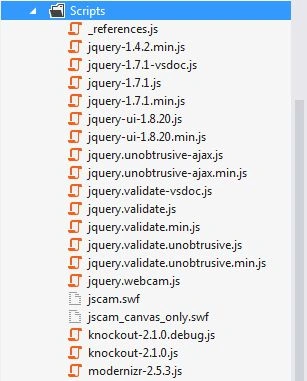
After adding the files, let's move to adding a Controller.
Adding Controller (PhotoController)
We will add a Controller with the name PhotoController.
Code Snippet of photocontroller
- using System;
- using System.Collections.Generic;
- using System.Linq;
- using System.Web;
- using System.Web.Mvc;
- using System.IO;
- namespace WebcamMVC.Controllers
- {
- public class PhotoController : Controller
- {
- [HttpGet]
- public ActionResult Index()
- {
- return View();
- }
- }
- }
Now let's add a View to this Index action method.
Adding Index view
To add the View just right-click inside View and select Add View. A new dialog will popup for configuring the View. Don't change the name of the View, let it be “ Index”. Just click on the Add button.
After adding the View let's add some controls and scripts to it for capturing it and submitting it to the Controller.
Code Snippet of Index View
- <div style="margin: 0 auto; width: 980px; text-align: center">
- <div style="float: left; border: 4px solid #ccc; padding: 5px">
- <div id="Camera">
- </div>
- <br>
- <input type="button" value="Capture" />
- </div>
- <div style="float: left; margin-left: 20px; border: 4px solid #ccc; padding: 5px">
- <img id="show" style="width: 320px; height: 240px;" src="../../WebImages/person.jpg" />
- <br>
- <br>
- <input id="Submit1" type="submit" value="submit" />
- </div>
- </div>
- @section scripts
- {
- <script src="@Url.Content("~/Scripts/jquery.webcam.js")">
- </script>
- <script type="text/javascript">
- $("#Camera").webcam({
- width: 320,
- height: 240,
- mode: "save",
- swffile: "@Url.Content("~/Scripts/jscam.swf")",
- onTick: function () { },
- onSave: function () {
- UploadPic();
- },
- onCapture: function () {
- webcam.save("@Url.Content("~/Photo/Capture")/");
- },
- debug: function () { },
- onLoad: function () { }
- });
- </script>
- }
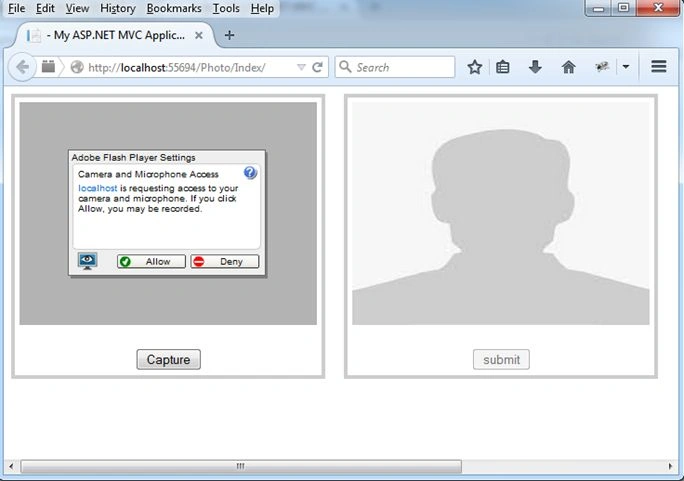
Adding Action Method Capture( )
For capturing an image I will add 1 new Action Method with the name Capture and another method to write stringtoBytes with the name String_To_Bytes2 in the same Photo controller.
- public ActionResult Capture()
- {
- var stream = Request.InputStream;
- string dump;
- using (var reader = new StreamReader(stream))
- {
- dump = reader.ReadToEnd();
- DateTime nm = DateTime.Now;
- string date = nm.ToString("yyyymmddMMss");
- var path = Server.MapPath("~/WebImages/" + date + "test.jpg");
- System.IO.File.WriteAllBytes(path, String_To_Bytes2(dump));
- ViewData["path"] = date + "test.jpg";
- Session["val"] = date + "test.jpg";
- }
- return View("Index");
- }
- private byte[] String_To_Bytes2(string strInput)
- {
- int numBytes = (strInput.Length) / 2;
- byte[] bytes = new byte[numBytes];
- for (int x = 0; x < numBytes; ++x)
- {
- bytes[x] = Convert.ToByte(strInput.Substring(x * 2, 2), 16);
- }
- return bytes;
- }
- @section scripts
- {
- <script src="@Url.Content("~/Scripts/jquery.webcam.js")">
- </script>
- <script type="text/javascript">
- $("#Camera").webcam({
- width: 320,
- height: 240,
- mode: "save",
- swffile: "@Url.Content("~/Scripts/jscam.swf")",
- onTick: function () { },
- onSave: function () {
- UploadPic();
- },
- onCapture: function () {
- webcam.save("@Url.Content("~/Photo/Capture")/");
- },
- debug: function () { },
- onLoad: function () { }
- });
- </script>
- }
- onCapture: function () {
- webcam.save("@Url.Content("~/Photo/Capture")/");
- },
To capture an Image on button click we need to call the function webcam.capture();
- <input type="button" value="Capture" onclick="webcam.capture();" />
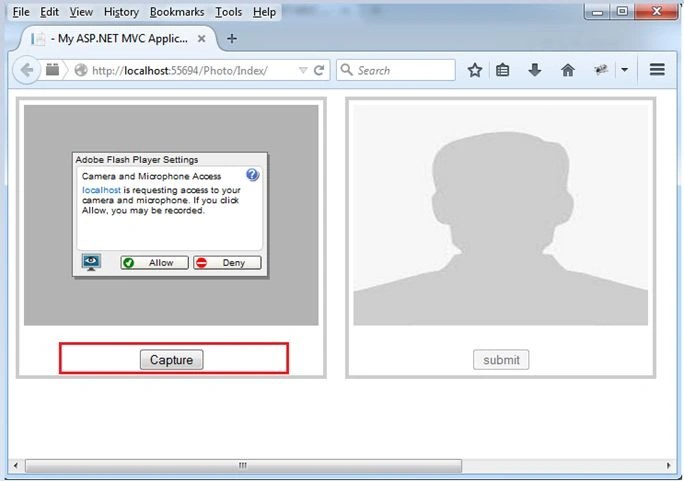
After writing the code for capturing let's move to binding the image that we have captured.
Adding Action Method and Script for binding image
For binding the image I wrote a JSON method with the name Rebind that will be called when I click on the Capture button.
- public JsonResult Rebind()
- {
- string path = "http://localhost:55694/WebImages/" + Session["val"].ToString();
- return Json(path, JsonRequestBehavior.AllowGet);
- }
This Uploadpic ajax function calls the JSON method Rebind() that returns the path of the image. We will bind this path to the image control.
- function UploadPic() {
- $.ajax({
- type: 'POST',
- url: ("@Url.Content("~/Photo/Rebind")/"),
- dataType: 'json',
- success: function (data) {
- $("#show").attr("src", data);
- document.getElementById('Submit1').disabled = false;
- alert("Photo Capture successfully!");
- }
- });
- }
- onSave: function ()
- {
- UploadPic();
- },
- [HttpPost]
- public ActionResult Index(string Imagename)
- {
- ViewBag.pic = "http://localhost:55694/WebImages/" + Session["val"].ToString();
- return View();
- }
We are taking an image name from the image control that we bound when the image was captured.
- function Uploadsubmit()
- {
- debugger;
- var src = $('img').attr('src');
- src_array = src.split('/');
- src = src_array[4];
- if (src != "") {
- $.ajax({
- type: 'POST',
- url: ("@Url.Content("~/Photo/Index")/"),
- dataType: 'json',
- data: { Imagename: src },
- success: function () {
- }
- });
- }
- <input id="Submit1" type="submit" onclick="Uploadsubmit();" value="submit" />
Displaying the index View in New Window
- [HttpGet]
- public ActionResult Changephoto()
- {
- if (Convert.ToString(Session["val"]) != string.Empty)
- {
- ViewBag.pic = "http://localhost:55694/WebImages/" + Session["val"].ToString();
- }
- else
- {
- ViewBag.pic = "../../WebImages/person.jpg";
- }
- return View();
- }
After creating the action method let's add a View to this action method.
Tp add the View just right-click inside the View folder and select Add View. A new dialog will popup for configuring the View. Don't change the name of the View, let it be “Changephoto”. Just click on the Add button.
After clicking on the Add button a new View will be generated in the View folder inside the Photo Folder.
Now inside this View I will add an image control to display the captured image and a button to display the Index View in a new window.
Changephoto.cshtml Code Snippet
- @{
- ViewBag.Title = "Changephoto";
- }
- <script type="text/javascript">
- function ShowPopUp() {
- window.open('/Photo/Index/', "wndPopUp", 'width=720,height=400,left=100,top=100,resizable=no');
- }
- </script>
- <img id="Userpic" src="@ViewBag.pic" />
- <br />
- <input type="button" id="btnSave" value="Take Photo" onclick="ShowPopUp();" />
PhotoController Code Snippet
- using System;
- using System.Collections.Generic;
- using System.Linq;
- using System.Web;
- using System.Web.Mvc;
- using System.IO;
- namespace WebcamMVC.Controllers
- {
- public class PhotoController : Controller
- {
- [HttpGet]
- public ActionResult Index()
- {
- Session["val"] = "";
- return View();
- }
- [HttpPost]
- public ActionResult Index(string Imagename)
- {
- ViewBag.pic = "http://localhost:55694/WebImages/" + Session["val"].ToString();
- return View();
- }
- [HttpGet]
- public ActionResult Changephoto()
- {
- if (Convert.ToString(Session["val"]) != string.Empty)
- {
- ViewBag.pic = "http://localhost:55694/WebImages/" + Session["val"].ToString();
- }
- else
- {
- ViewBag.pic = "../../WebImages/person.jpg";
- }
- return View();
- }
- public JsonResult Rebind()
- {
- string path = "http://localhost:55694/WebImages/" + Session["val"].ToString();
- return Json(path, JsonRequestBehavior.AllowGet);
- }
- public ActionResult Capture()
- {
- var stream = Request.InputStream;
- string dump;
- using (var reader = new StreamReader(stream))
- {
- dump = reader.ReadToEnd();
- DateTime nm = DateTime.Now;
- string date = nm.ToString("yyyymmddMMss");
- var path = Server.MapPath("~/WebImages/" + date + "test.jpg");
- System.IO.File.WriteAllBytes(path, String_To_Bytes2(dump));
- ViewData["path"] = date + "test.jpg";
- Session["val"] = date + "test.jpg";
- }
- return View("Index");
- }
- private byte[] String_To_Bytes2(string strInput)
- {
- int numBytes = (strInput.Length) / 2;
- byte[] bytes = new byte[numBytes];
- for (int x = 0; x < numBytes; ++x)
- {
- bytes[x] = Convert.ToByte(strInput.Substring(x * 2, 2), 16);
- }
- return bytes;
- }
- }
- }
- <script type="text/javascript">
- function UploadPic() {
- $.ajax({
- type: 'POST',
- url: ("@Url.Content("~/Photo/Rebind")/"),
- dataType: 'json',
- success: function (data) {
- $("#show").attr("src", data);
- document.getElementById('Submit1').disabled = false;
- alert("Photo Capture successfully!");
- }
- });
- }
- function Uploadsubmit() {
- debugger;
- var src = $('img').attr('src');
- src_array = src.split('/');
- src = src_array[4];
- if (src != "") {
- $.ajax({
- type: 'POST',
- url: ("@Url.Content("~/Photo/Index")/"),
- dataType: 'json',
- data: { Imagename: src },
- success: function () { }
- });
- window.opener.location.href = "http://localhost:55694/Photo/Changephoto";
- self.close();}}
- </script>
- @using (Html.BeginForm())
- {
- @section scripts
- {
- <script src="@Url.Content("~/Scripts/jquery.webcam.js")">
- </script>
- <script type="text/javascript">
- $("#Camera").webcam({
- width: 320,
- height: 240,
- mode: "save",
- swffile: "@Url.Content("~/Scripts/jscam.swf")",
- onTick: function () { },
- onSave: function () {
- UploadPic();
- },
- onCapture: function () {
- webcam.save("@Url.Content("~/Photo/Capture")/");
- },
- debug: function () { },
- onLoad: function () { }
- });
- </script>
- }
- <div style="margin: 0 auto; width: 980px; text-align: center">
- <div style="float: left; border: 4px solid #ccc; padding: 5px">
- <div id="Camera"></div><br>
- <input type="button" value="Capture" onclick="webcam.capture();" />
- </div>
- <div style="float: left; margin-left: 20px; border: 4px solid #ccc; padding: 5px">
- <img id="show" style="width: 320px; height: 240px;" src="../../WebImages/person.jpg" />
- <br><br>
- <input id="Submit1" type="submit" onclick="Uploadsubmit();" value="submit" />
- </div>
- </div>
- }
- <script type="text/javascript">
- window.onload = load();
- function load() {
- debugger;
- document.getElementById('Submit1').disabled = true;
- }
- </script>
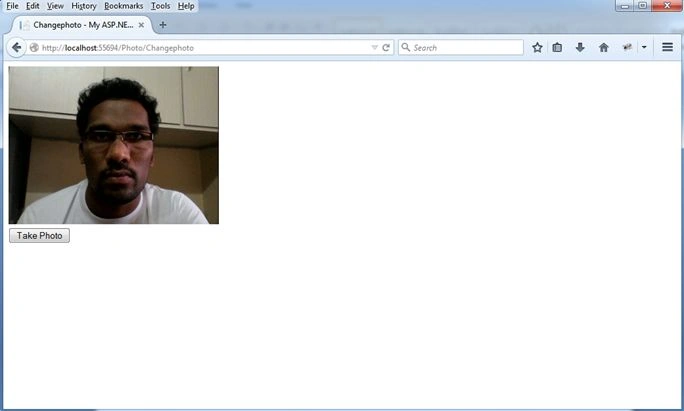
Now let's run the application and access the changephoto View.
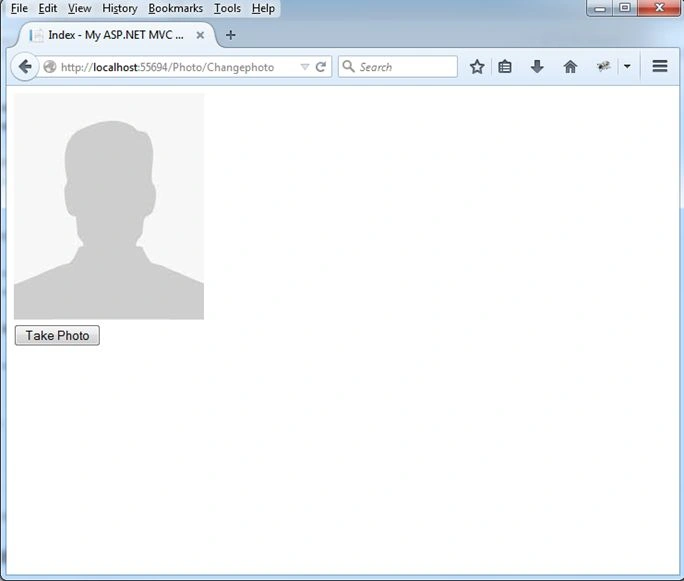
Now just click on the Take photo button and a new window will popup.
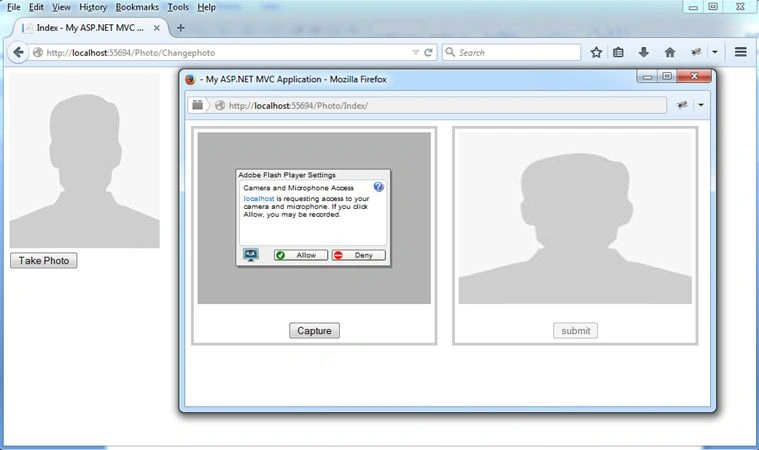
Just click on the Allow button.
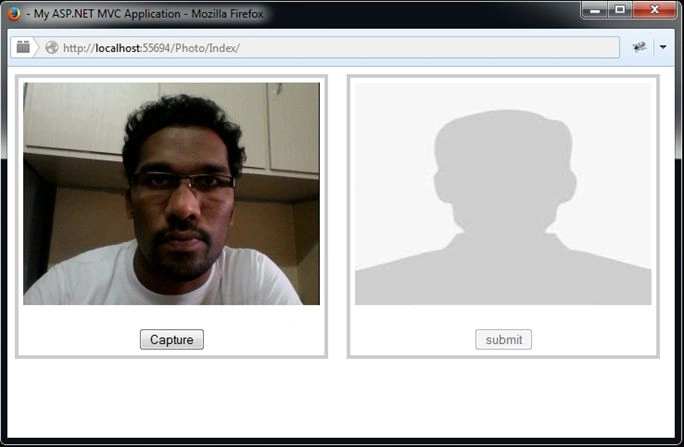
Now to capture. Just click on the Capture button.
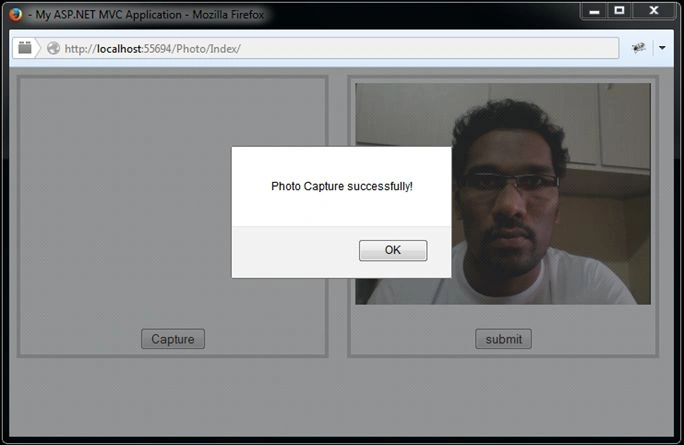
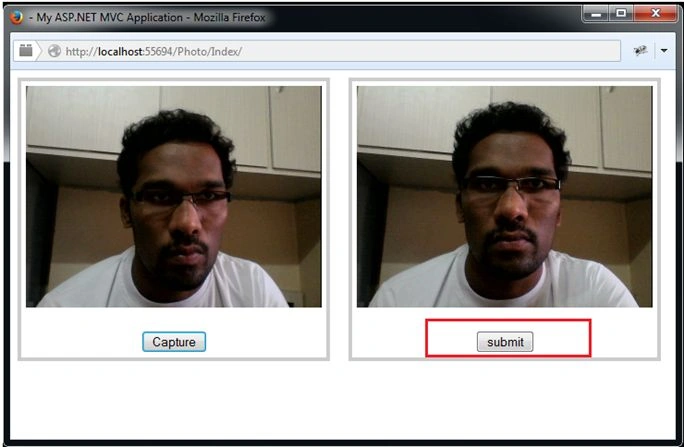
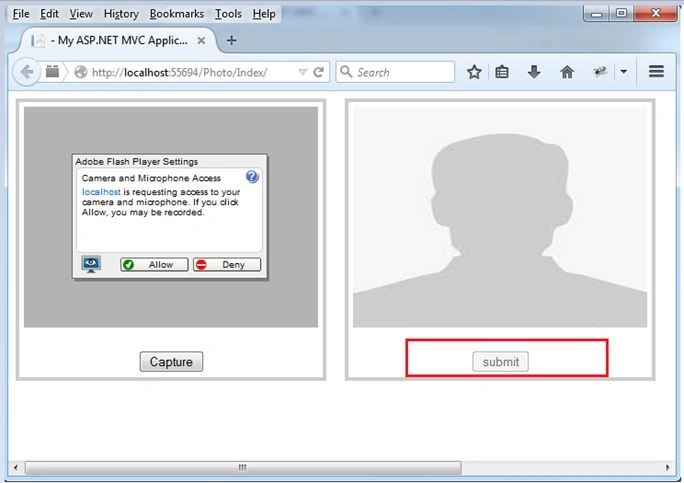
Now click on the Submit button.
After clicking the submit button the popup is closed and an image is set to the Profile picture.
Conclusion
This article showed how to capture an image using webcam.js in MVC in a simple procedure.
Nidhi PaneriPosted Dec 3, 2021, 7:46 AM
How can we use rear camera
Trinadh TataPosted Oct 17, 2020, 12:07 PM
As flash will go off by 31 dec 2020 in all browsers, can this approach works from next year?
Denmark PusoPosted May 9, 2020, 8:20 PM
Is it working when i use cellphone ?
ribha shakoorPosted Aug 1, 2019, 4:47 AM
Can we use this code with a digital camera?
Tên Họ VàPosted Dec 17, 2018, 3:58 AM
Handsome @@
Nabeel HassanPosted Oct 10, 2018, 6:22 AM
Nice and thankx
Abdul NasirPosted Sep 18, 2018, 9:48 AM
How to insert captured picture in sqlserver please...
John FelixPosted Jul 12, 2018, 5:22 AM
Thanks for the article. Camera is showing as blank. Hence image is also blank. Please help me to resolve this
Ratnadeep JadhavPosted Jul 11, 2018, 12:24 AM
Thank you for the code , but same when i am adding to by project it is showing error cannot read property capture of null in jquery.webcam.js , please help me with this
narendra CPosted Mar 5, 2018, 5:16 AM
Hi i used same example to understand and it is working well in local machine. but its not in from remote machine. i mean after deployement it is unable to switch on the camera. do you have any idea to sort it out
Jhoel Daniel Salinas JimenezPosted Feb 26, 2018, 9:35 AM
Gracias necesitaba este ejemplo ..
mahmoud eidPosted Feb 15, 2018, 5:00 AM
I want prevent poupp for allow and denay camera , i want allow access
Sasiumar GPosted Dec 4, 2017, 7:50 AM
How to open webcam in onload function
Sasiumar GPosted Dec 4, 2017, 7:48 AM
How to save capture image into database
Mohammad GhorbaniPosted Oct 21, 2017, 7:13 PM
Nice man , i like it
Sonia MartinezPosted Aug 16, 2017, 4:17 PM
Hola, How do I display the image without saving it to a folder?
Sonia MartinezPosted Aug 16, 2017, 4:17 PM
Como hacer para que se muestre la imagen en pantalla sin guardarlo en una carpeta?
Mahesh VartakPosted Jun 28, 2017, 11:10 AM
Hi Saineshwar, The code provided works perfectly fine for me. But when I allow camera on popup comes saying 'A script in this movie is causing Adobe Flash Player to run slowly...'. Do you know about this issue?
Rafael PortalPosted May 25, 2017, 10:25 AM
Great - perfect - that's it
Sridevi MahapatraPosted May 10, 2017, 6:09 AM
Thanks a Lot. I have saved the Image in WebImage folder, and even saved ImagePath in Database.
Smriti SarkarPosted May 9, 2017, 4:48 AM
I have saved the pictures in Content/Images/Profile with Username it works but Rebind did not happend. How can i do it?? Please help... And is this work in mobile Camera??
Najim MullaPosted Mar 21, 2017, 1:42 PM
How can 2 user between video chatting using browser
Mutaz AlsayeghPosted Feb 6, 2017, 5:24 PM
Hi, do you gave a minute to discuss a project? Email me if you do: mikesayegh003 @gmail.com.
Henry WendixPosted Dec 20, 2016, 8:56 AM
Thanks Saineshwar Bageri.
Delpin Susai RajPosted Aug 28, 2016, 10:34 AM
Nice
RamprasathPosted Jul 14, 2016, 4:34 AM
If i implement the IIS how to change the localhost picture path..
RamprasathPosted Jul 14, 2016, 4:22 AM
Ok .. any other solution Immediately showing?
RamprasathPosted Jul 14, 2016, 1:45 AM
Hi Saineshwar Bageri..good article..i am implemented my project..but i take snopshot delay to showing the picture..Not immediately showing...how to solve this one..
mark borresPosted Mar 30, 2016, 8:42 PM
Adobe flash settings confirmation does not appear in my browser Chrome Version 24.0.1312.57
mark borresPosted Mar 15, 2016, 9:56 PM
can I test this program yet without webcam? or this is only working if you have plugin a webcam. Thanks
sandeep rattuPosted Dec 29, 2015, 7:06 AM
After publicshing on (FTP) local host swf file not working it is working on computer
Saineshwar BageriPosted Nov 6, 2015, 12:22 AM
kiran thanks for your comment
Kiran BPosted Nov 5, 2015, 1:26 PM
The above method was actually written by http://programmerramblings.blogspot.in/2008/03/convert-hex-string-to-byte-array-and.html In the Original article http://weblogs.asp.net/gunnarpeipman/using-jquery-webcam-plugin-with-asp-net-mvc the auther actually given credit to the person who wrote String_To_Bytes2 method. Credits for String_To_Bytes2() method that I quickly borrowed go to Kenneth Scott and his blog posting Convert Hex String to Byte Array and Vice-Versa.
Kiran BPosted Nov 5, 2015, 1:24 PM
String_To_Bytes2
Kiran BPosted Nov 5, 2015, 1:16 PM
One thing I agree, you added few more into the original article. Good work
Kiran BPosted Nov 5, 2015, 1:15 PM
Even the method names are exact.
Kiran BPosted Nov 5, 2015, 1:15 PM
Please check http://weblogs.asp.net/gunnarpeipman/using-jquery-webcam-plugin-with-asp-net-mvc
Saineshwar BageriPosted Nov 5, 2015, 12:37 PM
check step by step before commenting Kiran http://www.c-sharpcorner.com/UploadFile/4d9083/capturing-image-from-web-cam-in-Asp-Net/ http://www.c-sharpcorner.com/uploadfile/4d9083/capturing-image-from-web-cam-in-asp-net-mvc139/#ReadAndPostComment http://weblogs.asp.net/gunnarpeipman/using-jquery-webcam-plugin-with-asp-net-mvc
Kiran BPosted Nov 5, 2015, 10:22 AM
Saineshwar Bageri, This is an exact copy from the below blog. http://weblogs.asp.net/gunnarpeipman/using-jquery-webcam-plugin-with-asp-net-mvc
Anil KumarPosted Oct 1, 2015, 10:25 AM
Thanks
praneet kumarPosted Aug 28, 2015, 1:11 PM
Thank you sir its very helpful........
Yashwanth MuthineniPosted Aug 27, 2015, 3:14 AM
Nice Share
Neeraj KumarPosted Jul 24, 2015, 12:51 PM
Great
Humayun Kabir MamunPosted Jul 24, 2015, 10:32 AM
Great Work...
Rajeesh MenothPosted Jul 24, 2015, 8:23 AM
good one
Rahul Kumar SaxenaPosted Jul 24, 2015, 7:40 AM
Good Show
Sibeesh VenuPosted Jul 24, 2015, 4:12 AM
Nice Share. Thank you
SharadPosted Jul 24, 2015, 3:14 AM
nice....
Gopi ChandPosted Jul 24, 2015, 1:43 AM
Excellent work
Shridhar SharmaPosted Jul 23, 2015, 5:17 PM
good one
Apple ArbanPosted May 13, 2015, 4:38 AM
hi how can i mirror the webcam ?
alx kebedePosted May 6, 2015, 12:58 AM
nice article thank you
Rubaiyat HasanPosted May 5, 2015, 7:27 PM
It's interesting
Jeetendra GundPosted May 5, 2015, 12:26 PM
Good one
Ashish NakilPosted May 5, 2015, 5:46 AM
nice article :) Thanks
Asp.Net HeinPosted May 4, 2015, 11:47 PM
Very interesting topic . Thz author :-)
Santhakumar MunuswamyPosted May 4, 2015, 2:24 PM
Thanks for nice article
Santhakumar MunuswamyPosted May 4, 2015, 2:24 PM
Excellent work
Karthik Muthu KaruppanPosted May 4, 2015, 1:54 PM
Good