

Introduction
JSLink is JavaScript link [ CSR - Client-side rendering]. This feature was introduced in SharePoint 2013 for customizing SharePoint list forms Newfrom, displayform, editform.
Using this feature, you can change the overall look and feel of the SharePoint list. It works well to customize the SharePoint components using OOTB (Out Of the Box).
Let’s get started to implement jQuery datatable.
Open SharePoint site
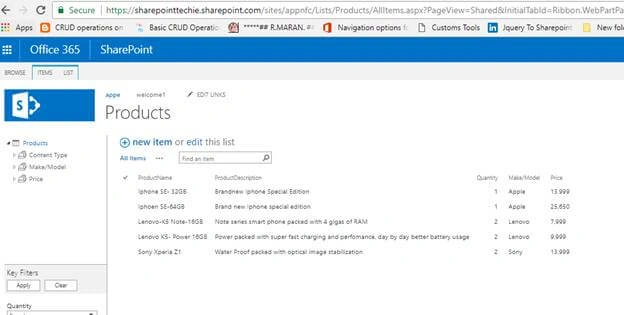
Create a SharePoint custom list with some data.

Open SharePoint Designer -> Navigate to Site Assets -> Create a file customize.js.

Next, upload all the CSS and JavaScript plugins for building a datatable.
Download here - Datatable
Upload all the CSS and JavaScript files into Site Assets library.

Open the customize.js and start building code.
Add CSS and JavaScript
Inside a JavaScript file, you can call the CSS like this.
- /Declare my custom css for design HTML
- var cssId = 'myCss';
- if (!document.getElementById(cssId)) {
- var head = document.getElementsByTagName('head')[0];
- var link = document.createElement('link');
- link.id = cssId;
- link.rel = 'stylesheet';
- link.type = 'text/css';
- link.href = 'https://sharepointtechie.sharepoint.com/sites/appnfc/SiteAssets/datatable/css/jquery-ui.css';
- link.media = 'all';
- head.appendChild(link);
- }
- var cssId = 'myCss1';
- if (!document.getElementById(cssId)) {
- var head = document.getElementsByTagName('head')[0];
- var link = document.createElement('link');
- link.id = cssId;
- link.rel = 'stylesheet';
- link.type = 'text/css';
- link.href = 'https://sharepointtechie.sharepoint.com/sites/appnfc/SiteAssets/datatable/css/dataTables.jqueryui.min.css';
- link.media = 'all';
- head.appendChild(link);
- }
Create a function for overriding the item template. Inside the function, declare necessary jQuery Snippets.
- (window.jQuery || document.write('<script src="https://sharepointtechie.sharepoint.com/sites/appnfc/SiteAssets/datatable/js/jquery-1.12.4.js"><\/script>'));
- (window.jQuery || document.write('<script src="https://sharepointtechie.sharepoint.com/sites/appnfc/SiteAssets/datatable/js/jquery.dataTables.min.js"><\/script>'));
- (window.jQuery || document.write('<script src="https://sharepointtechie.sharepoint.com/sites/appnfc/SiteAssets/datatable/js/dataTables.jqueryui.min.js"><\/script>'));
HTML Code
- <table id="example" class="display" cellspacing="0" width="100%">
- <thead>
- <tr>
- <th>Name</th>
- <th>Position</th>
- <th>Office</th>
- <th>Age</th>
- <th>Start date</th>
- <th>Salary</th>
- </tr>
- </thead>
- <tfoot>
- <tr>
- <th>Name</th>
- <th>Position</th>
- <th>Office</th>
- <th>Age</th>
- <th>Start date</th>
- <th>Salary</th>
- </tr>
- </tfoot>
- <tbody>
- <tr>
- <td>Tiger Nixon</td>
- <td>System Architect</td>
- <td>Edinburgh</td>
- <td>61</td>
- <td>2011/04/25</td>
- <td>$320,800</td>
- </tr>
- <tr>
- <td>Garrett Winters</td>
- <td>Accountant</td>
- <td>Tokyo</td>
- <td>63</td>
- <td>2011/07/25</td>
- <td>$170,750</td>
- </tr>
- </tbody>
- </table>
Now, override the default list template.
- (function () {
- (window.jQuery || document.write('<script src="https://sharepointtechie.sharepoint.com/sites/appnfc/SiteAssets/datatable/js/jquery-1.12.4.js"><\/script>'));
- (window.jQuery || document.write('<script src="https://sharepointtechie.sharepoint.com/sites/appnfc/SiteAssets/datatable/js/jquery.dataTables.min.js"><\/script>'));
- (window.jQuery || document.write('<script src="https://sharepointtechie.sharepoint.com/sites/appnfc/SiteAssets/datatable/js/dataTables.jqueryui.min.js"><\/script>'));
- var overrideCtx = {}; // Create a variable for override context
- overrideCtx.Templates = {} // Get the templates of the list
- //Declare the template header with HTML Tags
- overrideCtx.Templates.Header = " <table id='example' class='display' cellspacing='0' width='100%'><thead><tr><th>Product</th><th>Description</th><th>Quantity</th><th>Make/Model</th><th>Price</th></tr></thead><tfoot><tr><th>Product</th><th>Description</th><th>Quantity</th><th>Make/Model</th><th>Price</th></tr></tfoot><tbody>";
- // Get the Item data from context
- overrideCtx.Templates.Item = dataTemplate;
- //Declare the template footer with HTML tags
- overrideCtx.Templates.Footer = "</tbody></table>";
- // Onpostrender event fires after the DOM is loaded
- overrideCtx.OnPostRender = dataTableOnPostRender;
- //Register the template overrides
- SPClientTemplates.TemplateManager.RegisterTemplateOverrides(overrideCtx);
- })();
Now, let’s create a “DataTemplate” function to render the table <tbody></tbody>
- // This function provides the rendering logic
- function dataTemplate(ctx) {
- // Return whole item html
- return "<tr><td>"+ ctx.CurrentItem.ProductName +"</td><td>"+ ctx.CurrentItem.ProductDescription +"</td><td>"+ ctx.CurrentItem.Quantity +"</td><td>"+ ctx.CurrentItem.Make_x002f_Model+"</td><td>"+ ctx.CurrentItem.Price+"</td></tr>";
- }
You can fetch the data from context for example you need to get the data from “Title” field.
Example Variable Declaration
Var titleVal = ctx.CurrentItem.Title;
Also, you can directly pass the context value into the HTML it works.
Next , I have called the jQuery datatable function into OnPostrender.
- function dataTableOnPostRender() {
- $(document).ready(function () {
- $('#example').DataTable();
- });
- }
Full Code
- //Declare my custom css for design HTML
- var cssId = 'myCss';
- if (!document.getElementById(cssId)) {
- var head = document.getElementsByTagName('head')[0];
- var link = document.createElement('link');
- link.id = cssId;
- link.rel = 'stylesheet';
- link.type = 'text/css';
- link.href = 'https://sharepointtechie.sharepoint.com/sites/appnfc/SiteAssets/datatable/css/jquery-ui.css';
- link.media = 'all';
- head.appendChild(link);
- }
- var cssId = 'myCss1';
- if (!document.getElementById(cssId)) {
- var head = document.getElementsByTagName('head')[0];
- var link = document.createElement('link');
- link.id = cssId;
- link.rel = 'stylesheet';
- link.type = 'text/css';
- link.href = 'https://sharepointtechie.sharepoint.com/sites/appnfc/SiteAssets/datatable/css/dataTables.jqueryui.min.css';
- link.media = 'all';
- head.appendChild(link);
- }
- (function () {
- (window.jQuery || document.write('<script src="https://sharepointtechie.sharepoint.com/sites/appnfc/SiteAssets/datatable/js/jquery-1.12.4.js"><\/script>'));
- (window.jQuery || document.write('<script src="https://sharepointtechie.sharepoint.com/sites/appnfc/SiteAssets/datatable/js/jquery.dataTables.min.js"><\/script>'));
- (window.jQuery || document.write('<script src="https://sharepointtechie.sharepoint.com/sites/appnfc/SiteAssets/datatable/js/dataTables.jqueryui.min.js"><\/script>'));
- var overrideCtx = {};
- overrideCtx.Templates = {}
- overrideCtx.Templates.Header = " <table id='example' class='display' cellspacing='0' width='100%'><thead><tr><th>Product</th><th>Description</th><th>Quantity</th><th>Make/Model</th><th>Price</th></tr></thead><tfoot><tr><th>Product</th><th>Description</th><th>Quantity</th><th>Make/Model</th><th>Price</th></tr></tfoot><tbody>";
- overrideCtx.Templates.Item = dataTemplate;
- overrideCtx.Templates.Footer = "</tbody></table>";
- overrideCtx.OnPostRender = dataTableOnPostRender;
- // This line of code tell TemplateManager that we want to change all HTML for item row render
- SPClientTemplates.TemplateManager.RegisterTemplateOverrides(overrideCtx);
- })();
- // This function provides the rendering logic
- function dataTemplate(ctx) {
- // Return whole item html
- return "<tr><td>"+ ctx.CurrentItem.ProductName +"</td><td>"+ ctx.CurrentItem.ProductDescription +"</td><td>"+ ctx.CurrentItem.Quantity +"</td><td>"+ ctx.CurrentItem.Make_x002f_Model+"</td><td>"+ ctx.CurrentItem.Price+"</td></tr>";
- }
- function dataTableOnPostRender() {
- $(document).ready(function () {
- $('#example').DataTable();
- });
- }
Now, let’s go to SharePoint and navigate to Products list.
Click on Edit page - > Edit web part.

Expand the “Miscellaneous” tree. You are now able to see the JSLink Field.

Note: /Sites/deve/siteAssets/jslink/sustomize.js it does not work. You pass it like below url
URL: ~site/SiteAssets/jslink/customize.js
Click OK.


Now, let’s add more data into it.

Let’s check pagination -- that also works well.

Now, check the filter from “ metadata navigation". Search for “Apple” from make/model.

Works awesome!
Now, search inside the datatable “Sony”.

Conclusion
You can also customize SharePoint like this. It’s one of the coolest OOTB features. It changes the overall look and feel of SharePoint list components.
Happy SharePointing!...
Ajay SharmaPosted Jun 18, 2018, 1:09 AM
I have found an issue with group by else it is working.
Ajay SharmaPosted Jun 15, 2018, 1:40 AM
Hi Vinod, It is not working for task list. Please suggest the solution.
Shankar NSPosted Apr 9, 2018, 12:11 PM
Dear Vinod, excellent article. It works perfectly on SP on prem. I tried the same on SP online and it does not work. Any idea what could be the issue?
venkat KotaiahPosted Dec 11, 2017, 11:39 PM
Hi Vinod have a nice day..i have tried same process but for me its not working ...i have forward my code to your mail kindly do some needful .....
venkat KotaiahPosted Dec 8, 2017, 12:58 AM
Hi vinodh have a nice i tried same process as above but i am getting error like Failed to load resource: the server responded with a status of 404 () can you please help out me on this
venkat KotaiahPosted Dec 7, 2017, 7:40 AM
Hi Vinodh Were we can write html code in list view webpart we linking only js file i am missing html file ..can you help out me were we link html code to our code