
Introduction
Ajax (Asynchronous
JavaScript and XML) is a new web development technique for interactive
websites. AJAX helps us to develop web applications and retrieve small amounts of
data from the web server. AJAX consists of a different type of technology.
- JavaScript
- XML
- Asynchronous Call to the server
Chat
The AJAX Chat Sample shows how to build a
browser based chat using ASP .NET and AJAX. ASP.NET AJAX is the easiest and most
enjoyable way to start writing asynchronous Web applications using ASP.NET.
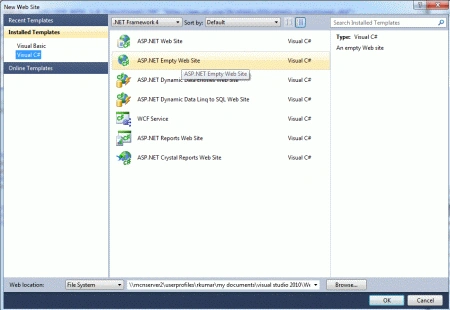
Step 1 : Open Visual Studio 2010.
- Go to File->New->WebSite
- Select ASP.NET Empty WebSite
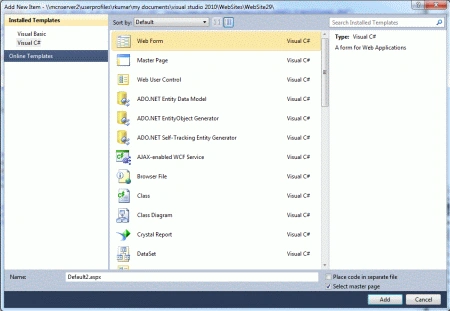
Step 2 : Go to Solution Explorer and right-click.
- Select Add->New Item
- Select WebForm
- Default.aspx page open
Add Some Chat Control
Step 3 : Go to the Default.aspx page and click on the [Design] option and drag control from Toolbox.
- Drag ScriptManager control, UpdatePanel control, Button, Bulleted List,TextBox
Define Trigger for UpdatePanel
Step 4 : Go to Default.aspx [Design] option and click on the UpdatePanel.
- Select Properties option
- Click on Trigger and define ControlIDand Event Name
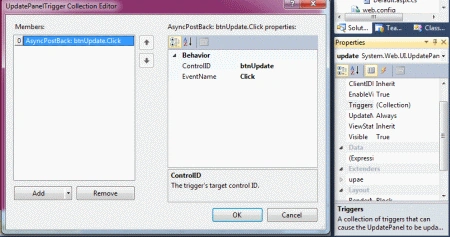
Step 5 : Write code for UpdatePanel control and define AsyncPostBackTrigger.
Code :
<asp:UpdatePanel
ID="ChatUpdatePanel"
runat="server"
UpdateMode="Always">
<ContentTemplate>
Chatters<br/>
<asp:BulletedList
ID="ChattersBulletedList"
runat="server"
BackColor="#FF8000"
/>
Chat Text<br/>
<div
id="ChatText"
style="width: 440px;
height: 140px;
overflow: auto;
background-color:
#B6E2B7;">
<asp:BulletedList
runat="server"
ID="ChatMessageList"
/>
</div>
</ContentTemplate>
<Triggers>
<asp:AsyncPostBackTrigger
ControlID="SendButton"
EventName="Click"
/>
<asp:AsyncPostBackTrigger
ControlID="ChatTextTimer"
EventName="Tick"
/>
</Triggers>
</asp:UpdatePanel>
Add
App_Code Folder
Step 6 : Go to Solution Explorer and add App_Code Folder for the Chat.cs and Chatter.cs class files, needed to create our test data.

Add Some Chatter
Step 7 : Go to Solution Explorer
and click on the project.
- Select Add->NewItem
- Select GlobalApplication class
- Global.asax page open
Define NameSpace
<%@ Import Namespace="System.Collections.Generic"
%> This is test only data.
Code :
<%@
Import Namespace="System.Collections.Generic"
%>
<%@
Application Language="C#"
%>
<script
runat="server">
void Application_Start(object
sender, EventArgs e)
{
List<Chatter>
chatters = new List<Chatter>();
chatters.Add(new
Chatter(new
Guid("CD863C27-2CEE-45fd-A2E0-A69E62B816B9"),
"RAJ"));
chatters.Add(new
Chatter(Guid.NewGuid(),
"Bhavana"));
chatters.Add(new
Chatter(Guid.NewGuid(),
"Amit"));
chatters.Add(new
Chatter(Guid.NewGuid(),
"Deepak"));
chatters.Add(new
Chatter(Guid.NewGuid(),
"Manish"));
chatters.Add(new
Chatter(Guid.NewGuid(),
"Sachin"));
chatters.Add(new
Chatter(Guid.NewGuid(),
"Puja"));
Application.Add("Chatters",
chatters);
List<chate>
chats = new List<chate>();
chats.Add(new
chate());
Application.Add("Chats", chats);
foreach (KeyValuePair<Guid,
Chatter> chatter in
Chatter.ActiveChatters())
{
chatter.Value.Join(chate.ActiveChats()[0]);
}
}
void Application_End(object
sender, EventArgs e)
{
// Code that runs on application shutdown
}
void Application_Error(object
sender, EventArgs e)
{
// Code that runs when an unhandled error
occurs|
}
void Session_Start(object
sender, EventArgs e)
{
// Code that runs when a new session is
started
}
void Session_End(object
sender, EventArgs e)
{
// Code that runs when a session ends.
// Note: The Session_End event is
raised only when the sessionstate mode
// is set to InProc in the Web.config
file. If session mode is set to StateServer
// or SQLServer, the event is not
raised.
}
</script>
Note : Since we want to simulate a group
of Chatters that have logged into our site, we will create a list of Chatter
objects within the Application_Start method.
Step 8 :
Go to Default.aspx.cs and define
two private variables, one for our Chatter ("RAJ"), and one for the single
Chat instance.
Code :
using
System;
using
System.Collections.Generic;
using
System.Linq;
using System.Web;
using
System.Web.UI;
using
System.Web.UI.WebControls;
public
partial class
_Default : System.Web.UI.Page
{
private chate
m_chat = chate.ActiveChats()[0];
private Chatter
m_chatter = Chatter.ActiveChatters()[new
Guid("CD863C27-2CEE-45fd-A2E0-A69E62B816B9")];
protected void
Page_Load(object sender,
EventArgs e)
{
_UpdateChatterList();
_UpdateChatMessageList();
}
private void
_UpdateChatMessageList()
{
ChatMessageList.DataSource = m_chat.Messages;
ChatMessageList.DataBind();
}
private void
_UpdateChatterList()
{
ChattersBulletedList.DataSource = m_chat.Chatters;
ChattersBulletedList.DataTextField = "Name";
ChattersBulletedList.DataBind();
}
protected void
SendButton_Click(object sender,
EventArgs e)
{
if (!string.IsNullOrEmpty(NewMessageTextBox.Text))
{
string messageSent =
m_chat.SendMessage(m_chatter, NewMessageTextBox.Text);
NewMessageTextBox.Text = string.Empty;
}
_UpdateChatterList();
_UpdateChatMessageList();
}
}
Step 9 :
Go to Default.aspx page option and write a
code.
Code :
<body>
<form
id="form2"
runat="server"
style="background-color:
#ADC9D1">
<asp:ScriptManager
ID="ScriptManager1"
runat="server"
EnablePartialRendering="true"
/>
<asp:UpdatePanel
ID="ChatUpdatePanel"
runat="server"
UpdateMode="Always">
<ContentTemplate>
Chatters<br/>
<asp:BulletedList
ID="ChattersBulletedList"
runat="server"
BackColor="#FF8000"
/>
Chat Text<br/>
<div
id="ChatText"
style="width: 440px;
height: 140px;
overflow: auto;
background-color:
#B6E2B7;">
<asp:BulletedList
runat="server"
ID="ChatMessageList"
/>
</div>
</ContentTemplate>
<Triggers>
<asp:AsyncPostBackTrigger
ControlID="SendButton"
EventName="Click"
/>
<asp:AsyncPostBackTrigger
ControlID="ChatTextTimer"
EventName="Tick"
/>
</Triggers>
</asp:UpdatePanel>
Send Message Text<br/>|
<asp:TextBox
ID="NewMessageTextBox"
Columns="50"
runat="server"
BackColor="White"
/><asp:Button
EnableViewState="false"
ID="SendButton"
Text="Send"
runat="server"
OnClick="SendButton_Click"
/>
<asp:Timer
runat="server"
ID="ChatTextTimer"
Interval="1000"
/>
</form>
<script
type="text/javascript">
function _SetChatTextScrollPosition()
{
var chatText =
document.getElementById("ChatText");
chatText.scrollTop = chatText.scrollHeight;
window.setTimeout("_SetChatTextScrollPosition()",
1);
}
window.onload = function () {
_SetChatTextScrollPosition();
}
</script>
Step 10 : Go to the Chate.cs
class and write a code for the test data.
Code :
using System;
using
System.Collections;
using
System.Collections.Generic;
using
System.Collections.ObjectModel;
using System.Web;
///
<summary>
///
Summary description for chate
///
</summary>
public
class chate
{
private Guid
m_id;
public Guid
Id
{
get { return
m_id; }
}
private List<string>
m_messages = new
List<string>();
public List<string>
Messages
{
get { return
m_messages; }
}
private List<Chatter>
m_chatters = new
List<Chatter>();
public List<Chatter>
Chatters
{
get { return
m_chatters; }
set { m_chatters =
value; }
}
public static
ReadOnlyCollection<chate>
ActiveChats()
{
if (HttpContext.Current.Application["Chats"]
!= null)
{
List<chate>
chats = ((List<chate>)HttpContext.Current.Application["Chats"]);
return new
ReadOnlyCollection<chate>(chats);
}
else
{
return new
ReadOnlyCollection<chate>(new
List<chate>());
}
}
public string
SendMessage(Chatter chatter,
string message)
{
string messageMask =
"{0} @ {1} : {2}";
message = string.Format(messageMask,
chatter.Name, DateTime.Now.ToString(),
message);
m_messages.Add(message);
return message;
}
}
Step 11 : Now write the code for the chatter.cs class for the chat application.
Code :
using System;
using
System.Collections.Generic;
using System.IO;
using
System.Linq;
using System.Web;
///
<summary>
///
Summary description for Chatter
///
</summary>
public
class Chatter
{
private Guid
m_id;
public Guid
Id
{
get { return
m_id; }
}
private string
m_name;
public string
Name
{
get { return
m_name; }
}
public static
Dictionary<Guid,
Chatter> ActiveChatters()
{
Dictionary<Guid,
Chatter> retval = new Dictionary<Guid,
Chatter>();"
if (HttpContext.Current.Application["Chatters"]
!= null)
{
List<Chatter>
chatters = ((List<Chatter>)HttpContext.Current.Application["Chatters"]);
foreach (Chatter
chatter in chatters)
{
retval.Add(chatter.Id, chatter);
}
}
return retval;
}|
public void
Join(chate chat)
{
chat.Chatters.Add(this);
}
public Chatter(Guid
id, string name)
{
m_id = id;
m_name = name;
}
}
Step 12 :
Now run the application by Pressing F5.

Step 13 : Write a message inside the Texbox and click on send button.

Gowtham RajamanickamPosted Apr 19, 2016, 6:45 AM
Thanks
Pugal PillareePosted Jun 15, 2015, 12:51 AM
how to download the back up
Shailesh GhadashiPosted Mar 19, 2014, 7:10 AM
what should i do?
Shailesh GhadashiPosted Mar 19, 2014, 7:09 AM
chatter does not contain defination for value
bhanu PrasadPosted Feb 19, 2013, 11:53 PM
how to add App_code in Solution Explore plz help me.
Gjorgji StrezoskiPosted Jan 22, 2013, 7:38 AM
Hey Davin, this is a great tutorial and very easy to follow, but I'm a beginner and it would be much easier to learn if you uploaded the Solution File from Visual Studio. Could you do that? Thank you
Santosh PisipatiPosted Dec 13, 2012, 10:58 AM
how to add chatter name who are logged on from different Place and send them a message ??
AltamashPosted Sep 17, 2012, 6:17 AM
In chatter.cs class it tells me that Chatter must have a return type: public Chatter(Guid id, string name) { m_id = id; m_name = name; } Tell me what to do more please.
jwerw jbsdbdPosted Aug 12, 2012, 12:23 AM
thanks
Akash AhlawateditedPosted Jan 7, 2012, 11:08 PMEdited Jan 9, 2012, 11:47 AM
Thanks!