

Introduction
In this article, we’ll learn how to perform CRUD operations with a code-first approach in an MVC application. Here, we will create an MVC structure that will help to change in the Model Class, and that change will update in the database. Microsoft’s Entity Framework (EF) avoids working directly with the database and creates the database as per model classes. We will not use a visual model designer (EDMX) completely but will create POCO classes first and then create the database from these POCO classes.
Recommended Prerequisites
- Visual Studio 2010 SP1
- ASP.NET MVC
- SQL Server
Step 1
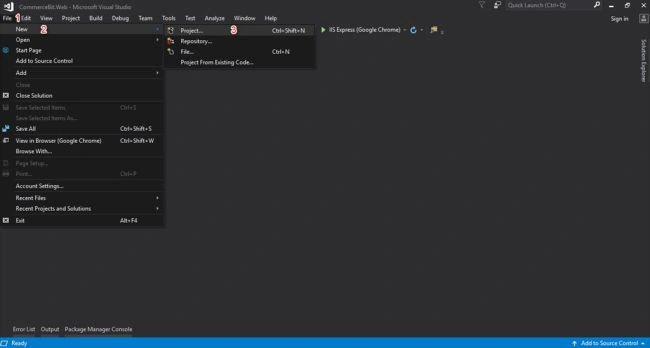
Open Visual Studio and select “File” >> "New". Then click on Project. (Remember, don't go with the option 'File->New->Website'.)
Step 2
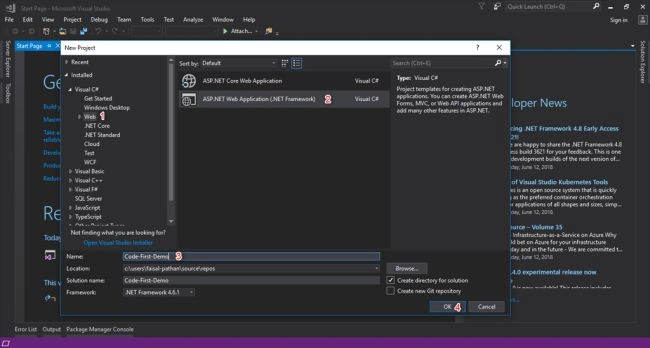
Select “Templates” >> Visual C# >> Web then ASP.NET Web Application (.NET Framework), and put appropriate project name.
- And click the “OK” button.
Step 3
And, here is your default screen.
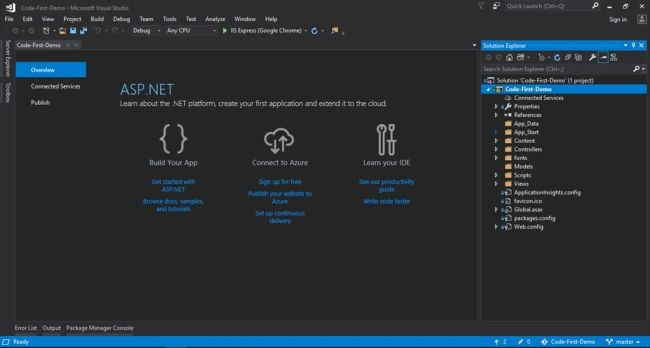
Here, we will create the basic structure which looks professional and easy to use.
- Code-First-Demo
It contains Web UI like our Controller, Views, JS, Custom models, etc.
- Code-First-Demo.Repository
It contains our migration files (whatever file we have generated in the application, it will be added to this project).
- Code-First-Demo.Model
It contains our Model classes. (whatever classes/models we have generated in the application, they will be added to this project).
Step 4
Right click on Solution >> Add >> New Project.
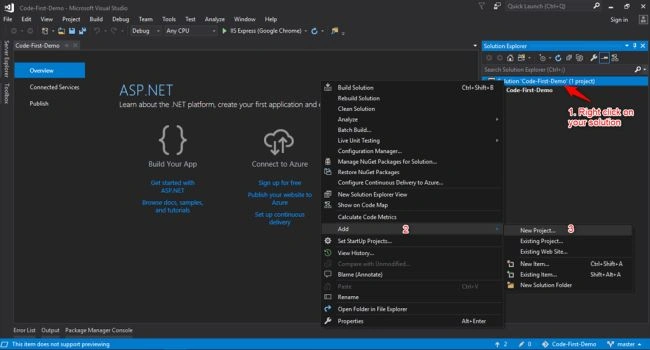
Now, we will add our Code-First-Demo.Repository Class Library which contains our Migration files.
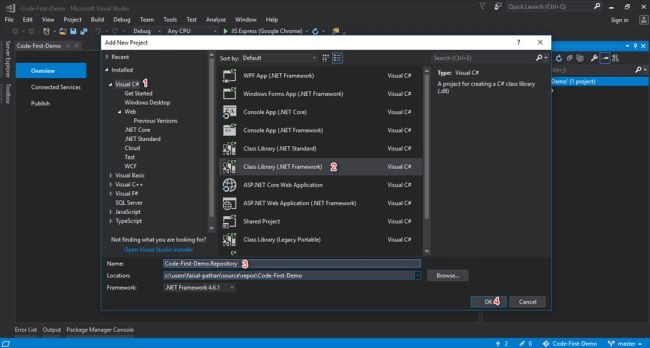
Step 5
Right-click on Code-First-Demo.Repository >> Add and add a new class.
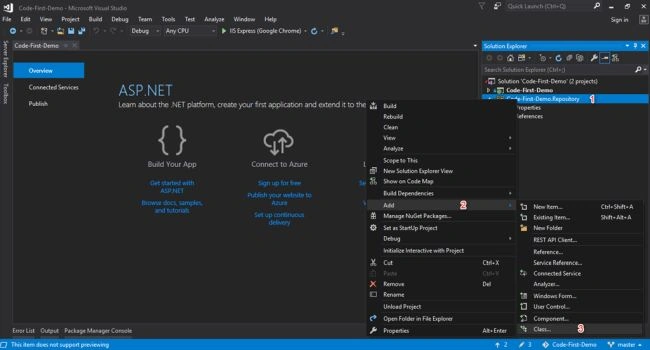
Step 6
Click on the class and give an appropriate name. Here, I’ll set the name as CDBContext.
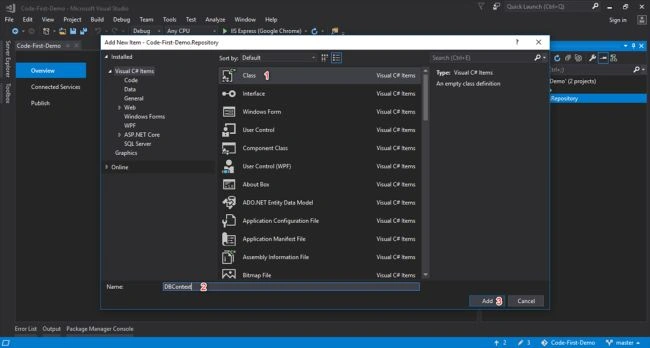
Step 7
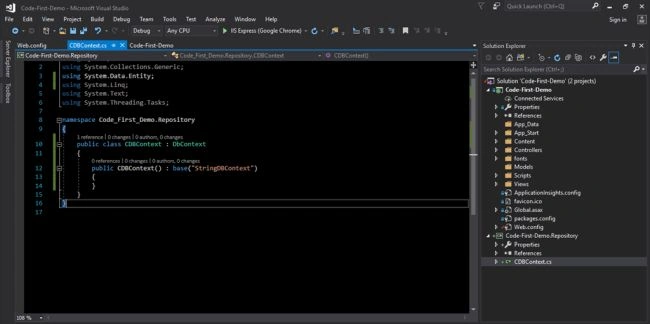
Now, add the reference of EntityFramework, add namespace "using System.Data.Entity;" and set access specifier as public and extend from DbContext.
- using System;
- using System.Collections.Generic;
- using System.Data.Entity;
- using System.Linq;
- using System.Text;
- using System.Threading.Tasks;
- namespace Code_First_Demo.Repository
- {
- public class CDBContext : DbContext
- {
- }
- }
- <connectionStrings>
- <add name="StringDBContext" connectionString="Server=FAISAL-PATHAN\SQLEXPRESS;Initial Catalog=DemoDB;Persist Security Info=False;User ID=sa;Password=***;MultipleActiveResultSets=True;Encrypt=False;TrustServerCertificate=False;Connection Timeout=30;" providerName="System.Data.SqlClient" />
- </connectionStrings>
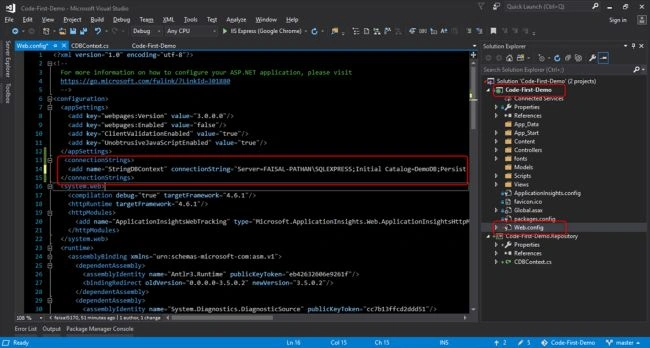
Step 8
Create constructor and extend from the base class and pass connectionstring name which we set in web.config file.
Step 9
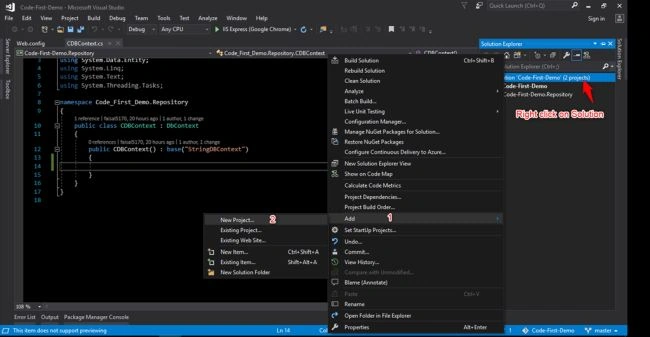
Right-click on Solution, add a new project.
Now, we will add our Code-First-Demo.Model Class Library, which contains all our classes.
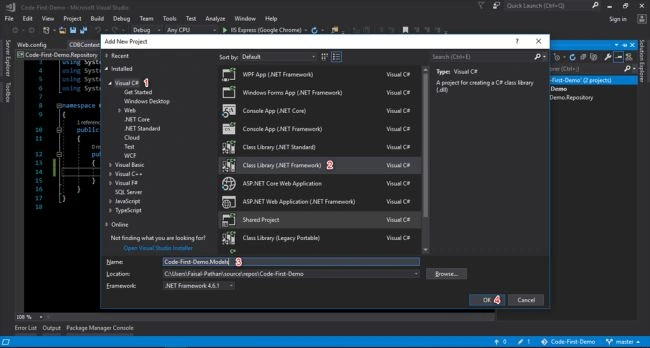
After this, delete the default class namely Class1.cs.
Now, we must add Code-First-Demo.Model Class Library reference to Code-First-Demo.Repository Class Library in order to access and generate a table in SQL Server.
Step 10
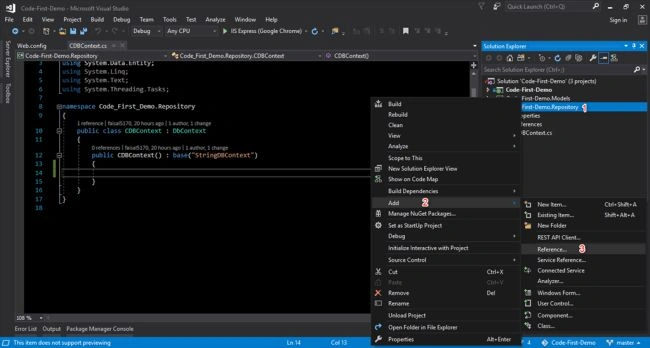
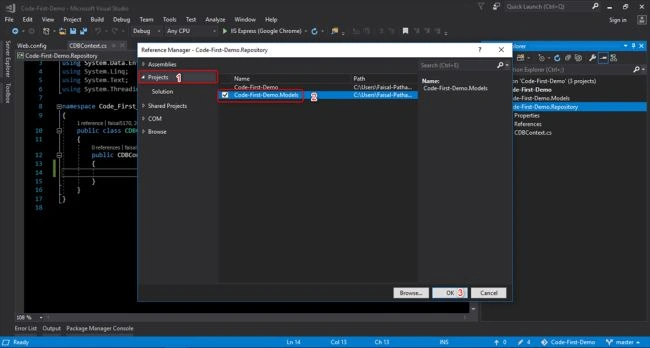
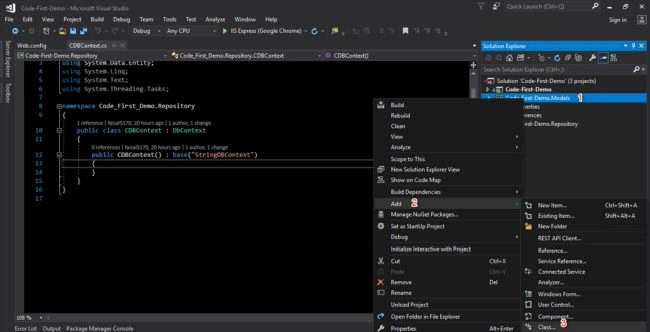
Add Code-First-Demo.Model Class Library reference to Code-First-Demo.Repository Class Library. Right-click on Code-First-Demo.Repository, Select Add > Reference.
Step 12
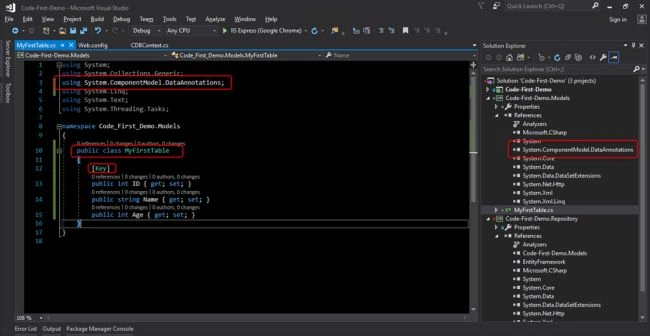
Add properties to the class as per columns that you want in the table.
- Add reference System.ComponentModel.DataAnnotations.dll to Code_First_Demo.Models.
- Set the Key attribute to your primary key.
- The Key attribute can be applied to a property in an entity class to make it a key property and the corresponding column to a PrimaryKey column in the database.
- Add using System.ComponentModel.DataAnnotations; namespace.
- using System;
- using System.Collections.Generic;
- using System.ComponentModel.DataAnnotations;
- using System.Linq;
- using System.Text;
- using System.Threading.Tasks;
- namespace Code_First_Demo.Models
- {
- public class MyFirstTable
- {
- [Key]
- public int ID { get; set; }
- public string Name { get; set; }
- public int Age { get; set; }
- }
- }
Step 13 - Add DbSet Properties
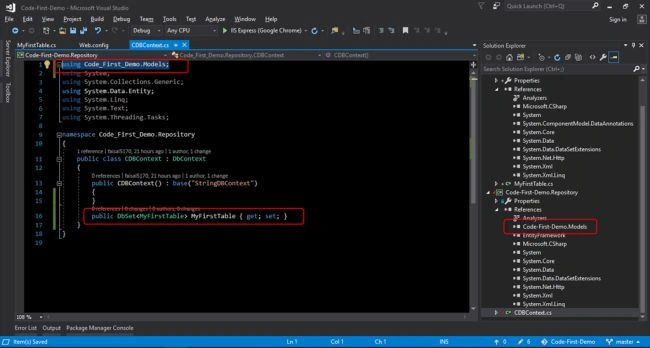
Add using Code_First_Demo.Models; namespace.
- using Code_First_Demo.Models;
- using System;
- using System.Collections.Generic;
- using System.Data.Entity;
- using System.Linq;
- using System.Text;
- using System.Threading.Tasks;
- namespace Code_First_Demo.Repository
- {
- public class CDBContext : DbContext
- {
- public CDBContext() : base("StringDBContext")
- {
- }
- public DbSet<MyFirstTable> MyFirstTable { get; set; }
- }
- }
Step 14
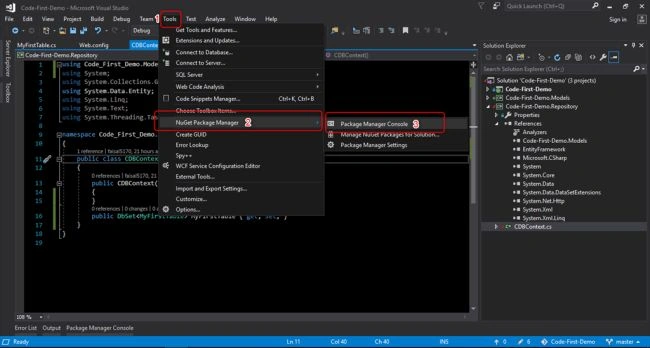
Now, open the package manager console to fire the commands.
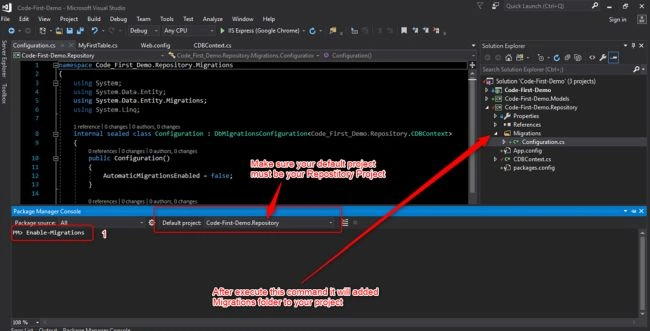
Enable-Migrations
Enables Code First Migrations in the project.
Syntax
- Enable-Migrations [-ContextTypeName <String>][-EnableAutomaticMigrations][-MigrationsDirectory <String>]
- [-ProjectName <String>][-StartUpProjectName <String>][-ContextProjectName <String>][-ConnectionStringName <String>]
- [-Force][-ContextAssemblyName <String>][-AppDomainBaseDirectory <String>][<CommonParameters>]
- Enable-Migrations [-ContextTypeName <String>][-EnableAutomaticMigrations][-MigrationsDirectory <String>]
- [-ProjectName <String>][-StartUpProjectName <String>][-ContextProjectName <String>] -ConnectionString <String>
- -ConnectionProviderName <String> [-Force][-ContextAssemblyName <String>][-AppDomainBaseDirectory <String>]
- [<CommonParameters>]
Add-Migration
Scaffold a migration script for any pending model changes.
Syntax
- Add-Migration [-Name] <String> [-Force][-ProjectName <String>][-StartUpProjectName <String>]
- [-ConfigurationTypeName <String>][-ConnectionStringName <String>][-IgnoreChanges]
- [-AppDomainBaseDirectory <String>][<CommonParameters>]
- Add-Migration [-Name] <String> [-Force][-ProjectName <String>][-StartUpProjectName <String>]
- [-ConfigurationTypeName <String>] -ConnectionString <String> -ConnectionProviderName <String>
- [-IgnoreChanges][-AppDomainBaseDirectory <String>][<CommonParameters>]
- Update-Database [-SourceMigration <String>][-TargetMigration <String>][-Script][-Force][-ProjectName <String>]
- [-StartUpProjectName <String>][-ConfigurationTypeName <String>][-ConnectionStringName <String>][-AppDomainBaseDirectory <String>]
- [<CommonParameters>]
- Update-Database [-SourceMigration <String>][-TargetMigration <String>][-Script][-Force][-ProjectName <String>]
- [-StartUpProjectName <String>][-ConfigurationTypeName <String>] -ConnectionString <String> -ConnectionProviderName <String>
- [-AppDomainBaseDirectory <String>][<CommonParameters>]
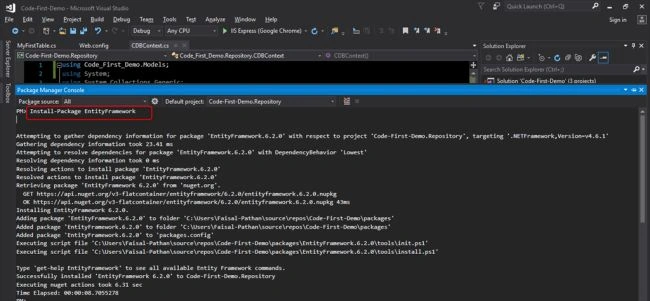
Type/Select below commands and press enter key.It will added EntiryFramwork releted packages.
Install-Package EntityFramework
 Enable-Migrations
 Add-Migration MyMigration
Note: You can put any migration name as per your choice.
Add-Migration MyMigration
Note: You can put any migration name as per your choice.
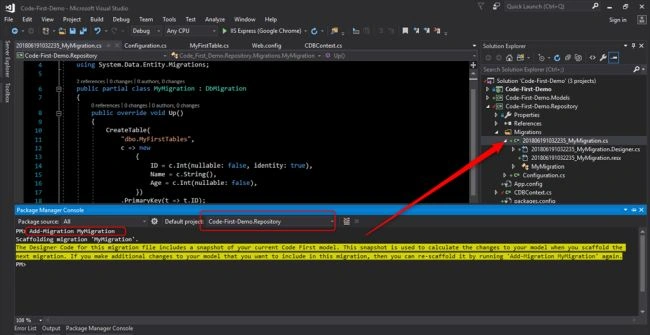 This command will create your migration file based on the model's properties.
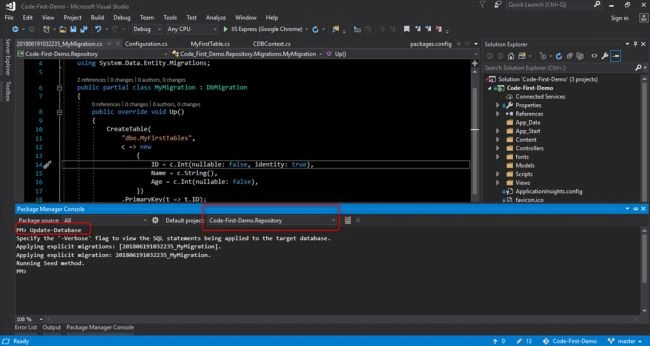
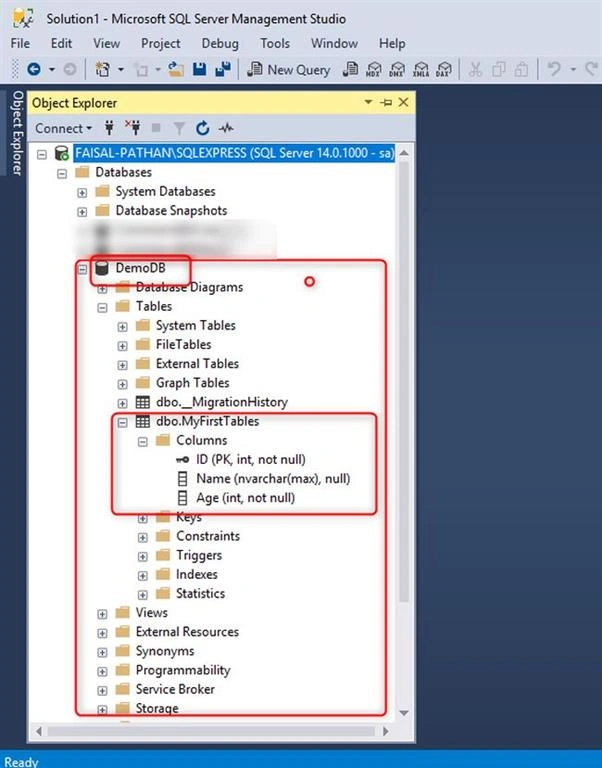
Update-Database
Note: This command will Create/modify your database on the mention connectionstring in the web.config file
This command will create your migration file based on the model's properties.
Update-Database
Note: This command will Create/modify your database on the mention connectionstring in the web.config file
Step 15
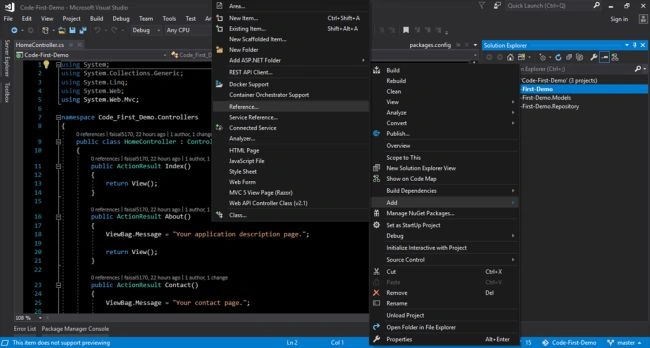
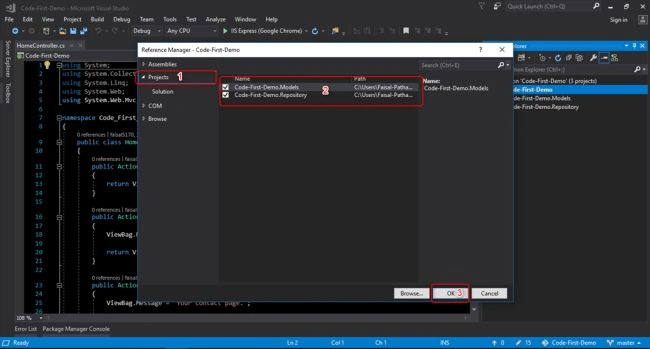
Now Rebuild the solution and Perform the below action to do CRUD operations.
Add a reference to both class library projects to the main web project.
Step 16
Now Add New Controller for CRUD operation.
Right-click on Controllers, Add, and Controller...
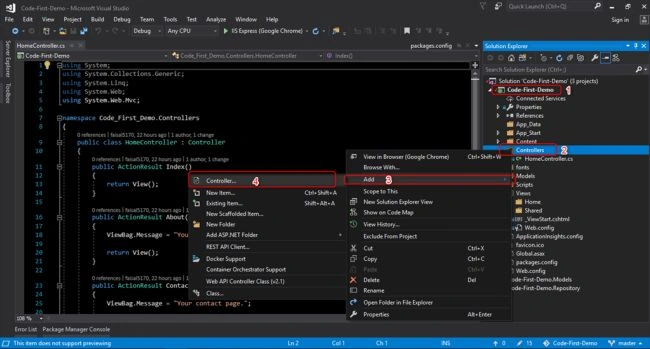
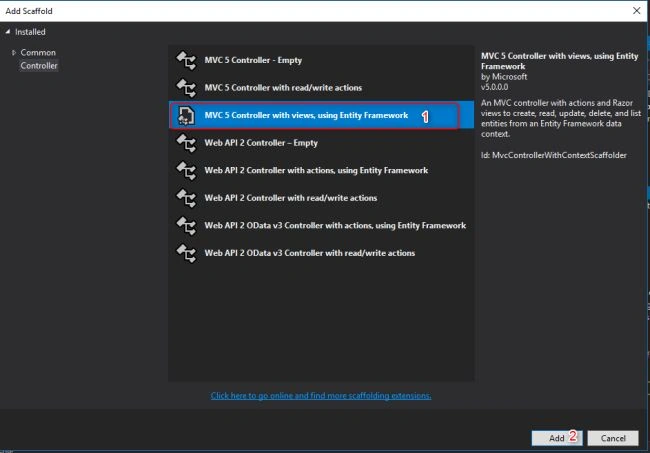
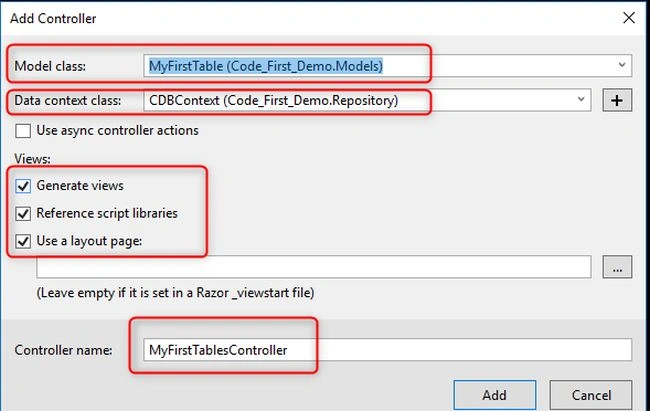
- Select your model and context class and set Controller name, (Don't remove Controller suffix),
- Click on the Add button to create a controller and its views.
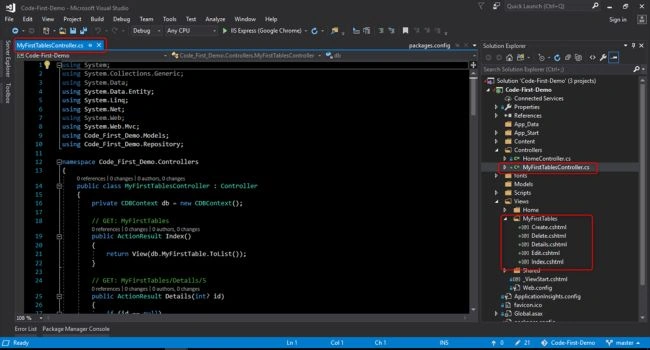
Here we dis the Code-First approach in MVC application in an easy way.
Output
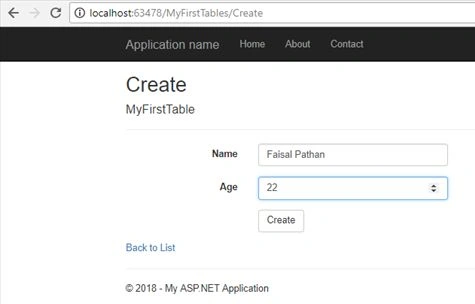
Create Page
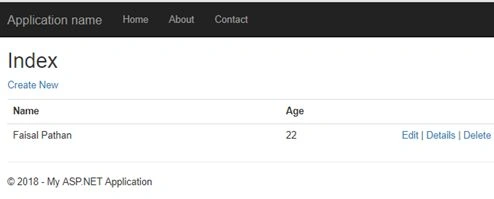
 Display Page (List of Users)
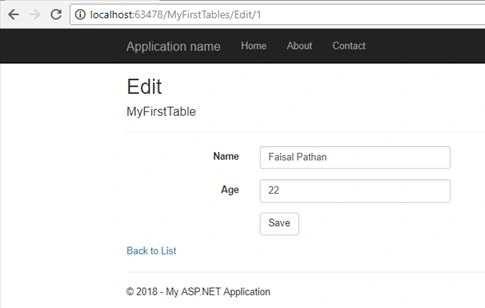
 Edit Page
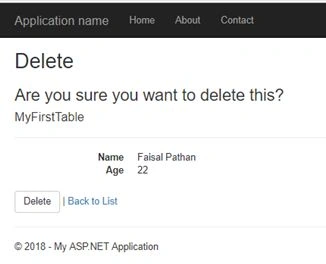
 Delete Page
Summary
Here, we created a simple application that uses the Entity Framework and SQL Server to perform CRUD operations with a Code First approach. In the following article, we will see how to do basic CRUD operations. You can leave feedback/comments/questions to this article. Please let me know how you like and understand this article and how I could improve it.
Shailendra KumarPosted Aug 8, 2018, 5:01 AM
Very easy steps for learning MVC architecture.
Farhan AhmedPosted Jul 24, 2018, 3:42 AM
Good work faisal like it.
Kaushik DudhatPosted Jul 19, 2018, 10:51 PM
Nice article
Goutham KsPosted Jun 27, 2018, 4:18 AM
Explained very well...bro :-)
G.M. PatelPosted Jun 26, 2018, 7:47 AM
Just fabulous article to learn code-first MVC for beginners.
Talaviya BhavdipPosted Jun 25, 2018, 1:04 PM
Nice article dude, keep it up