

ASP.NET Core MVC is a powerful framework that makes building web applications fast and easy. In many real-world scenarios, users need to upload and download files to and from the server. In this article, we will build a simple application that provides file upload and file download functionality in ASP.NET Core MVC.
1. Setting up the Project
To begin, create a new ASP.NET Core MVC project using the .NET CLI or Visual Studio.
Using CLI
dotnet new mvc -n FileUploadDownloadApp
cd FileUploadDownloadApp
Using Visual Studio
- Open Visual Studio and create a new project.
- Select "ASP.NET Core Web App (Model-View-Controller)".
- Name it FileUploadDownloadApp.
2. Creating the Model
The next step is to create a model that represents the file to be uploaded. We will store the uploaded file in an IFormFile object.
public class FileUploadViewModel
{
    public IFormFile File { get; set; }
}
The IFormFile interface represents the uploaded file in the HTTP request.
3. Creating the Controller
The controller handles user requests to upload and download files. Create a new FileController with actions for file upload, file listing, and file download.
using Microsoft.AspNetCore.Mvc;
using System.IO;
using System.Threading.Tasks;
using FileUploadDownloadApp.Models;
using Microsoft.AspNetCore.Hosting;

public class FileController : Controller
{
    private readonly IWebHostEnvironment _environment;
    public FileController(IWebHostEnvironment environment)
    {
        _environment = environment;
    }
    // GET: File/Upload
    public IActionResult Upload()
    {
        return View();
    }
    // POST: File/Upload
    [HttpPost]
    public async Task<IActionResult> Upload(FileUploadViewModel model)
    {
        if (model.File != null && model.File.Length > 0)
        {
            // Define the upload folder
            string uploadPath = Path.Combine(_environment.WebRootPath, "uploads");
            // Create the folder if it doesn't exist
            if (!Directory.Exists(uploadPath))
            {
                Directory.CreateDirectory(uploadPath);
            }
            // Generate the file path
            string filePath = Path.Combine(uploadPath, model.File.FileName);
            // Save the file to the specified location
            using (var stream = new FileStream(filePath, FileMode.Create))
            {
                await model.File.CopyToAsync(stream);
            }
            ViewBag.Message = "File uploaded successfully!";
        }
        return View();
    }
    // GET: File/ListFiles
    public IActionResult ListFiles()
    {
        string uploadPath = Path.Combine(_environment.WebRootPath, "uploads");
        if (!Directory.Exists(uploadPath))
        {
            return View(new List<string>());
        }
        var files = Directory.GetFiles(uploadPath).Select(Path.GetFileName).ToList();
        return View(files);
    }
    // GET: File/Download?filename=example.txt
    public IActionResult Download(string filename)
    {
        if (string.IsNullOrEmpty(filename))
        {
            return Content("Filename is not provided.");
        }
        string filePath = Path.Combine(_environment.WebRootPath, "uploads", filename);
        if (!System.IO.File.Exists(filePath))
        {
            return Content("File not found.");
        }
        byte[] fileBytes = System.IO.File.ReadAllBytes(filePath);
        return File(fileBytes, "application/octet-stream", filename);
    }
}
Breakdown
- Upload: Saves uploaded files to the /uploads directory in wwwroot.
- ListFiles: Displays a list of uploaded files.
- Download: Allows downloading files from the server by providing the file name as a query parameter.
4. Creating Views
Upload View (Upload. cshtml)
@model FileUploadViewModel
<h2>Upload File</h2>
<form asp-action="Upload" enctype="multipart/form-data" method="post">
    <div class="form-group">
        <input type="file" asp-for="File" class="form-control" />
    </div>
    <button type="submit" class="btn btn-primary">Upload</button>
</form>
@if (ViewBag.Message != null)
{
    <p>@ViewBag.Message</p>
}
List Files View (ListFiles.cshtml)
@model List<string>
<h2>Uploaded Files</h2>
<table class="table">
    <thead>
        <tr>
            <th>File Name</th>
            <th>Download</th>
        </tr>
    </thead>
    <tbody>
    @foreach (var file in Model)
    {
        <tr>
            <td>@file</td>
            <td>
                <a asp-action="Download" asp-route-filename="@file" class="btn btn-success">Download</a>
            </td>
        </tr>
    }
    </tbody>
</table>
5. Navigation in Layout
To make file upload and download pages easily accessible, add links to these views in the main layout file (_Layout. cshtml).
<!DOCTYPE html>
<html lang="en">
<head>
    <meta charset="utf-8" />
    <meta name="viewport" content="width=device-width, initial-scale=1.0" />
    <title>@ViewData["Title"] - FileUploadDownloadApp</title>
    <link rel="stylesheet" href="~/lib/bootstrap/dist/css/bootstrap.min.css" />
    <link rel="stylesheet" href="~/css/site.css" asp-append-version="true" />
    <link rel="stylesheet" href="~/FileUploadDownloadApp.styles.css" asp-append-version="true" />
</head>
<body>
    <header>
        <nav class="navbar navbar-expand-sm navbar-toggleable-sm navbar-light bg-white border-bottom box-shadow mb-3">
            <div class="container">
                <a class="navbar-brand" asp-area="" asp-page="/Index">FileUploadDownloadApp</a>
                <button class="navbar-toggler" type="button" data-bs-toggle="collapse" data-bs-target=".navbar-collapse" aria-controls="navbarSupportedContent"
                        aria-expanded="false" aria-label="Toggle navigation">
                    <span class="navbar-toggler-icon"></span>
                </button>
                <div class="navbar-collapse collapse d-sm-inline-flex justify-content-between">
                    <ul class="navbar-nav flex-grow-1">
                        <li class="nav-item">
                            <a class="nav-link text-dark" asp-area="" asp-page="/Index">Home</a>
                        </li>
                        <li class="nav-item">
                            <a class="nav-link text-dark" asp-controller="Home" asp-action="Upload">Upload File</a>
                        </li>
                        <li class="nav-item">
                            <a class="nav-link text-dark" asp-controller="Home" asp-action="ListFiles">List Files</a>
                        </li>
                    </ul>
                </div>
            </div>
        </nav>
    </header>
    <div class="container">
        <main role="main" class="pb-3">
            @RenderBody()
        </main>
    </div>

    <footer class="border-top footer text-muted">
        <div class="container">
            © 2024 - FileUploadDownloadApp - <a asp-area="" asp-page="/Privacy">Privacy</a>
        </div>
    </footer>

    <script src="~/lib/jquery/dist/jquery.min.js"></script>
    <script src="~/lib/bootstrap/dist/js/bootstrap.bundle.min.js"></script>
    <script src="~/js/site.js" asp-append-version="true"></script>

    @await RenderSectionAsync("Scripts", required: false)
</body>
</html>
6. Running and Testing the Application
Once you've added the controller, views, and navigation links, run the application.
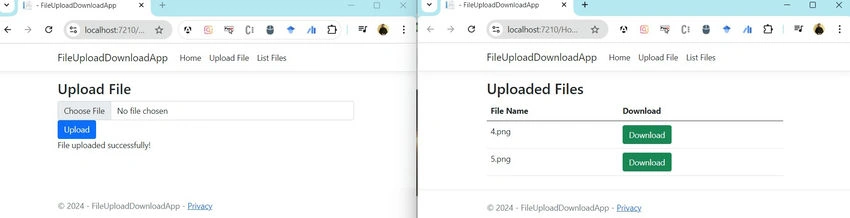
- Upload Files: Navigate to /File/Upload to upload files.
- List Files: After uploading, go to /File/ListFiles to see all uploaded files.
- Download Files: Click the "Download" button to download the files.
7. Security and Best Practices
When implementing file upload and download functionality, security should be a top priority.
- File Size Limitations: Enforce limits on file size to prevent large files from overwhelming the server.
services.Configure<FormOptions>(options => options.MultipartBodyLengthLimit = 10485760); // 10MB - Validate File Types: Only allow certain file types by checking the file extension or MIME type.
var allowedExtensions = new[] { ".jpg", ".png", ".pdf" }; var extension = Path.GetExtension(model.File.FileName); if (!allowedExtensions.Contains(extension)) { ModelState.AddModelError("File", "Unsupported file type."); } - Sanitize File Names: Remove any unwanted characters from file names before saving them.
var safeFileName = Path.GetFileNameWithoutInvalidChars(model.File.FileName); - Limit Upload Folder Access: Restrict access to the upload folder to prevent unauthorized access. Only allow authenticated users to download files if necessary.
8. GitHub Project Link
9. Output
10. Conclusion
In this article, we built a simple ASP.NET Core MVC application to handle file upload and download. We covered the basics of creating models, controllers, and views and implemented security best practices to ensure the application remains secure.
With this knowledge, you can extend the application further, adding features such as progress bars, database storage for file metadata, or even Azure blob storage integration for handling larger files in cloud environments.
Join the conversation! Your thoughts help the community grow.